Friday, April 28, 2023

Easel Card with Treat Box


I am guest designing today with the Creative Creases Blog. This challenge is anything goes with a fun fold.  I have a Mother's Day card to share with you all.

I created an easel card with a treat box. It's a new fun fold design type for me and I really like how it turned out. I had this saved on Pinterest -here is a link. This one will go to my Mother-in-Law for Mother's Day. She especially likes Hershey's kisses (who doesn't) so they will fill the treat box part of my card.

Design Steps:

I am using elements from the "Something For Everything" Paper Pumpkin kit from 2019. It's and older one for sure but it was sitting untouched in my craft room. My goal for 2023 is to get these kits finished.

I took one of the card bases from the kit and cut off  ½" on the solid part of the base. Then I scored at 2-3/4", 5-1/2" (is already scored), 6-1/2" and 7-1/2". If you're using other designer paper or card base, once you cut off the 1/2" your 2nd score line would be at 3 3/4".
I used Scor-Tape on the striped end of the card base and then folded on all the score lines. The small tab gets taped to the inside to form a box shape.
Easel Card Assembly: 
Stampin' Up Shaded Spruce cardstock measuring 10" x 2 1/4" and scored at 2 1/2" and 5". I used double sided tape and attached to the top of the box. 
Then a 2nd piece of shaded spruce cardstock (5" x 2 1/2") that will be for the image panel. I attached this to the easel panel with double sided tape to the bottom half of the panel only. 
Inside Drawer Box:
Shaded Spruce cardstock measuring 9" x 6 1/8" and scored at 3/4" x 1 3/4" on all 4 sides. 
Then you are going to cut the shorter ends only to form tabs. Cut the first 2 squares off each corner. Then cut the 1st square in the 2nd row. 
On the 2nd square in the 2nd row you will cut at an angle to form tabs. Add Scor Tape to the panels as shown in this photo. 
Peel the backing from the tape on the short sides first and fold over each tab on the score lines towards the inside. Next remove the backing from the long sides and fold these over the angled tabs. The box will look like this photo when folded. 
Decorating the image panel:
I cut a piece of white cardstock 4 7/8" x 2 1/4". This panel is decorated with floral images and enamel dots from the Paper Pumpkin Kit. 
This is the easel image standing up. I used a die from CottageCutz for the celebrate word. The sentiment is a stamp from the Paper Pumpkin Kit. 
This is a photo showing the box with the chocolate kisses inside.

Whew! This was a long post but I hope I have given you an idea for a Mother's Day card and treat box. 

I am also entering:
1.  Creative Knockouts has a Flower Power challenge. 
2Simon Says Stamp has an anything goes challenge. 
3.  Paper Funday is anything goes w/optional of flower power.
4.  Shopping Our Stash has a fun fold challenge. 


Friday, April 21, 2023

Split Trellis Fun Fold

Hello Blogger friends! Thanks for taking the time to stop and visit with The Charmed Life Blog today.

It's Friday and the start of another weekend. Hope you have some fun plans in the works. We have a wedding to attend on Saturday. 

I was there at the venue today to decorate the trellis they will stand under for their ceremony. I used greenery and pink silk tulips, and she loved the look. Everything looks so beautiful - table settings, the table with the card box. This table has micro lights underneath the white tablecloth and the card box has greenery around it. It looks so stunning.

Now onto my card for today. This one I created for the Splitcoaststampers color challenge #944. We were to use blushing bride, very vanilla and soft seafoam for our color trio. Optional was to use bling. 
blushing bride, very vanilla, soft seafoam
I have to admit that I did struggle with these colors because soft, pastel colors are not my fave to work with. But after my card was finished, I was happy with how it turned out. 

I decided to try a new fun fold that I have been seeing all over Pinterest.  They are fairly easy and if you want to see how the card is made -  . Here is a link for instructions. 

I used the new Spring Butterflies die from CottageCutz and cut in blushing bride and soft seafoam. I did the die inlay technique using the soft seafoam pieces for the inlay. 

My CottageCutz die - hugs phrase is cut in designer paper from the "Brushstokes" collection from Stampin' Up. I also used the same designer paper on the card inside to add some color behind the trellis.

Scattered a few gold sequins and stamped some texture to complete my card. that's it for me for this post. So until next time.......God bless. 

card details:
Stamps: gorgeous grunge (Stampin' Up)
Paper: very vanilla, soft seafoam, blushing bride, brushstroke dsp (Stampin' Up)
Paper Size: A2
Ink: soft seafoam (Stampin' Up)
Accessories: spring butterflies, hugs phrase (CottageCutz), gold sequins (Darice)
Techniques: trellis split fun fold
I am also entering:
1.  Cut It Up has a "what's in your garden" challenge. Butterflies and a trellis.
2.  Ellibelle's Corner has an anything goes challenge. 
3.  Simon Says Stamp Wednesday challenge has a things with wings challenge.


Thursday, April 20, 2023

Daffodils for Mother's Day

Hello Blogger friends! Thanks for taking the time to stop and visit with The Charmed Life Blog today. 

It's a beautiful Spring day today here in Pittsburgh. I have my windows open and as I am putting this post together, I can hear the birds singing and our wind chimes moving so softly. It's such a melodic tone.  
I already  was out for a 3 mile walk and this afternoon my goal is to get my craft room straightened out. That seems to be a never-ending job. You know how that goes. 

We are going to a wedding on Saturday, and I committed to baking 10 dozen cookies for the cookie table. It's a Pittsburgh tradition and here is a link that explains what it's about. I love the tradition and I am making mini lady locks or creme horns as they are called in some places. They are about 2" long. 
I baked the shells yesterday and tomorrow I will fill them with a vanilla butter creme filling.  The caterers will prepare the cookie trays and set them out on a table. Here is a photo of what the cookie looks like.
Now onto my card for today. This one I created using new CottageCutz die for a Mother's Day card. I send several cards to family & friends and of course to my mother-in-law. 

Design Steps:
I started my card this week by cutting the daffodil images. I used Stampin' Up cardstock in daffodil delight and mango melody for the floral images. The stems are granny apple green.

I wanted to layer the daffodil images on black cardstock. I saw a card recently on Pinterest and it was so striking on black. I used the Stampin' Up 3D textile embossing folder for a bit of background interest. It's more of a subtle embossing which is the look I was going for.
Tip: when you use a 3D folder spritz the cardstock with water to break up the fibers. This way your cardstock doesn't crack.
I wanted a stamped sentiment on the card and after a bit of thought I decided to use one of the banner images from the Windows Slimline die. It was the perfect size for my sentiment. I cut the banner in the mango melody cardstock and stamped in black ink. The stamp is from a 2018 Stampin' Up Paper Pumpkin Kit. 

Attached the flowers with glue dots. I used these just in case I needed to move any of the floral images. It's much easier to do that with glue dots than liquid glue. Attached the banner sentiment and scattered a few green sequins on the card.
Well, that's it for me for this post. So until next time.......God bless.

I am also entering:
1.  Splitcoaststampers WT945 challenge.  2 of something or double down on elements. 
2.  Retro Rubber Challenge is "It's Spring". Stamp is from 2018. 
3.  Crafty Gals Corner is Easter or Spring. I chose Spring. 
4Fab 'n' Funky has an April Showers/May Flowers challenge. 
5.  I Spy with my Little Eye challenge- April Showers or May Flowers. 


Monday, April 17, 2023

A Sweet Thank You


Last week was a busy one for me. It was income tax time. I always seem to put it off to the last minute. But then again, we always owe additional tax so I am in no hurry to pay. 

Compiling the information needed and getting my Quicken software entries up to date takes a couple of days. Then I use Turbo Tax to complete the tax forms and to do an e-filing. 

We used to take it to an accountant but then I realized I was putting all the info for them into a spreadsheet. One year they called and were asking me questions that were answered on the spreadsheet. When I told him they were on the spreadsheet he said he didn't have anything from me. 

That settled it for me. I took the time to put the info together and then they lost the spreadsheet. I wasn't happy.  Why should I pay him to do the work that I could do with Turbo Tax. Anyway, I have been using Turbo Tax for about 6 years and it's worked out fine for us.  

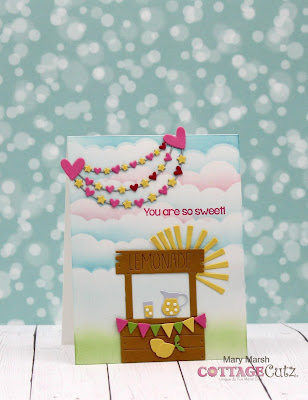
Now onto my card for today. This one I created using some new CottageCutz dies. I am featuring the Lemonade Stand and Celebrate Banner dies.

I was in need of a thank you card to send to a friend who invited us to visit with them at their Florida home for a week. It was such a wonderful time and a handmade thank you card was in order. I recently found out she saves all the cards I send her. That's so heartwarming for a card maker to hear. So, let's get started on some details of how I made my card.

Design Steps:
I started my card by stenciling clouds on white cardstock with tumbled glass, broken china, spun sugar and mowed lawn distress inks.
Image Panel: 4 1/4" x 5 1/2"
Next, I cut the lemonade stand and the celebrate banner from different colored Stampin' Up cardstock.
My card elements are prepared and ready for card assembly. I attached the lemonade stand with double sided tape. I decided to use the Arch Sun die and attached it to the side of the lemonade stad for added interest. 
Before I added the celebrate banner, I stamped my sentiment in a bright pink ink. I used my MISTI for placement, and this also needed a double inking. The MISTI is so perfect for this feature alone.
Added my celebrate banner with clear drying glue.
To finish off my card, I attached the image panel to a white card base with double sided tape. I kept the base the same size as the image panel.
White Card Base: 4 1/4" x 5 1/2"
That's it for me for this post. So until next time........God bless.

card details:
Stamps: more lemonade 2 (Stamps of Life)
Paper: basic white, polished pink, daffodil delight, real red, granny apple green, (Stampin' Up), toffee (TE)
Paper Size: A2
Ink: polished pink (Stampin'-Up), tumbled glass & spun sugar distress inks (Ranger)
Accessories: lemonade stand, celebrate banner dies(CottageCutz), mini cloud stencil (MFT)
Techniques: stenciling
I am also entering:
1.  Lil Patch of Crafty Friends has an anything goes challenge. 
2.  Allsorts challenge is anything goes w/option of creating your own background.
3.  Alphabet Challenge is "A" for adorable or anything cute. 
4.  Creative Fingers Challenge #252 is anything goes. 
5.  Cut it Up Challenge is to use a die cut & something with letter "B". I have a banner. 
6.  Word Art Wednesday is anything goes. 


Monday, April 10, 2023

Cross w/Spring Lilies

Hello Blogger Friends! Thanks for taking the time to stop and visit with The Charmed Life Blog today. 

It's the day after Easter and I hope your celebration was a good one. We started our day with our church service. Then we had my hubby's family here for dinner. It was a great family time. 

Orthodox Easter is this coming Sunday, so I feel like I am still okay to be showing the cards I made for Easter 2023.
 
I started this card with the layout. I am using a sketch that I had saved on one of my Pinterest boards. I thought it would work great to show off the cross and allow me also to use some background designer paper. This particular sketch gave all the dimensions for the layers so it made creating the card a bit easier.
I just had to select my card colors and I decided on shades of purples since purple is the color of royalty.

For the center panel I used a white dotted tulle and an olive satin ribbon. The olive picks up the stem of the lilies. For the oval panel, I used the 3rd largest CottageCutz Oval and Stitched Oval dies.
I cut my cross using 2 shades of Stampin' Up purple cardstock- gorgeous grape & highland heather. The lilies are cut in a paler shade of Stampin' Up purple -purple posy with old olive for the stem. I thought that color would look better against the white background.
Next, I stamped my sentiment in the heather shade of ink. It's the top layer of the cross color. Attached to the ovals with dimensional adhesive.

Now that all the panels, card base and cross are cut, I am ready to start card assembly. I used double sided tape for all the panels. I secured the ribbons with glue dots.
To complete my card, I secured the oval image panel with dimensional adhesive and attached to the card base with double sided tape. That's it for me for this post. I have 2 more Easter cards to show so stop back the next 2 days and check out my cards. 

card details:
Stamps: Jesus paid it all (SNSS)
Paper: gorgeous grape, highland heather, purple posy, old olive, so saffron (Stampin' Up), Designer Paper (Momenta)
Paper Size: A2
Ink: highland heather (Stampin'-Up)
Accessories: Cross with Spring Lilies, Oval & Oval stitched dies (CottageCutz), old olive satin ribbon white dotted tulle (Stampin' Up)
I am also entering: 
1.  Use Your Stuff has an Easter challenge. 
2.  Crafty Calendar Challenge is to use die cuts. 
3.  Polkadoodles has an Easter challenge. 
4.  Sweet Stampin' wants us to use die or punches + stamping. 
5.  MTTC #505 wants us to use Easter or Spring flowers. I have lilies. 

Thursday, April 6, 2023

Easter Tulips

Hello Blogger Friends! Thanks for taking the time to stop and visit with The Charmed Life Blog today. 

It's the Thursday before Easter. I am having dinner at my home on Sunday. It will just be a small group. My brother-in-law and his wife and my hubby and I. We enjoy their company so it will be a good day.

My mother-in-law is not wanting to leave the house anymore or get out of her pajamas each day. She is 92 now. So, we are just letting her do what she wants instead of forcing her to come for dinner. I did offer to cook my dinner at home and bring it over to my sister-in-law's home where Mom lives but the offer was declined. 

Now onto my card for today. This is another of my Easter cards. I used new dies from CottageCutz - Spring Tulips and the He is Risen dies. 

I knew the layout I had in mind with the tulips when I started this card. So the first thing I did was cut them in a bright pink (polished pink)cardstock. I used a brighter green (granny apple green) for the stems and leaves. I also cut the He is Risen phrase in the same pink cardstock.

I decided to do a bit of stenciling on the white background. I used a light hand with salvaged patina distress ink and a sponge dauber for the stencil work.
Next, I attached the tulips along the bottom and up the left side of the card using a clear drying adhesive.
Now onto my He is Risen phrase. I attached it with the same clear drying adhesive.
And that's my card for today. So until next time.......God bless. 

I am also entering:
1.  Paper Funday is anything goes w/optional of flower power. 
2Stencils are our Fame challenge is stencils w/option of patterns. 
3Everybody Art Challenge is celebrate. Easter is a big celebration for me.
4.  Arty Divas challenge is anything goes. 
5.  Beautiful Blossoms is anything goes floral. 

LinkWithin

Related Posts with Thumbnails