Monday, August 29, 2022

Woodland Country Church

Hello Blogger friends! Thanks for taking the time to stop and visit with The Charmed Life Blog today. Hope you had a great weekend and found some time to be crafty. 

I had my cardmaking time on Friday. Then Saturday I spent doing household chores. We were having friends over on Sunday night, so I had a few things to get ready. Then I spent some time in the kitchen.

For me kitchen time is also craft time because I love to cook. I made a delicious pizza with pesto, chicken, spinach and tomatoes. We like my homemade ones better than anything we have bought from a pizza shop.   

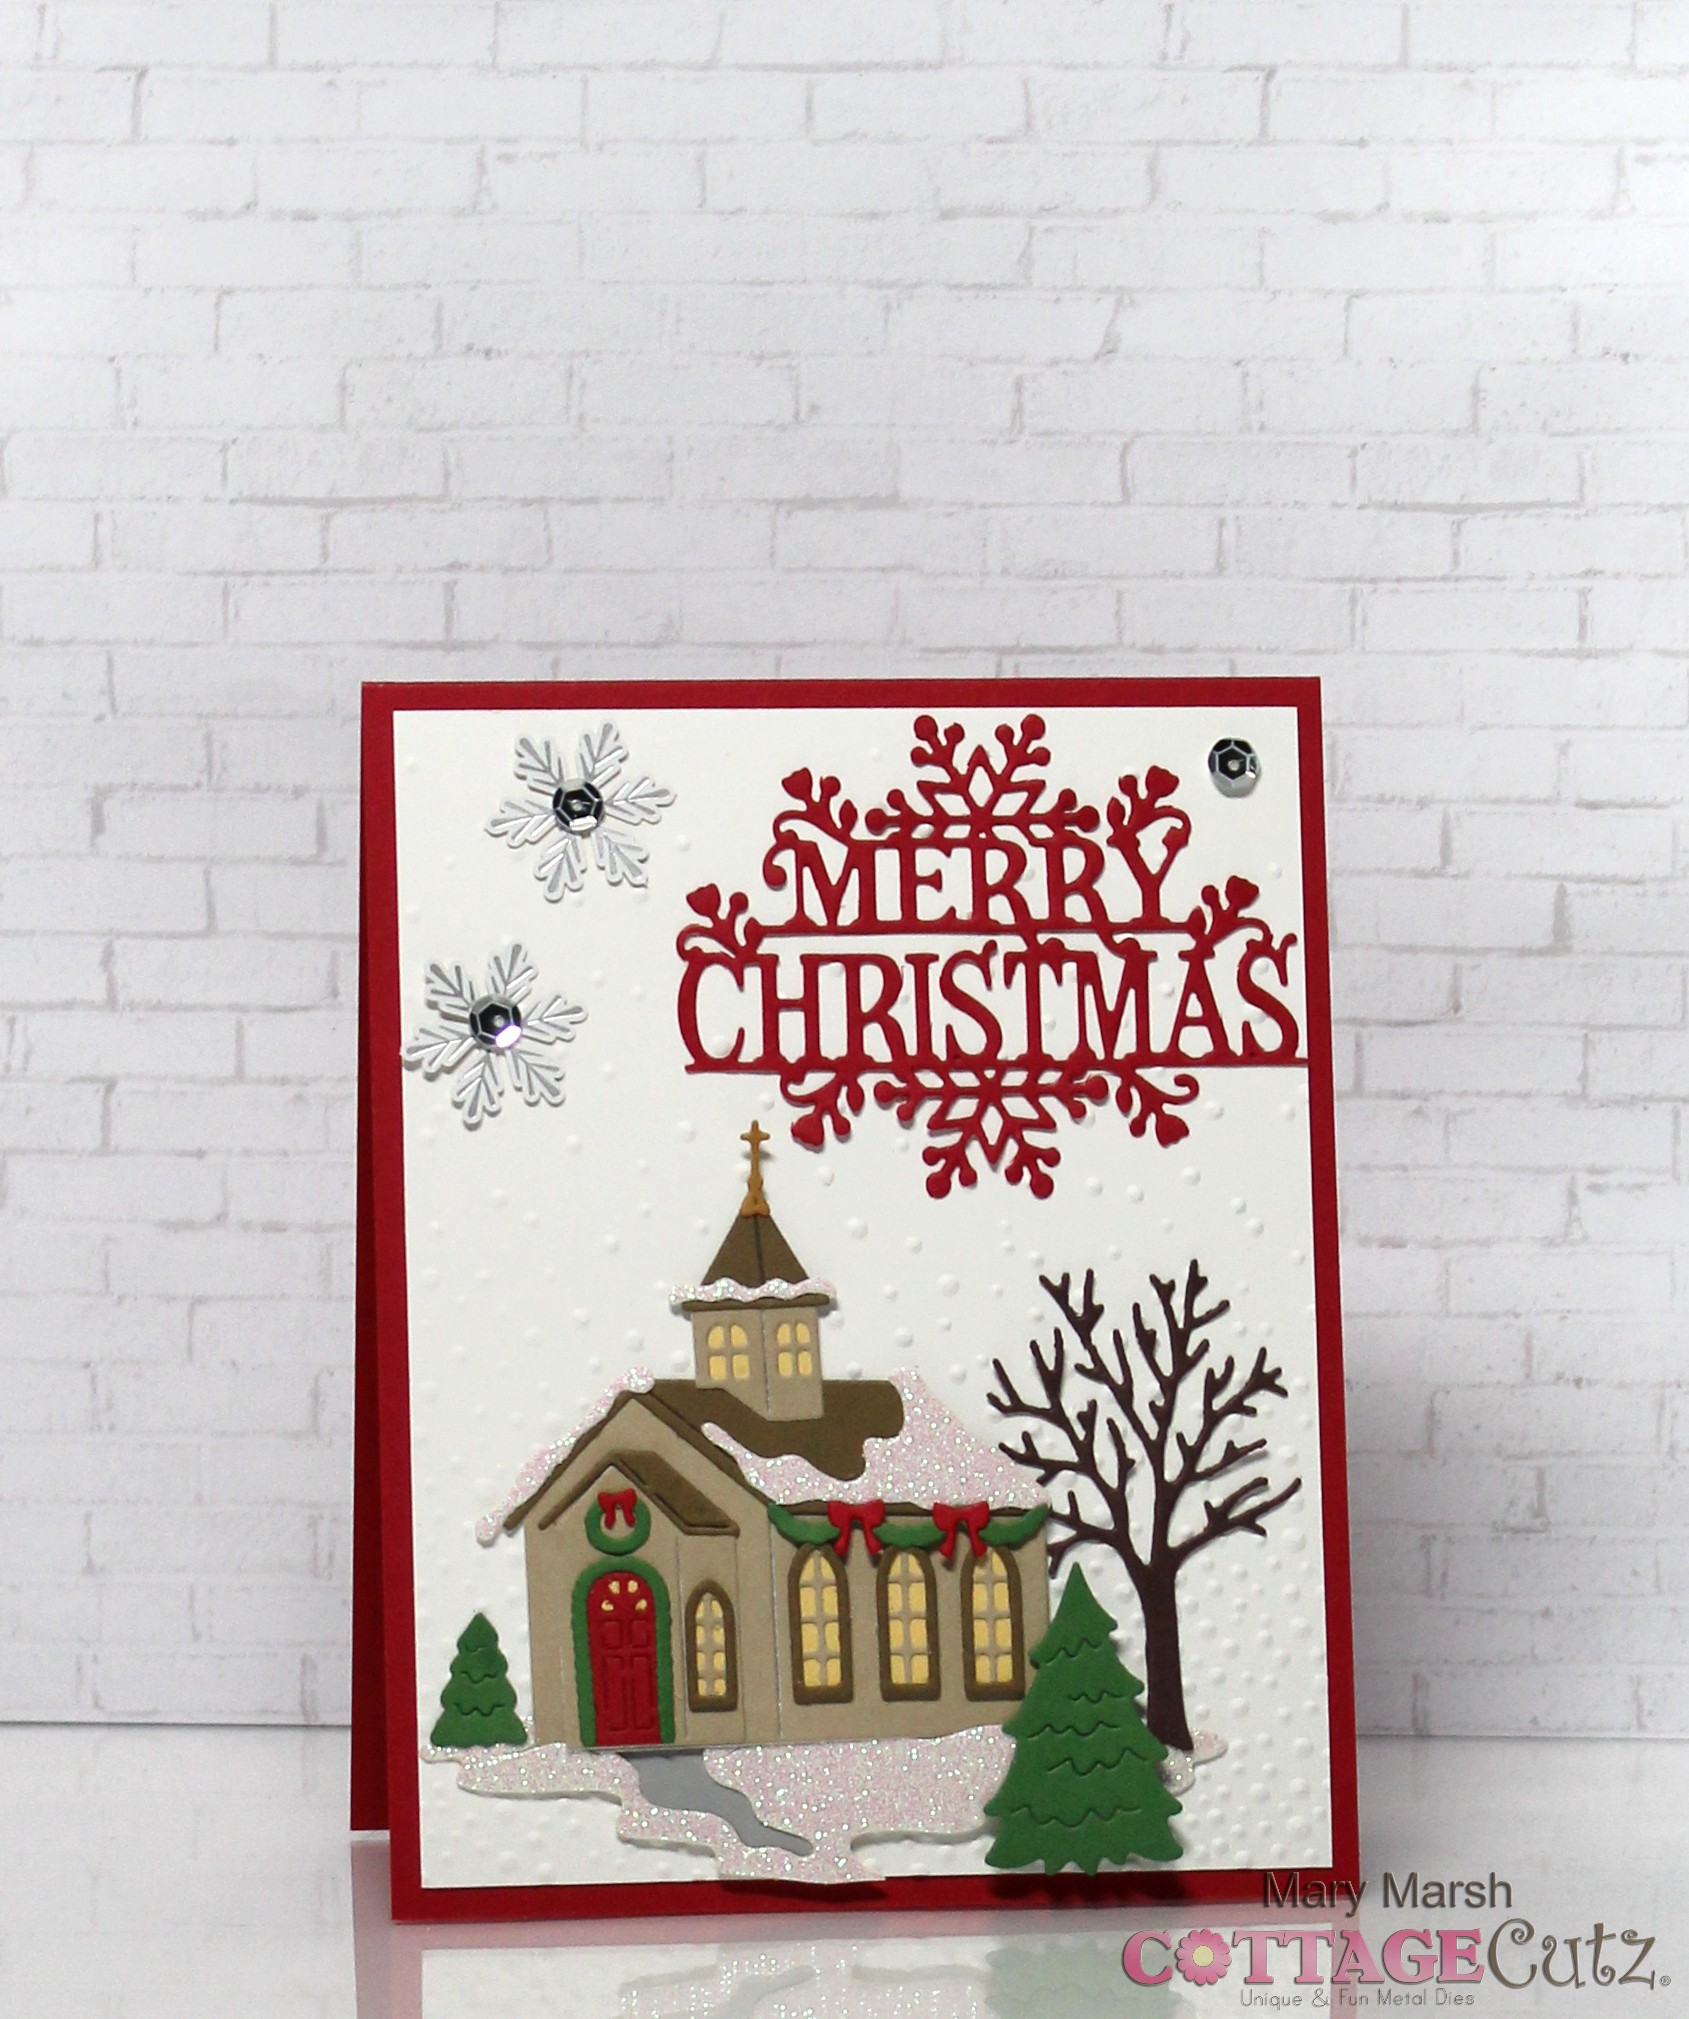
Today for your viewing pleasure, I am featuring a Christmas card using the CottageCutz Woodland Country Church  and the Merry Christmas w/Snowflakes dies.  

So let's get started with some details of how I created this card. 

Design Steps:

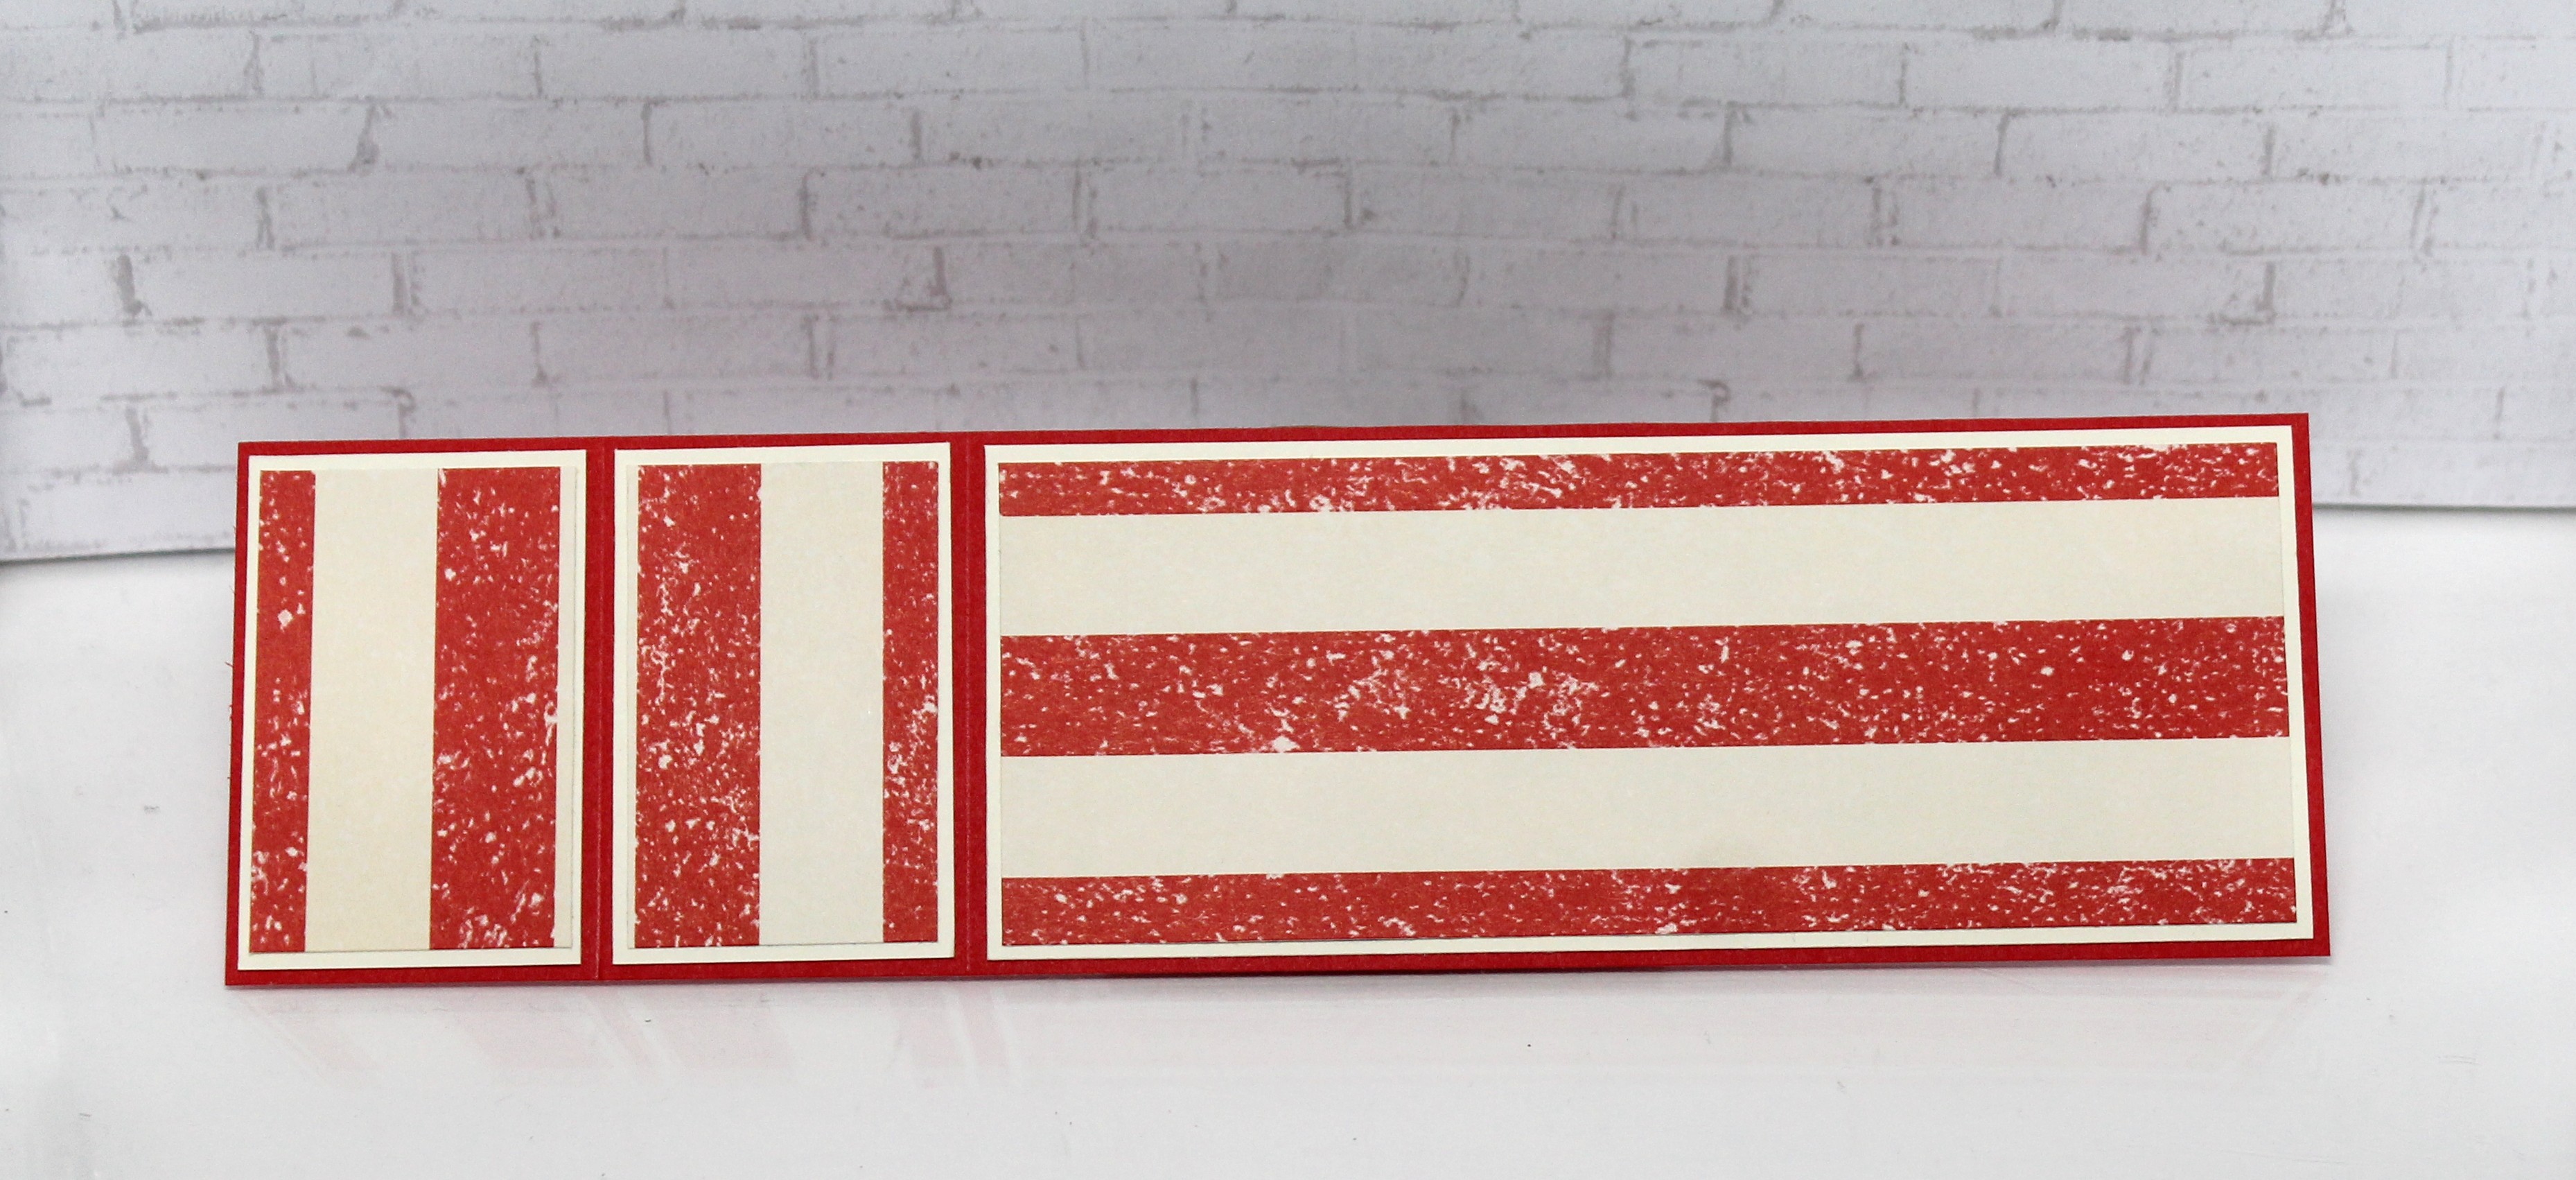
I started with my card colors. These ones were selected for the color challenge #906 on Splitcoaststampers. We were to use real red, garden green and silver. Perfect colors for this church image. 

real red, silver, garden green

I cut the church image in the challenge colors plus some allowed neutral shades.  For the snow I used a white glitter paper for a little added sparkle. 
The Merry Christmas phrase is cut in real red cardstock. The image is large enough that I thought one layer would be enough. Sometimes I double them up, but it wasn't necessary with this die.
For my image panel I used the Stampin' Up "falling snow" embossing folder for added background interest.
Now that my card elements are prepared, I am ready to start card assembly. I attached the church image with double sided tape. For the larger tree, I used dimensional adhesive.

Next, I secured the Merry Christmas phrase with a clear drying glue.
To finish off my card, I attached the image panel to the card base. I kept the panels to just the base and image panel. That way the images would be the star of the show. To get the silver color in, I added these snowflake images from my stash and used a silver sequin in the middle.
 Real Red Card Base: 4 1/2" x 5 3/4"
White Image Panel: 4 1/4" x 5 1/2"
Well, that's it for me for this post. So Until next time.......God bless. 

Dies I used to create card:

I am also entering:
1.  Peace on Earth Christmas has an anything goes. I picked up on the background falling snow for my outdoor scene.
2.  CHNC challenge #609 is anything goes w/optional of embossing. I used an embossing folder. 
3.  Polkadoodles has an anything goes challenge. 
4.  Cardz 4 Galz wants us to use 3 of anything- 3 silver sequins & 3 trees
5.  Crafts Galore Encore Challenge has an anything goes. 

Saturday, August 27, 2022

Fun Fold Golf Birthday Card

Hello Blogger Friends! Thanks for taking the time to stop and visit with The Charmed Life Blog this last Saturday of August. 

It's harvest time here at the Marsh household.  I was in my kitchen all day on Thursday. We had another harvest of basil and I made pesto and put it in the freezer for wintertime enjoyment. We also had another harvest of banana peppers. I like to stuff those with a combo of hot and sweet sausage and freeze them as well. I shared a panful of these with a friend who came to visit on Thursday night. He was so grateful since banana peppers are his favorite. 

Today I will roast some tomatoes. Our big harvest on those hasn't come in yet. When it does, I will be in the kitchen for days preparing those. It's a time of year I do enjoy as I see the work of my hubby's hands be used for food for us. 

Now onto my card for today. This one I created for my weekly DT post on the CottageCutz Blog.  My card today is featuring the new Golfer SilhouettePutting GreenGolf Cart  and Golf Bag & Clubs dies. I made this for my hubby's friend. He has a September birthday and is also an avid golfer. So, let's get started with some details of how I created my card.

Design Steps:
I love trying different fun fold techniques. I ran across this one while perusing Pinterest one night. You know how that can be! I thought the fold would be great to show off some of the golf dies.

I started by selecting my card colors and designer papers. I decided on these ones that had a masculine appeal and also the one pattern looked like trendy golf balls. At least that's what I thought (LOL)!!!
Here is a diagram of the cardstock size and where it's to be scored.
Fold both these panels into the center and burnish on the folds. Added a piece of white cardstock measuring 4 1/8" x 5 3/8" to inside of card. This will be decorated as well.
Next, I cut the designer paper for the front panels. On the lower panel I used the striped paper and cut it at 2" x 4". The top panel I used the "golf ball" paper and I cut it at 3" x 4".

For my image panel I used the 2nd largest (2 1/2" x 3 1/2") Stitched Rectangle Die and cut it in red cardstock. I used the 3rd largest (2 1/4" x 3 1/4") Rectangle Die and cut in white cardstock. I stenciled some clouds and added some grass using the Spring Grass die. It's an older die but still available.
I cut my golfer silhouette in navy blue cardstock and used dimensional adhesive to secure to card. On the image panel, only use adhesive to the top part of the panel to allow the card to open.
Now to the card inside, I used the Putting Green & Golf Bag & Clubs dies. I stamped the sentiment in navy ink to complete this part of the card.
Normally I don't do anything to an envelope, but I am not mailing this card. It will be hand delivered. I already had the golf card die cut and it didn't work on the inside of the card. So, I decided to use it on the envelope and also added the word phrase "par". It was cut from the Stitched Alphabet die.
To complete the front of my card, I added a "happy birthday" phrase. I stamped on white cardstock and then added blue and red flags for interest. Well, that's it for me for this post. So, until next time......God bless. 

Dies I used to create card:


I am also entering:
1.  Creative Creases has an anything goes with a fun fold. 
2.  Daring Cardmakers has an "in the long run" challenge. Golfers hit long shots. 
3.  Cardz 4 Guys has a "use a stencil" challenge. I stenciled some clouds. 
4.  Country View Challenge is birthday. 
5.  Craftyhazelnuts Patterned Paper Challenge is anything goes.


Monday, August 15, 2022

Beyond Grateful

Hello Blogger Friends! Thanks for taking the time to stop and visit with The Charmed Life Blog today. 

Hope you all had a great weekend and are enjoying the summer months. I can't believe that we are halfway through August already. The summer is going by way to quickly for me. I love the long, hot days of summer and sitting out on our deck at night. We had dinner on the deck on Friday night and then lingered for a bit to listen to the crickets and locusts singing away. 

Today my grandson is here to spend the night. He and my hubby went golfing this morning and I have a few minutes to get this Blog post done before they return. We always enjoy the visits and especially that they want to spend the night. 

granny apple green, mango melody, coastal cabana

Now onto my card for today. This one I created for the color challenge #898 on Splitcoaststampers. Our colors were granny apple green, mango melody and coastal cabana.

I started my card by sponging around the left edge of the white panel with coastal cabana ink. I used the forever fern stamp set and stamped in mango melody, granny apple green and coastal cabana inks.

After I stamped in the mango color, it seemed to washed out so I decided to stamp and then die cut a few of the leaves. It added some interest and more color to the card.

My sentiment is from the Stampin' Up "charming sentiments" set. It has a coordinating die. Scattered a few coastal cabana enamel dots and my card is finished.

Well, that's it for me for this post. So until next time........God bless. 

card details:
Stamps: forever fern, charming sentiments (Stampin' Up)
Paper: granny apple green, whisper white
Paper Size: A2
Ink: mango melody, granny apple green, coastal cabana
Accessories: forever flourishing dies, sentiment silhouette dies, coastal cabana enamel dots (Stampin' Up)
I am also entering:
1.  Use Your Stuff has a Nature challenge. 
2.  Lil Patch of Crafty Friends has an anything goes challenge. 
3.  We Love Stamping has an "in my garden" challenge. 
4.  Crafty Calendar has an anything goes challenge. 
5.  Creative Fingers has an anything goes challenge. 


Sunday, August 14, 2022

Baseball Wiper Card

Hello Blogger Friends! Thanks for taking the time to stop and visit with The Charmed Life Blog today. Hope you had a great weekend and that you are enjoying your Sunday. 

I spent time yesterday with a family that I visit regularly. One of their kids had a football game. He is 9 years old, and the game was just a scrimmage, but it was fun spending time with his brother and Mom. His Dad is one of the coaches. 

Today we started off with church went to lunch with a friend afterwards and now we are home just relaxing. I am trying to get my craft room straightened out after making this card. I am always amazed at the mess I can make with just one card. I have one to make for my DT spot on Splitcoaststampers and I find it hard to work with stuff everywhere. 

Anyway, onto my card for today. This one I made for my weekly DT post on the CottageCutz Blog. My card today is featuring the new Baseball Glove, Bat & Ball die, Baseball Phrases die and the Baseball Phrase w/Shadow die. I created a fun fold wiper card for my friend's little boy (9 years old) who loves baseball. 
His birthday is September 4 and when I saw these new dies, I thought of him immediately. He loves baseball and was the MVP for many games this season. This is the same kiddo that I went to watch his football game yesterday. He's into sports. 

So, let's get started with some details of how I created my card.

Design Steps:

I saw this wiper fold technique demonstrated on YouTube so if you like visuals, here is a link.
I started my card by cutting all the cardstock and designer paper needed for this fun fold technique.

Red cardstock base: 4 1/4" x 8 1/2", score at 5 1/2" & 7”
Red Z-Fold: 2 1/4" x 8 1/2", score at 1 1/2" & 3”
Baseball themed Designer Paper: 4” x 5 1/4 - attached with double sided tape.
Far Right Panel vanilla cardstock: 1 3/8” x 4 1/8”
Striped designer paper: 1 1/4" x 4 -attached with double sided tape. 
Z-Fold Panel vanilla cardstock: 2 1/8” x 5 3/8”
Striped designer paper: 2” x 5 1/4" - attached with double sided tape.  
Now I am going to attach the z-fold panel to the card base. I only want adhesive on 1 1/4" of the long panel. I used a pencil to tick mark the 1 1/4" point and added double sided tape. Lined up with right side of panel and secure to card base.  
Now I am ready to cut my baseball images. I used a toffee shade of cardstock for glove and sponged with dye and rusty hinge distress inks to get more of a deeper shade. For the bat I used a kraft card cardstock and sponged lightly with antique linen distress ink for a deeper wood shade.
Attached the images to the card base with dimensional adhesive and glue dots.
Next, I cut the MVP and Baseball phrases word from red, white and blue cardstock.
For the wiper mechanism I cut a piece of 1" x 2" red cardstock. Folded the right corner upwards. This is what allows the MVP phrase to move up and down.
When attached it should be just inside the score line and make sure it doesn't extend beyond the front panel. I used a glue dot to secure in place. 
You also need a piece of acetate (1/2" x 2") to anchor the MVP phrase. I also secured this with a glue dot.
Now to close the z-fold bridge I used double sided tape on the left panel only. You line it up with the bottom of the card base just like on the other side. I added the baseball phrase with liquid glue and a couple more baseballs to finish off my card.
Here is photo of wiper card when it pops up.
Here is a short video showing the card wiper card open.
 

Well, that's it for me for this post. So, until next time.....God bless.

I am also entering:
1.  Alphabet Challenge is "J" for juvenile (young person). My card is for a 9-year-old. 
2.  Creative Creases has an anything goes with a fun fold. 
3.  Aud Sentiments Challenge is Summer + a Sentiment.
4.  Tic Tac Toe Challenge 174- I used red-patterned paper- die cuts.
5A Gem of a Challenge has an anything goes.  


Saturday, August 6, 2022

Welcome to our Hive

Hello Blogger Friends! Thanks for taking the time to stop and visit with The Charmed Life Blog this first Saturday in August. 

Hope your weekend is going well. We have no plans for today just a lot of little household chores. I am teaching Sunday School tomorrow for the kids, so I have a lesson to prepare. My class is K-1st grade. I love this age group. My hubby comes and helps me in the class. It's a good example for the kids to see a man who loves and serves the Lord. 

My card for today is one that I made for my weekly DT post on the CottageCutz Blog. I am featuring the new Bee Phrases and Honey Bee dies. We have new neighbors and I thought I would create a card to welcome them to the neighborhood.

Usually, I would make a meal or a baked treat to go along with it, but Covid changed all of that. I still send and receive meals from the neighbors on either side of me, but we have known each other for a lot of years.

I don't know how the new neighbors would feel about a meal coming from someone they don't know. So, I decided to cut flowers from my husband's flower garden and make them a bouquet. He has at least 10-12 different varieties of flowers so I will have a nice selection for the bouquet.

 Card Details:

I didn't really have a layout in mind for the card when I started so I cut out the hive, bees and welcome phrase first. On the vellum wings I sponged a bit of tumbled glass distress ink. 
My design idea then went to a slimline card. I cut a panel from the Scalloped Stitched Rectangle Slimline die. I used the largest die 3 1/4" x 8 1/4". I decided to stencil some leaves on the panel with twisted citron distress ink. I added a stenciled branch with ground espresso distress ink so the beehive would have something to hang from.
Next, I attached the "welcome to our hive phrase" with clear drying glue and the images with glue dots. 

To finish off my card, I added a few flowers. these are cut from the Strawberry Cottage die. I secured the card to a base of green apple cardstock. The base measures 3 1/2" x 8 1/2".
Well, that's it for me for this post. So until next time.......God bless.  

Dies I used to create card:


I am also entering: 
1.  Allsorts Challenge is to create your own background. I stenciled my background. 
2.  Crafty Calendar Challenge is anything goes. 
3.  Paper Dragonfly Creative Challenge is summertime buzz. 
4.  Addicted to Stamps and More challenge is die cuts and/or stencils. I used both.
5.  Paper Funday is anything goes with optional of friendship. 


LinkWithin

Related Posts with Thumbnails