Saturday, January 30, 2021

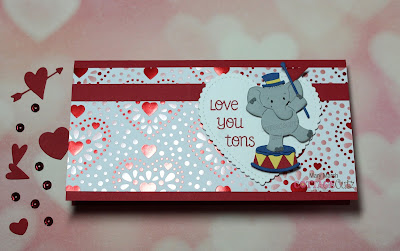
Balancing Elephant


Hello Blogger Friends! Thanks for taking the time to stop and visit with The Charmed Life Blog this last Saturday in January. 

I happened to notice last night that it was light here until almost 6:00. I guess it's just a "me" thing but I so enjoy watching the progression of longer days throughout the winter. When someone complains about the cold weather or the snow I always remind them of the lengthening of the days as a positive. 

Anyway, let's move onto my card for today. This one I created for my weekly DT post on the CottageCutz Blog.  I am featuring the new Balancing Elephant die and I created a whimsical Valentine card. I plan on giving this to my hubby for Valentine's Day.

Design Steps:
I started my card this week with the layout. I saw this sketch #838 on Splitcoaststampers using a slimline design and decided to use it for my card. Slimline cards are so popular now and add such great eye appeal. 
Next, I cut the elephant image from various colored cardstock. I liked the colors on the packaging and they work well as Valentine colors. 
Then I chose my designer paper and card base colors. I really like this metallic heart paper from the Stampin'-Up "from my heart" collection.  
Red Card Base: 7 1/2" x 4"
Heart Designer Paper: 7 1/2" x 3 1/2"
Red Strip (Element 3): 1/2" x 7 1/2" 
I changed the circle image to a heart. It's from the 2019 "be my valentine puppies" die. My sentiment is from a Lawn Fawn set- "love you tons".  It is a one line sentiment and I had to space it on the heart with my elephant. So I masked and with the help of my MISTI, I was able to stamp it vertically.
Attached the elephant with dimensional adhesive to the heart and then used the same adhesive to attach the card to the designer paper. 

I also finished the inside of this card. Because I am giving this to my hubby, I wanted the inside to reflect my love for him.  The sentiments are from the Penny Black "words sweet" stamp set. The #xoxo & hearts are from the 2019 Valentine Phrases & More die. 
Well, that's it for me for this post. So until next time.....God bless. 

Dies I used to create card:


I am also entering:
1.  Crazy For Challenges has a project of love challenge. 
2.  Sweet Stampin' has a love challenge. 
3.  As You Like It has a true love Valentines challenge
4.  Aud Sentiments Challenge has a sending love + a sentiment challenge.
5.  Cute Card Thursday has a Valentines challenge.
6.  Simon Says Stamp has an anything goes challenge.   


Saturday, January 23, 2021

Stop Monkeyin' Around

Hello Blogger Friends! Thanks for taking the time to stop and visit wit The Charmed Life Blog this Saturday in January. 

It's definitely a cold one here in Pittsburgh. Our high temperature today was 25°. The wind was blowing so it made it even colder. I went with a couple of other women to our church today to take down our Christmas decorations. It went fairly quick and then we went out and had lunch at a local restaurant.  We made a quick trip to Hobby Lobby to pick up a few items for some other decorating we wanted to do in our lobby area. 

Then, for me, a trip to Trader Joe's to get a few grocery items I needed and then home. It's after 5:00 now and all I can say is wow this day really went fast. So now for my Blog post and then a relaxing evening with my hubby. 

My card for today is one that I made for my weekly DT post on the CottageCutz Blog. So let's get started with some details on how I created my card. 

Design Steps:

I started my card this week with the layout. I saw this sketch #837 on Splitcoaststampers and decided to use it for my layout.
Next, I cut my images in the colors on the packaging front. I thought they were good ones for a Valentine card. After I cut the monkey image, I realized that using the squares on the sketch wasn't going to work. So I switched them up to hearts. And instead of 3 hearts the same size, I used a large heart for the juggling monkey and 2 smaller ones for the sentiments. 
 
The large heart is from the 2019 Be My Valentine Puppies die. The smaller hearts are from the Hearts set. I used the "be my valentine" phrase and cut it in red cardstock. It's from the same die as the large heart.  
I decided to keep the layout a bit more on the simple side. I cut my card base in red at 7 1/2" x 3 1/2". Then for elements 3 & 4 of this sketch, I used some borders that I had in a Christmas paper collection. I think they worked out great for this sketch.
Next, I stamped my sentiment in red ink on the first smaller heart. I like using punny sentiments when I create whimsical Valentine cards. The stamp set. is a new to me from Technique Tuesday.

Now I am ready to start card assembly. I attached the 3 hearts using dimensional adhesive to lift them slightly off the card base. It gives a nice visual to the card and creates added interest. I decided to cut some additional white hearts and scatter them around the card base. The hearts are from the same die I referenced above.
And, that's my card for today. So until next time......God bless. 

dies  I used to create card:


I am also entering:
1.  Creative Fingers has an anything goes challenge. 
2Aud Sentiments has an anything goes with a sentiment. 
3.  C.R.A.F.T. Challenge has anything new. This is a new die and the stamped sentiment set is new. 
4.  CRAFT Rocket Challenges has a for the boys/men challenge. 
5.  2 Crafty Critter Crazies has an anything goes with a critter. 
6.  Crafty Animals has an anything goes challenge. 


Saturday, January 16, 2021

Burger to my Fries

Hello Blogger Friends! Thanks for taking the time to stop and visit with The Charmed Life Blog today. 

Well I finally got all my Christmas decorations taken down and mostly put away where they are stored. I have a few containers to get put away and then it's officially a wrap. This is such a time consuming process and definitely not one of my favorite tasks. But after today it's all finished until next year. 

We also woke up to a couple of inches of snow on the ground and it's still coming down. It looks so pretty outside. The trees are all covered with a blanket of white. This is one of those days where a hearty meal is in order. I think I will make some chili today and hopefully some cornbread. 

But before that happens, I am getting this post finished. I made this card as part of my weekly DT post on the CottageCutz Blog. I am featuring the new Build-a-Burger die and created a card for Valentine's Day.

I used the current MojoMonday sketch for my card layout. 
I started by cutting the hamburger and fries images. For the hamburger I used various colors of cardstock to match the photo on the package. I used the following Stampin'-Up cardstock: hamburger (baked brown sugar), tomatoes (real red), lettuce (garden green), pickles (cucumber crush), cheese (mango melody), onion (confetti white).

For the fries I cut in so saffron cardstock (soft yellow) and then sponged with wild honey distress ink to get more of a golden glow. 
My designer paper is from the Stampin'-Up "from my heart" collection. I selected coordinating colors that match the cardstock for the card base and the center rectangle panel. 
The sentiment is from a Taylored Expressions set "we go together." I masked and stamped the sentiment on both of the rectangle panels. I used a stamp-a-ma-jig for placement. 

Now, I am ready to start card assembly. I attached the designer paper, embossed layer and oval to the card base with double sided tape.
The white rectangle panels are attached with double sided tape. For the images, I used dimensional adhesive. To finish off the card I scattered a few red hart sequins. They look darker in the photo but they are red. 
I added a Valentine sentiment on the card inside. I used an older die from CottageCutz - Valentine Phrase & More And that completes my card for this post. So until next time........God bless.

dies I used to create card:


I am also entering:
1.  Crafty Calendar has a "make it cute" challenge. 
2.  Creative Fingers has an anything goes challenge.
3PolkaDoodles has an anything goes challenge.  
4.  Happy Little Stamper has an anything goes with dies challenge. 
5.  World Wide Open Design Team Challenge has an anything goes. 


Friday, January 15, 2021

Ringing in the New Year

Hello Blogger friends! Thanks for taking the time to stop and visit with The Charmed Life Blog today.

I just had the Verizon tech here to change out our internet router and we also did a speed upgrade. What a difference in the internet access and speed now. The router we had was 8 years old and we were having some issues. 

The technician was amazing. He made sure all our  devices-tv, cell phone, land line, computers and wireless printer were all working properly before he left. He entered the new passwords and on our I-phones- they shared with each device. Apple technology is also amazing. 

Now onto my card for today. This one I created for the Splitcoaststampers color challenge #823. I was the hostess and I chose soft seafoam, pear pizzazz, pretty peacock for the color trio. 
I had a totally different idea for this card. I wanted to use the Stampin'-Up "forever greenery" designer paper since it had all the colors that I chose. But I just couldn't get my idea to come together.

So onto plan B. I went with this New Year's card and since I couldn't get the designer paper out of my head (LOL), I covered it with some vellum to soften it a bit. My card base is pretty peacock. 

I used the CottageCutz "Ring in the New Year" die and cut the images in the challenge colors. For the champagne glasses , I used soft seafoam and for the bubbly- I cut in vellum and then used clear Wink of Stella to give it some shine.

To finish off my card, I added a few pretty peacock enamel dots and called it done. Well that's it for me for this post. So until next time.......God bless. 

card details:
Paper: pretty peacock, pear pizzazz, soft seafoam, gold foil, forever greenery dsp (Stampin'-Up)
Paper Size: A2
Accessories: ring in the new year die (CottageCutz), wink of stella, pretty peacock enamel dots (Stampin'-Up)

dies used to create card:

I am also entering:

1.  Crafter's Cafe has a "new" challenge. I used new (to me) designer paper + a New Year card.
2.  The Creative Crafters has an anything goes challenge. 
3.  Cute Card Thursday has a "what's new challenge. I used new (to me) designer paper + I made a New Year card. 
4.   Moving Along with the Times has a new challenge.  I used new (to me) designer paper + I made a New Year card.  
5.  Simon Says Stamp has a a layer it up challenge. 

Saturday, January 9, 2021

Pedaling Puppy Valentine Card

 
Hello Blogger Friends! Thanks for taking the time to stop and visit with The Charmed Life Blog this Saturday in January. 

I am going to start taking down my Christmas decorations today. I spread this out over many days because of all that I have up in every room. That way I don't get discouraged with how much I have to take down. This part is my least favorite thing to do. Just because you have to be so careful with everything so it's good for the next year to display. 

So let's move onto my card for today so I can get to some of my disassembling plans. This one I made for my weekly DT post on the CottageCutz Blog.  I used a new die from the just released Circus collection and turned it into a Valentine card. 

I have several little boys on my list that would love this card. I just have to decide which one will receive it. So let's get started with some details on how I created my card. 

Design Steps:
I started off my card this week with the layout. I saw this sketch #835 on Splitcoaststampers and decided to use it for my layout.

Once the layout was chosen I selected my designer papers and that determined the card colors. I wanted a background paper that was a bit festive, and I think this paper achieves that look. The paper is from the Stampin'-Up "festive birthday" collection. 

For layer # 2, I embossed the melon mambo cardstock with a heart embossing folder. Layer #4 is the reverse side of the designer paper I used for my background layer.
I cut my pedaling puppy from cardstock colors that are in the designer paper. I decided to use a heart for the puppy background since it's a Valentine's Day card. I used the largest die from the Heart Set. I picked a punny sentiment to pick up on the bike movement and stamped on an angle in black ink. 

Now I am ready to start card assembly. I attached all the card layers to the card base with double sided tape.  Secured the heart with double sided tape and attached the image with dimensional adhesive.
I wanted a bit more of a Valentine theme to my card so I used the 2019 Valentine Phrase & More die and cut some hearts and the Valentine phrase for my card. Cut those in melon mambo cardstock that coordinates with the embossed panel and the designer paper. 

Well, that's it for me for this post. So until next time.......God bless.

 dies I used to create card:


I am also entering:
1.  Crafty Calendar has a make it cute challenge. 
2.  Cute Card Thursday has an anything goes challenge. 
3.  2 Crafty Critter Crazies has an anything goes with a critter. 
4A Bit More Time To Craft has an anything goes challenge. 
5Crafty Animals has an anything goes challenge. 


Friday, January 1, 2021

Happy New Year

Hello Blogger Friends! Thanks for taking the time to stop and visit with The Charmed Life Blog this first day of the New Year 2021.

We didn't do anything special last night. I made some appetizers and we watched some movies together. At midnight several people in the neighborhood shot of some fireworks and that was it. We are looking forward to a great new year. Anxious to see what God has planned for our lives. 

For my card for today, I am featuring a card I made for my weekly DT post on the CottageCutz Blog. I used a Christmas die - Woodland Birdhouse and turned it into a New Year's card. I usually make a couple of New Year's cards to send out to people. So this one goes to my nephew who always gets a New Years card from me. 

Design Steps:

I started this card with the colors. I used the colors from the Splitcoaststampers color challenge #824. The colors are blushing bride, pool party and smoky slate. Optional was sparkle or shine.  And, with all the color options that are available in this challenge with neutral shades I knew I could make it work as a New Year's card.
I selected my background paper next. I had this paper in the pool party shade that looked like a snowy background. 

Then I started cutting my images. The birdhouse and pinecones are cut from soft suede (medium brown) cardstock. For the fir branches and leaves I used mossy meadow (dark green) designer paper and the berries are cut from merry merlot cardstock. All of these colors are considered neutrals.

I used white glitter paper for the snow on the birdhouse roof and the tree branches. For the Happy New Year sentiment, I used the Ring in the New Year die and cut it in a black foil paper for emphasis. 

To finish off this card, I added a little bird cut in smoky slate from the Fox & Bird die. To finish off my card, I scattered a few pink enamel dots. 

Well, that's it for me for this post. So until next time.........God bless.

card details:
Paper: pool party, basic black, smoky slate, soft suede, merry merlot, see a silhouette dsp (Stampin'-Up), white glitter paper (Recollections)
Paper Size: 4 1/2" x 5 3/4"
Accessories: woodland birdhouse die (CottageCutz), pink enamel dots (Doodlebug Designs)
I am also entering:
1.  A Bit More Time to Craft has an anything goes challenge. 
2.  A Perfect Time to Craft has an anything goes challenge. 
3.  Crafts Galore Encore Challenge is anything goes. 
4.  Crafty Hazelnuts Patterned Paper Challenge is anything goes. 
5Love to Craft Challenge Blog has an anything goes. 
6.  Simon Says Stamp Wednesday Challenge has a sparkle and shine. 


LinkWithin

Related Posts with Thumbnails