Monday, June 29, 2020

Potting Shed

Hello Blogger friends! Thanks for taking the time to stop and visit with The Charmed Life Blog today. 

Hope you are enjoying the change in season. We are 9 days into the summer season and it has been so beautiful here with warm and mostly sunny days. Just what you want for summer weather. Our flower beds are spectacular looking right now. 

And, my hubby's vegetable garden is growing nicely. We had our first harvest of basil, parsley and sugar snap peas yesterday. My hubby sautéed the peas with olive oil and garlic. They were fabulous. He doesn't cook but he loves to when it comes to his garden. Mainly the peas and green beans. 

Now onto my card for today. This one I made for my hubby for Father's Day. He is an avid gardener and has a potting shed so when I received this Potting Shed die from CottageCutz I knew exactly what I would do with it. So let's get started with some details on my card. 

I hosted the color challenge #793 on Splitcoaststampers, and the colors I chose worked great for the potting shed image. For this challenge you can use neutrals and that includes dark green, so that was in my favor as well.
blueberry bushel, balmy blue, lovely lipstick
The potting shed was cut in the challenge colors plus neutral shades of brown, gray and green. I sponged the flower pot and the watering can with the same color ink as the cardstock to get a deeper shade of blue. Used a cloud stencil for the clouds and lightly sponged the dark green ink for the grass.

I used the stitched sun, clouds & umbrella die for my cloud and stamped the sentiment in blueberry ink. Finished off this card with a few epoxy hearts. My hubby really liked the card when I gave it to him on Sunday. He always likes cards for him when they are personal like this one. 

Well that's it for me for this post. So until next time..........God bless.

dies I used to create card:
I am also entering:
1.  Creative Craft Cottage has an anything goes challenge. 
2.  Creative Sketchy Girls has a masculine challenge. 
3 Love to Scrap has a "for the boys" challenge. 
4Creative Crafter has an anything goes challenge. 
5.  Crafty Friends has a men/boys challenge

Saturday, June 20, 2020

Cardinals Send Christmas Wishes

Hello Blogger Friends!  Thanks for taking the time to stop and visit with The Charmed Life Blog on this first day of summer 2020. It's a beautiful day here in Pittsburgh with plenty of sunshine and warm temps. Just what you would want the summer to kick off with. 

I started off my day by going to a tee-ball game this morning. A little boy who was in my Pre-School class a couple of years ago was playing in his first game. His Mom asked me to come.  I have maintained a relationship with this family so of course I was going to attend. They don't keep score at this age and the game is about 1 1/2 hours. It was just a fun time watching the game and chatting with the family.

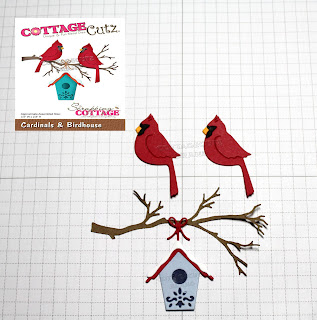
Now onto my card for today. This one I made for my weekly DT post on the CottageCutz Blog. I am featuring an older Christmas die - Cardinals & Birdhouse and I created a Christmas card. So let's get started with some details on how I created this card.

Design Steps:
My inspiration to create a Christmas card came from the color challenge #796 on Splitcoaststampers. When I saw the colors just I just thought of Christmas.
real red, pool party, garden green
When I started thinking about my card, I remembered I had a pack of beautiful frosty winter themed designer papers from Stampin'-Up.  I chose this pine tree one that was covered in snow and ice and knew it would be perfect for a scene with cardinals in it. And, my card was born!

The navy color is considered a neutral in this challenge so that color was a go. I took a photo of the entire 6 x 6 piece of cardstock because I wasn't quite sure at this point where I was going to cut the paper.

White card base: 4 1/2" x 5 3/4"
Navy blue layering panel: 4 1/4" x 5 1/2"
Designer paper layer: 4 1/8" x 5 3/8"
I cut the birdhouse and cardinals in the challenge colors. I used a navy panel as an accent on the birdhouse. The branch is cut in soft suede cardstock a neutral shade.

My Christmas wishes sentiment is stamped in garden green ink to satisfy that part of the challenge. 
My elements are cut and I am ready to start card assembly. I attached the die cut images using a combo of glue dots and ranger multi medium matte. This one dries clear so I like using it on die-cuts. 
For the sentiment I cut the banner and used dimensional adhesive to secure it to the top of the card.
To finish off my card, I attached the image panel to the card base. Added a couple of red glitter enamel dots to highlight the sentiment. And, then scattered a few more and my card is finished. A Christmas card ready for the December stash.
Well, that's it for me for this post. So until next time.......God bless. 

Die I used to create card:
I am also entering:
1.  C.R.A.F.T. challenge is Christmas.
2.  Merry Little Christmas Challenge is anything goes.
3.  The Holly and Ivy Christmas challenge is anything goes. 
4CHNC challenge is anything goes Christmas. 

Saturday, June 13, 2020

Kitty & Hedgie Birthday Wishes

Hello Blogger Friends! Thanks for taking the time to stop and visit with The Charmed Life Blog today. Can you believe that we are almost mid-June? 

We went strawberry picking at a farm the other day. We came home with 10lbs of strawberries. I was going to make some strawberry jam but I wasn't up to it on a 90 degree today. It's a lot of work. So I washed and froze about 3/4 of them. It will be nice to enjoy them in the winter if they last that long. 

Today I made some strawberry ice cream in my VitaMix. One word to describe it- DELICIOUS!!! I have never made anything in the Vita-Mix except smoothies. I found the cookbook that came with this machine and there are some good recipes in there. I will be trying some for sure. It's quick and easy. 

So onto my card for today. This one I created for my weekly DT post on the CottageCutz Blog. For my card today, I am featuring the new Garden Cat w/Wagon die and created a birthday card. This little cat and hedgehog are just too cute and I thought they would make a great whimsical card. So let's get started with some details on how I created my card.

I started off by selecting my cardstock and designer paper. I had a sketch picked out to use with several layers, but it didn't work for these images. So I flipped the designer paper over and decided to use the striped side. My original plan was to use the side of the paper with balloons but it wasn't working for me. This is also a square card. I hadn't planned on that when I started though (lol)!! I realized this was going to be a work in progress this week.

Pacific Point card Base: 5 3/4" Square
Striped Designer Paper: 5 1/2" square
Next, I cut the cat in an ivory confetti cardstock and sponged fossilized amber ink for a different look. The wagon and hedgie are cut in different shades of brown cardstocks and also sponged in the matching inks for more depth.

I plan on giving this card to a little 5 year old boy so I didn't want to place flowers in the wagon. I thought balloons and then pulled out the Festive Birthday Greeting die. It was released in June 2019. I cut 3 for inside the wagon and then 2 additional for the cat to carry.
Because of the bold striped background, I needed another layer to place my images on. I picked one of the colors (lemon-lime) in the designer paper and used the largest Wacky Stitched Rectangle die. Looks like it's out of stock but the Stitched Rectangle die would be a good substitute.

I thought I would use the Happy phrase that's part of the Festive Birthday Greeting die and then stamp birthday wishes in the corner of the rectangle. I stamped with Stampin'-Up pacific point ink.
Now I am ready to start card assembly. I attached the images to the rectangle panel with dimensional adhesive. That always gives a nice look to the card.
Attached the designer paper to the card base with double sided tape and then the image panel with the same adhesive. For the balloons that the cat is carrying, I used a dab of ranger multi medium matte adhesive. To finish off my card I added a few royal blue enamel dots. And, that completes my card for this post.
dies I used to complete card:


I am also entering:
1.  Alphabet Challenge is E for earthbound animal. 
2.  Cut It Up has the perfect pet challenge.
3.  Festive Friday inspo list - I picked green yellow and a "sweet" sentiment.  
4.  Aud Sentiments is anything goes + a sentiment. 
5.  Cute Card Thursday has a masculine challenge. My card is for a little boy. 


Saturday, June 6, 2020

Plant A Garden

Hello Blogger friends! Thanks for taking the time to stop and visit with The Charmed Life Blog this first Saturday in June. 

It's a beautiful, sunny day here. The humidity is down and I have the windows open and a gentle breeze is blowing through my home. I can hear the lawnmowers and other Saturday morning activity in the neighborhood. 

Last night we were on my next door neighbor's patio enjoying pizza and conversation. It felt so good to be out and and enjoying time with friends once again. We just discovered a new pizza place fairly close to our house. The pizza is so delicious. 

Anyway, let's move onto my card for today. This one I created for my weekly DT post on the CottageCutz Blog. For my card today, I am featuring the new Gardening Cat die and created a thinking of you card for a friend who loves to garden. So let's get started with some details on how I created my card.

Design Steps:

I started this card with my sketch. I had one saved on my computer that I thought would work well with this die image. It's an older one from Splitcoaststampers #696. I used this sketch a couple of years ago and created this card. I linked it just to give you an idea of how you can get a different look from a sketch just by changing up the images.
Next, I looked through my designer papers and found this floral one. It caught my eye almost immediately. I liked the flowers and soft pink background.

Sweet Sugarplum card base: 4 1/4" x 5 1/2"
Designer Paper Layer: 4 1/8" x 5 3/8"
Old Olive layer 2 + White layer 3 of sketch: used largest Pierced Rectangle die (4 1/4 x 3 1/4")

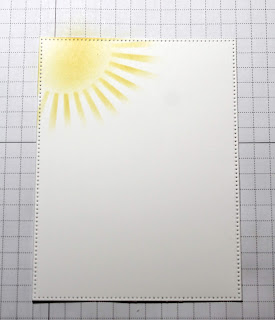
For the background layer instead of stenciling clouds, I decided to use a sun rays stencil and sponge the corner with wild honey distress ink. It helped to fill in the white space on the card.

The sentiment was the next to be completed. I recently bought some garden sentiment stamps and thought this one would work well with the Gardening Cat image. I didn't intend to stamp who the quote was from, but I forgot to tape it off when I inked the stamp. Audrey Hepburn was an actress in the 50's & 60's. It's stamped in chocolate chip ink. The stamp set is from the Penny Black set -"blooming sentiments".
Now that all the elements of the sketch are cut, stamped and sponged, I am ready for card assembly.
I attached the images to the white panel with double sided tape.
I did take some liberties with the sketch. I moved element 4 of the sketch to the bottom of the image panel. My garden plot is covering that part of the sketch. 

I finished off my card by attaching the remaining panels to the designer paper and then the card base. Added a couple of heart enamel dots and my card is finished.
Well that's it for me for this post. So until next time........God bless.

dies I used to create card:

I am also entering:
1. Crafty Friends has an anything goes challenge. 
2 A Gem of a Challenge has an anything goes. 
3.  Just Us Girls has a sunshine challenge. 
4.  My Time to Craft has a stencil challenge. 
5.  Joy of Sets has a tic-tac-toe. I chose nature-summer-animals. 


Friday, June 5, 2020

Happy Father's Day

Hello Blogger Friends! Thanks for taking the time to stop and visit with The Charmed Life Blog this first Friday in June. 

It's not a good time in our country right now with all the rioting and looting. But, my hubby and I are consistently praying for law and order to return. The Bible says that when those with moral courage and spiritual integrity cry for help the Lord hears.

Our area of PA moved into the green phase of the Covid-19 pandemic. So a number of businesses were able to re-open their doors. It is exciting news for small business owners. I am hoping that their businesses are able to recoup and recover. 

Now let's move onto my card for today. This one I created for the color challenge #792 on Splitcoaststampers.  Chris was our hostess and she chose granny apple green, shaded spruce and coastal cabana for her color trio. Optional was to use a circle.
coastal cabana, granny apple green, shaded spruce
I thought these colors would work well for a masculine card, and I created my 1st Father's Day card of the season.

Stenciled the background clouds in cracked pistachio ink- it's almost an exact match for coastal cabana. The lawnmower is cut in granny apple green and neutrals of gray, black and sahara sand. I sponged the granny apple green pieces in the same color for a bit deeper of a shade.

The grass is cut in shaded spruce cardstock. I trimmed down the left side to make it appear as though the lawnmower had cut that part of it. I finished off my card by stamping a few birds in the clouds and then also some butterflies above the grass.

Well that's it for me for this post. So until next time .........God bless. 

card details:
Stamps: my wonderful family (PaperPumpkin Kit April)
Paper: coastal cabana, shaded spruce, granny apple green, whisper white, black, basic gray, sahara sand (Stampin'-Up)
Paper Size: A2
Ink: shaded spruce, granny apple green (Stampin'-Up), cracked pistachio distress (Ranger)
Accessories: lawnmower, spring grass dies (CottageCutz), cloud stencil (MFT)
I am also entering:
1.  Cut It Up has a boys will be boys challenge. Create a masculine project with a die cut. 
2.  Just Add Ink has a just add "F" challenge. My "F" is Father.
3.  C.R.A.F.T. has a masculine challenge. 
4.  Paper Funday has an anything goes challenge with optional of masculine.
5.  Simon Says Stamp has a masculine challenge.  


LinkWithin

Related Posts with Thumbnails