Tuesday, May 30, 2017

~ Holiday Car ~

Hello Blogger Friends. Thanks for taking the time to stop and visit with the Charmed Life Blog.
 
Hope your Memorial Day celebration was a good one whatever you did. Our community has a parade each year in honor of those who gave their lives for our freedom.
 
It's also the "unofficial" start of summer. In our area, people use this day to get their gardens in-plant flowers or just do work outside. My hubby was out in his yard all day. He works so hard to keep our yard looking beautiful. As for me, I was inside and up in my craft room. Both of us were so content, doing what makes us happy.
 
This morning my friend is coming over and we are going on a bike ride. I just bought a bike at a garage sale. I don't intend to do any serious riding just to get some additional exercise. We are going to a local park that has a bike lane and will give us about 4 miles of riding area.
 
I  wanted to get a card posted before I leave for the ride. This one I made for the color challenge #636  on Splitcoaststampers. Roberta was our hostess and she chose old olive, tangelo twist and cherry cobbler for her color trio. Optional was to use ribbon or twine. There is twine holding the tree to the top of the car-even though it's paper (lol)!!
 
As soon as Roberta selected these colors, I thought I would try and make a Christmas card. Working the tangelo twist was a bit difficult, but I managed it.

I used an MFT stencil and some 3D molding paste to create a snowy background. As soon as I removed the stencil, I sprinkled dazzling diamonds glitter. IRL it's quite sparkly.

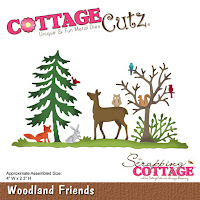
My Christmas car carrying the Christmas tree and gifts is a die from CottageCutz - Holiday Car. The pine tree is also a die from Cottage - "Woodland Friends".

I cut a hill using a die from Lawn Fawn and added chunky glitter to the top. Stamped my sentiment and added a few candy dots to complete my card.
 
Well, that's it for this post. Now I have another card to add to my Christmas stash. It's 3#.
 
card details:
Stamps: Holiday Home (PaperTrey Ink)  
Paper: Cherry Cobbler, old olive, tangelo twist, whisper white, basic gray, basic black, smokey slate
Paper Size: A2  
Ink: tuxedo black (Memento)
Accessories: Holiday card, woodland friends dies (CottageCutz), regals enamel dots, dazzling diamonds & chunky glitter (Stampin'-Up), falling snow stencil (MFT), 3 D Molding Paste (American Traditional Designs)  
Techniques: stenciling
 
Dies I used:
http://www.scrappingcottage.com/search.aspx?find=woodland+friends
 
 
I am also entering:
1.  A Snowflakes Promise has an anything goes challenge.
3.  Weekly Christmas Card Challenge is anything goes.

Wednesday, May 24, 2017

~ Sponged & Masked Sympathy Card ~

Hello Blogger Friends and thanks for taking the time to stop and visit with the Charmed Life Blog.
 
Well, it's my first official day of summer break. We had our final preschool program last night. The kids were so cute singing their songs and reciting the alphabet. Of course the parents loved it. We also had a video of what we had done over the last 8 months with them. That is always a big favorite with the kids and parents.
 
The parents blessed me with end of the year gifts. Their thoughtfulness always amazes me. I am making some thank you cards and will post those later this week.
 
Now onto my card for today. This is another one I made for the Splitcoaststampers Virtual Stamp Night Challenges. Brenda was the hostess and her challenge was to take inspiration from the Oscar-nominated song, Audition: The Fools Who Dream, from La La Land. I took the words "sunset inside a frame" and created my card.  
 
I sponged just a bit of daffodil delight ink for my setting sun. And, then moved to my night sky using pacific point ink.

I continued with soft sky for my water. I stamped waves in the water with wild wasabi ink and a stamp from Just For Fun.

Made a mask and sponged at the waters edge with crumb cake ink for a little sand. Moved the mask to the side of the card and sponged with tuxedo black ink for my island.

On the island I stamped a palm tree from the Stampin'-Up "plant hope" set. Used my wild wasabi marker to add some color to the tree fronds.
 
That's my card for today. It's time to dim the lights in Charmed Life Land for another day. So until next time.......God bless.
 
Card details:
Stamps: with heartfelt (rubber Cottage)plant hope, a touch of nature (Stampin'-Up), sunset at the beach (just for fun)
Paper: whisper white, pacific point, black
Paper Size: 4 1/2" x 5 3/4" 
Ink: pacific point, soft sky, wild wasabi, crumb cake, daffodil delight and tuxedo black
Accessories: rectangle frame die (Impression Obsession), sponges, daubers. Wild Wasabi marker
 
I am also entering: 
1.  Tuesday Throwdown has an anything goes challenge.  
2Always Fun Challenges has an anything goes challenge.
3.  Crafting From The Heart has an anything goes challenge
 

Saturday, May 20, 2017

Exploring in a MotorHome

Hello Blogger friends! Thanks for taking the time to stop and visit with the Charmed Life Blog.
 
Hope you are enjoying your Saturday whatever you are doing. I am enjoying the beautiful spring day here in Pittsburgh. Lots of household chores need done but, the windows are open and a gentle breeze is wafting in and through the house. I just love days like this.
 
Now onto my card for today. This one I created for my weekly DT post on the CottageCutz blog. For your viewing pleasure today, I am featuring one of the new Expressions Plus word dies. I am using the Explore Phrase. As soon as I saw this word, I thought of making an outdoor scene with the dies from the November 2016 Camping Bundle set.

I have some friends that just retired. They bought a motorhome and are taking a 3 month trip across our beautiful country. This is a retirement celebration card for them.

I thought the outdoor scene would work best in a different type fold. I found a tutorial on YouTube for a double front fold card. You have your front image, then an inside image an then another panel for a 2nd inside image.  Here is a video link. I will also give you a step by step tutorial.

So let's get started with some details on how I created my card this week.

Step 1: I started by cutting my navy blue card base. It is 5 1/2" x 8 1/2". I scored it at the 4 1/4" point and cut 2 1/4" off  the 8 1/2" side. This is how I achieved the front fold on my card.  I set that aside to work on my outside image panel.

Step 2: The next step was to cut the Motorhome. I used light and dark gray + red cardstock on the image. The white panel is cut at 2 3/4" x 3 1/4". I layered that over red cardstock measuring 3" x 3 1/2". I stamped my sentiment and set this aside to work on the inside image panel.
 Step 3: On this panel I used the images from the Campsite & Woodland Friends dies. I cut the pine tree in a dark green, a yellow sun and the directional arrows in red, green and blue. I cut a small cloud from the sun & clouds die and used that as a template and did a bit of background sponging.

The white panel is cut at 2 3/4" x 3 1/4". Cut the explore phrase word in navy cardstock. I layered this panel over red cardstock measuring 3" x 3 1/2".
Step 4: I cut another piece of white cardstock at 5 /14" x 8" and scored it at 4". I attached this image panel to the cardstock and then secured it to my navy blue card base.


1st inside image
Now I can attach the front panel to the card.  It goes directly over the inside image. I used Scor-tape to make sure it stays put when the card gets opened and closed.

 
Step 5: Now it's time to decorate the inside hidden panel or the double fold part. I used the Jamboree Bear die and the campfire from the Campfire Squirrel die. The background paper is some that I had in my stash. It reminds me of a nighttime sky so I thought it would work well here.

2nd inside image
Well, that completes my card for today. I hope I have shown you another way to use the new Expression Phrases dies and incorporating them with existing CottageCutz product you already have. And, I hope you will give this fun fold a try. I think it makes a big impact on a card. 
 
Dies I used to create card:
http://www.scrappingcottage.com/cottagecutzexpressionsplusexplorephrase.aspx

http://www.scrappingcottage.com/cottagecutzwoodlandfriends.aspx

 
http://www.scrappingcottage.com/cottagecutzcampsite.aspx

http://www.scrappingcottage.com/cottagecutzjamboreebear.aspx

http://www.scrappingcottage.com/cottagecutzmotorhome.aspx

http://www.scrappingcottage.com/cottagecutzsnowcappedmountains.aspx
 
front panel

1st inside panel


2nd inside image
I am also entering:
1. Cut It Up has a fun fold challenge.
2Crafty Catz has a more than 2 layers challenge.
3KittyBee Designs has an animals challenge. 
I am also entering

Friday, May 19, 2017

~ Candy Cane Penguin ~

Hello Blogger friends! Thanks for taking the time to stop and visit with the Charmed Life Blog.
Well, I have come to the end of another pre-school year. Yesterday was our last class and it was a day of fun for the kids.
 
We set up a bouncy house, face painting an art project station and then rotated the kids through each station 3 at a time. They enjoyed all of it. I was the art station teacher and we made a cute turtle with cardstock and cupcake liners. After they all had a turn at each station, we had ice cream cones with rainbow sprinkles. Then a little outdoor time in our play yard and the day was over.
 
We have a year end program planned for Monday night and then that will be officially it. This class of 3 year olds will move up to the 3 day class next year. I won't see them because I am only there on Tuesdays and Thursdays. I will really miss this group of sweet children. I am sure our class next year will be a sweet one as well. After all who doesn't love 3 year olds?
 
Now onto my card for today. This is my first Christmas card of the year. I made it for the Virtual Stamp Night challenges on Splitcoaststampers. Sharon was our hostess for the greatest hoax challenge. She gave us a link to the The Top 100 Greatest April Fool's Day Hoaxes of All Time and we were to pick one and create our card. They all were pretty funny and gave me quite a laugh.

I chose the hoax about the flying penguins. It's #25 on the list. When I saw this,  I immediately thought of this candy cane penguin die from CottageCutz.

The sentiment is part of the Merry Christmas Santa die also from CottageCutz. I found the snowflake embossed background and the glittered snow bank in my stash. The embossing folder is from Cuttlebug.

This card was easy enough to make and I think I will create a few more of this style for Christmas. And, that's it for me for this post. So until next time........God bless.

Card details:
Paper: real red, marina mist, whisper white, black, daffodil delight 
Paper Size: A2
Accessories: candy can penguin, merry christmas santa (CottageCutz), snowflake ef (Cuttlebug), in the meadow die (PTI), chunky glitter )Stampin'-Up) 
Techniques: dry embossing 

Dies I used:   

http://www.scrappingcottage.com/cottagecutzcandycanepenguin.aspx
 
http://www.scrappingcottage.com/cottagecutzmerrychristmassanta.aspx
 
I am also entering:
1.  ABC Christmas Challenge has a "K" for keep it simple. 
2.  Simon Says Stamp has a sparkle challenge.
3.  A Snowflakes Promise has an anything goes challenge.
4.  The Holly and Ivy Christmas Challenge has an anything goes.


Tuesday, May 16, 2017

~ Hummingbird Hugs ~

Hello Blogger friends! Thanks for taking the time to stop and visit with the Charmed Life Blog.
 
This week our Preschool year is coming to an end. Thursday we have a fun day planned for the kids. We have a bouncy house, face painting and a fun art project. We also are going to serve ice cream cones for snack. They will love these especially because we will roll them in sprinkles.
 
I will really miss this group of kiddos. They were by far the best class of 3 year olds we have had. They all worked their way into my heart. But, we can't keep them little forever. I have certainly learned that lesson with my own grandkids.
 
Before, I get all emotional let's move on to my card for today. This one I made for my weekly DT post on the CottageCutz blog. There is another great release of new dies over in the online store. The Expressions Plus (word dies) with 35 designs are currently on promotional pricing and are 25% off. The font is so beautiful and you will definitely want these in your collection.

For your viewing pleasure today, I am featuring one of the new dies. It's the hugs phrase along with the hummingbird die.  So let's get started with some details on this card.

I started my card this week with the card colors. I am using the colors from the Splitcoaststampers color challenge #636. They are Peekaboo Peach, Calypso Coral and Always Artichoke. Once that was decided, I started thinking about my layout. I am using the MojoMonday #497 sketch.
peekaboo peach, calypso coral, always artichoke

 
 Card Sizes:Card base: 4 3/8" x 5 5/8"
Calypso Coral Layer: 4 1/4" x 5 1/2"
Coral Designer Paper Layer: 4 1/8" x 5 3/8"
Vanilla Rectangle Layer: 2 1/4" x 4 3/4"
Calypso Coral Flower Paper: 2 1/8" x 4 5/8"
Image Layer: 2 3/8" x 4 1/8"
Calypso Coral Layering Panel: 2 1/2" x 4 1/4"

Step 1: I first figured out all the card panel sizes. Since I had the card colors, I looked through my patterned papers and found these ones in the coral shade. I decided I would go after a more monochrome look. I liked the gradient look on the background panel. I ended up putting the lighter shade at the top.
 
Step 2: I cut the flowers in peach and coral cardstocks and the leaves in artichoke. The hummingbird I cut in white cardstock and then sponged in coral, peach and a bit of artichoke.
 
Step 3:  I am now ready to start the card assembly. I wanted to show how I did my angled panel. I attached it onto the patterned paper panel at an angle with double sided tape . I used my craft knife and trimmed off the excess.


Step 4: The Hugs Phrase is cut with both artichoke and coral cardstocks. I did a slight offset for added interest. Here is a close-up shot of the hugs phrase as well as the hummingbird.

 
Well, that's it for me for this post. So until next time........God bless.

Dies I used to create card:
http://www.scrappingcottage.com/cottagecutzhummingbird4x4pre-order.aspx

http://www.scrappingcottage.com/cottagecutzexpressionsplushugsphrase.aspx
 
 
I am also entering:
1.  Crafting From the Heart has an anything goes challenge.
2.  Crafty Cardmakers has an add a sentiment challenge.
3A Bit More Time to Craft has an anything goes challenge.
4.  Classic Design Team Open Challenge is anything goes.
 

Wednesday, May 10, 2017

~ I Woof You ~

Hello Blogger Friends! Thanks for taking the time to stop and visit with the Charmed Life Blog.
 
I went to a garage sale on Saturday, in spite of all the rain we had. It was rainy and cold all day long. A friend of mine had this sale and she was selling a bike. It is in really good shape and I have been looking for a secondhand one.
 
We have lots of bike trails here in the Pittsburgh area and it is great exercise. I am not going to do any serious riding. My plan is to go a few miles on the trails. I have a friend who is interested in riding with me. So once school ends in a couple of weeks, I will be set to go. And having a riding partner is always good. I will keep you posted on the success of my plan.
 
Now onto my card for today. This one I created for the Virtual Stamp Night challenges on Splitcoaststampers. This is my card for Katlyn's color crazy challenge. She wants us to use pink and brown and extra points if we use a dog image.

My card used sketch # SC638 from Splitcoaststampers.  The background designer paper is some really old Stampin'-Up that I found in my stash.

My dog image is from the CottageCutz "jolly snowman" die. It just happened to have a dog image with it. The bones and paw print are a die from MFT.
 
I made this for my daughter-in-law for Mother's Day. Their dog is like one of their kids and he loves her so. She will think its cute and I am hoping to get a paw print from him on the inside of the card. That might be tough but we will see.
 
Well, that's my card for today. So until next time........God bless.
 
card details:
Stamps: Woof You (SNSS)  
Paper: close to cocoa, pretty in pink, taken with teal, dsp (Stampin'-Up) 
Paper Size: A2  
Ink: close to cocoa  
Accessories: jolly snowman, stitched rectangle dies (CottageCutz), pet accents (MFT)
 
CottageCutz dies: 
http://www.scrappingcottage.com/cottagecutzjollysnowman4x6.aspx
I am also entering:
1.  Addicted to Stamps and more challenge #241 is anything goes.
2.  Little Red Wagon has a punny projects challenge.
3.  Simon Says Stamp Wednesday challenge is going dotty.
4.  The Crafty Addicts challenge is to add a sentiment.  


Saturday, May 6, 2017

Dinosaur Birthday Kisses

Hello Blogger Friends! Thanks for taking the time to stop and visit this 1st Saturday in May.
 
It's rainy and a bit cool here in Pittsburgh but Spring is here for sure. Gardens are budding and blooming and we have already had our first lettuce harvest. And today, I will be cutting some basil- hopefully there is enough to make pesto.
 
Let's move to my card for today. This one I made for my weekly DT post on the CottageCutz Blog. Today for your viewing pleasure, I am showcasing a couple of the new baby dino dies using the Brontosaurus and T-Rex. I needed a child's birthday card and these dino's work perfectly. What little one doesn't love dinosaur's? And that's both boys and girls.

So let's get started with some details on what I did this week. I already knew I was making a birthday card so I just needed my layout. So when I saw the Splitcoaststampers sketch #643 for this week, I knew it would work for a little dinosaur scene.
 
Sweet Sugarplum Card Base: 4 1/2 " x 5 3/4"
White Image Panel: 4 1/4" x 5 1/2"
I used a hinge technique to get this larger size card base. Here is a link to some instructions I provided previously on how I do this with 8 1/2" x 11" cardstock.

Step 1: Once I looked at this sketch, I thought I would make rolling hills as the spot to place my dino's. I was going to cut the hills but after looking through my patterned paper, I found paper that already had the shape of the hills. I just needed to measure and fussy cut. The paper even had a little pattern. It's the look I was after.

Step 2: Once the hills were cut I adhered to white card base with dimensional adhesive. I used a cloud template and sponged the top of the white cardstock with tumbled glass distress ink. The clouds are covering layer 1 of this sketch.
 
Step 3: I wanted 3 dino's in this scene so I cut one (1) T-Rex and two (2) from the Brontosaurus dies. On the Brontosaurus I used peekaboo peach card stock + peach designer paper and daffodil delight cardstock and + daffodil delight designer paper.
On the T-Rex I used sweet sugarplum and old olive cardstocks + sweet sugarplum designer paper. I like the variegated colors on the designer papers I chose. It adds some interest to the dinosaurs.

Step 4: I also used the CottageCutz grass, tree and vines die for another element to this card.  Now that all the card elements are done, I needed to think about my sentiment and the placement of it.
I used a stamp set from MFT with individual sentiment words so I chose birthday & kisses. Since they are 2 separate stamps, I stamped in black ink on sweet sugarplum cardstock and cut them into 2 labels. Here is a card close-up.
 
Well, that's it for me for this blog post. So until next time..........God bless.
 
dies I used to create card:
http://www.scrappingcottage.com/cottagecutzbabydino-brontosaurus.aspx

http://www.scrappingcottage.com/cottagecutzbabydino-t-rex.aspx

http://www.scrappingcottage.com/cottagecutzgrasstreeandvines.aspx
 
I am also entering:
1.  Crafty Friends has a cute challenge.
2Jo's Scrap Shack has a fun Friday challenge of anything goes.
3.  Polkadoodles has an anything goes.
4That's Crafty challenge is "bright".
 

LinkWithin

Related Posts with Thumbnails