Showing posts with label Slimline. Show all posts

Saturday, February 12, 2022

Ewe Are So Sweet

Hello Blogger Friends! Thanks for taking the time to stop and visit with The Charmed Life Blog today. 

It's Valentine's Day weekend. I had a Galentine's Party on Wednesday night. First time event for me and it was such a fun night. I had lots of good food and invited 3 of my girlfriends. 

We each brought a gift that started with the first letter of either our first, middle or last name. I gave a box of Merci chocolates and some mandarin oranges that had the stems and leaves on them. It made for a fancier presentation. I put them in a new faux leather bag that I had on hand and probably wouldn't use. It seemed like everyone got a gift that was so appropriate for them. I definitely plan on doing this again next year. 

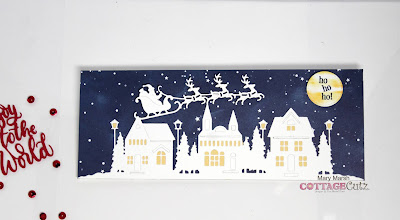
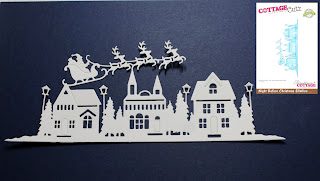
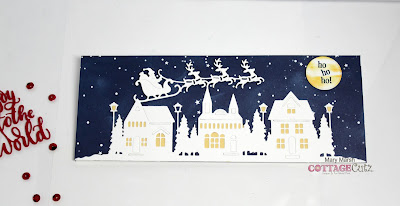
Now onto my card for today. This one I created for my weekly DT post on the CottageCutz Blog. I am featuring some new Spring dies and created a slimline card for Easter. 

I used the Circle Windows Slimline die to place the sheep. I cut some blue patterned paper from my stash. I liked the soft whimsical appeal. On my white card base, I used a stencil and stenciled some clouds with broken china distress ink.

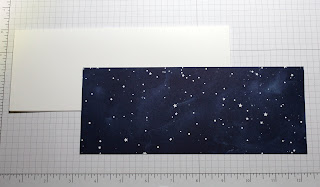
white card base: 8 1/2" x 3 1/2"
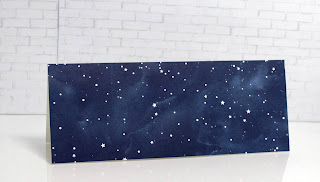
blue patterned paper: 8 1/2" x 3 1/2"
I cut the sheep, tulips and grass with cardstock. For the tulips I used 2 shades of purple cardstock. I cut more than I would need because I wasn't sure how I was going to place them.
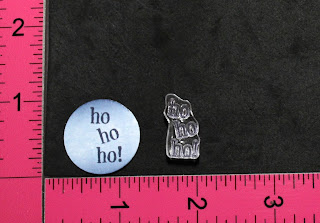
In the center window, I stamped my sentiment using a grape ink.
Now that all my elements are prepared, I am ready to start card assembly. I attached just the top portion of the designer paper to the card base. I wanted some wiggle room to get my grass and tulips positioned on the lower portion of the card. The grass is attached with glue dots and the sheep with dimensional adhesive.
To finish off my card I added some of the tulips to the circle windows and that completes this design. I then secured the bottom of the designer paper with double sided tape and liquid glue. And that's it for me for this post. I hope you all have a great weekend and have some fun plans to celebrate Valentine's Day. So until next time.......God bless. 

I am also entering:
1.  The Paper Funday is anything goes. 
2.  Critter Crazy Challenge is anything goes with a critter. 
3.  A Perfect Time to Craft has an anything goes challenge. 
4.  Classic Design Challenge is anything goes. 
5.  Crafty Animals has an anything goes challenge. 


Sunday, October 24, 2021

Night Before Christmas Slimline

Hello Blogger Friends! Happy Sunday to you all. Hope your weekend has been a great one and you had some fun involved. Maybe even some cardmaking activities.

I love watching the Hallmark Movie Channel and their Christmas movies have started. They had one on Friday night, 2 on Saturday night and one on tonight.  It just puts me in a Christmas mood even though it's October. I have started on my Christmas cards and will continue making those through November. I do need to get finished with my Thanksgiving cards though. 

So today I have a slimline card that I made for my weekly DT post on the CottageCutz Blog. There is a new Christmas release with 4 new Slimline designs. Today, I am featuring the Night Before Christmas Slimline die. So let's get started with some details of how I created my card.

Design Steps:

Since I had the design mind I was going to use, I looked through my designer paper for something with a nighttime sky. I found this one that I thought would work perfectly with the Night Before Christmas die.

white card base: 9" x 3 1/2"
designer paper layer: 9" x 3 1/2"
Next, I cut the image from white cardstock.
I decided I wanted a moon in this night sky so I used a 1" punch and cut one from designer paper. The paper was a lighter blue and I sponged navy ink around the edge to bring out the lighter shade. Then I stamped my ho-ho-ho sentiment.
After I assembled the card I didn't like this moon so I cut one from white cardstock and sponged 2 shades of yellow ink.
Now that my card elements are prepared, I am ready to start card assembly. I attached the designer paper to the card base with double sided tape.
My image is next and I used a combo of double sided tape and dimensional adhesive for Santa and reindeer. I changed the moon and sponged a couple of shades of yellow ink and then stamped the sentiment. I used the 2nd largest stitched circle die for the moon.

I also placed some of the white pieces back into the die using the inlay technique. To get the yellow light in the windows, I cut small pieces of yellow cardstock and glued them to the back of the panel. This method was a bit easier than laying in all the individual pieces.
Well, that's it for me for this post.  This is a card that I think would be quite easy to create multiples of to save some time with Christmas card making. So until next time........God bless

dies I used to create card:

I am also entering:
1.  Peace on Earth has an anything goes Christmas with optional inspiration board.
2.  Alphabet Challenge is "O" for outdoors. 
3Jingle Belles has a not a creature was stirring challenge. 
4.  ABC Christmas challenge is "V" for vocabulary.
5Crafty Creations has an anything goes challenge.  


Saturday, October 23, 2021

Joy of the Season Slimline

Hello Blogger Friends! Thanks for taking the time to stop and visit with The Charmed Life Blog this Saturday in October. 

Hope you are enjoying the Fall season. Our temperatures have just started to change and we are getting very cool nights. The tomatoes and peppers are winding down for the season. But just when I think it's over,  my hubby brings in 8-10 more for me to do something with. When we have our first frost it will definitely be over for the year. It's been an abundant harvest for us this year and I thank the Lord for all the vegetables that were harvested. 

Now onto my card for today. This one I created for my weekly DT post on the CottageCutz Blog. In the new Christmas release, there are 4 slimline designs. For this post I am featuring the Winter Scene Slimline die. So let's get started with some details on how I created this card. 

Design Steps:
For this card, I decided to create an ink blended background. It's another way to add the "wow" effect to a card. I used a blending brush an ink daubers along with chipped sapphire, navy, seedless preserves, grape, wild honey and spiced marmalade inks for the blending. I used Bristol smooth cardstock for this layer. I really like the way it takes ink.
Then I used some white acrylic paint mixed with a bit of water and splashed the background for a starry look. I added a few stars cut from white cardstock for a bit more interest.
Next, I cut the Winter Scene Slimline die in white cardstock. I added some pale yellow cardstock behind the windows to project a warm glow. I also sponged the moon with a bit of wild honey ink. For the sentiment on this card, I decided to stamp directly on the snow bank in navy ink.
Now I am ready for card assembly. I attached the winter scene image with double sided tape. I decided to add some layers to this card. I used navy cardstock and then the card base is a sugarplum shade. I thought it coordinated with the purple inks I used.

Sweet Sugarplum card base: 9 1/4" x 3 3/4"
Navy blue layer: 9 1/8" x 3 5/8"
Image panel: 9" x 3 1/2"
To finish off my card I added some wink of stella to all the stars and trees. IRL its really shimmery.  This one would be easy to create multiples of and each ink blended background would look just a bit different. Well that's it for me for this post. So until next time.......God bless. 

die I used to create card:


I am also entering:
1. CHNC #155 is anything goes Christmas. 
2.  Aud Sentiments Challenge is to use a Christmas sentiment.
3.  C.R.A.F.T. Challenge is non-traditional Christmas colors.  
4.  Christmas Crafts All Year Round has an "S" or "T" challenge. A scene and slimline card is mine. 
5.  Happy Little Stampers Christmas is anything goes with option of Joy. 
6 MLCCB #39 is anything goes Christmas. 


Saturday, September 11, 2021

Celebrate in the City

Hello Blogger friends! Thanks for taking the time to stop and visit with The Charmed Life Blog today. 

It's a solemn day of remembrance for the terrorist attacks that took place 20 years ago in the US.  There were memorial services held in NY, Washington DC at the Pentagon and also in Shanksville Pa where Flight 93 went down. 

I remember 20 years ago watching in shock at what was going on in NY as the buildings collapsed and the terror on the streets. Then hearing a plane had hit the Pentagon and then Flight 93 going down in Shanksville. It's something that I would never want to see repeated here. 

Now onto my card for today. This one I created for my weekly DT post on the CottageCutz Blog. Today for your viewing pleasure I have created a slimline card featuring the new City Skyline Slimline + Pinking Shear Edge Slimline dies. For my sentiment, I chose the new Celebrate w/Shadow die.

I needed a birthday card for my nephew. I like to create his card with patriotic colors of red, white and blue. He is a vet and served 4 tours of duty in Iraq. And, I am proud of him and like to honor his service. So let's get started with some details on how I created my card.

Design Steps:

I wanted a fireworks background for my city skyline scene but I didn't have any of that type paper in my stash. So I looked on Pinterest and found some Fireworks paper that you could download for free. Whoo-hoo it was just what I was looking for! I printed it on 8 1/2" x 11" cardstock. So I will have some left to use on another project.

I decided I wanted the pinking sheer edge to frame my city scene. So I used the largest die 3 1/2" x 8 1/2" and cut in red cardstock. Then I took the next size die and cut again to get my frame. I like how it adds to the festive appeal of my card. The card base is also red.

Red card base: 3 1/2" x 8 1/2"
Designer Paper: 3 1/4" x 8 3/8"
Pinking Shear Edge: 3 1/2" x 8 1/2"
Next, I cut the city skyline in a royal blue cardstock. And the Celebrate phrase in red and the shadow in white for contrast.
I decided to stamp some sentiments directly on the designer paper. I used the "celebrate" & "birthday wishes" words from the Lil' Bluebird Designs Happy Birthday set. And the word "party" from the Kitty Love set.

Now that all my card elements are prepared, I am ready to start card assembly. I attached the designer paper to the card base with double sided tape. The city skyline is also attached with double sided tape.
For the pinking shear frame, I used Tombow Mono liquid glue.
I added my celebrate phrase and scattered some sequins to the center of the fireworks.
And that's my card for this post. So until next time.......God bless

Stamps and Dies I used to create card:


I am also entering:
1.  Crafty Catz has a masculine birthday challenge. 
2Aud Sentiments has a birthday sentiments challenge. 
3.  Seize the Birthday has an anything goes birthday challenge. 
4Addicted to Stamps and More has a birthday challenge. 
5.  Mod Squad Challenge Blog has a slimline card challenge. 


Tuesday, May 25, 2021

Happy Birthday Fishes

Hello Blogger Friends. Thanks for taking the time to stop and visit with The Charmed Life Blog today.

Hope you all had a great weekend and were able to do something fun or crafty. We had some friends over for dinner on Sunday. It was a wonderful evening of just enjoying each other's company. We are going to be doing a lot of these evenings throughout the summer. Too long for being isolated and on lockdown. 

We are inviting our next door neighbor for dinner tonight. They are good friends and his wife just went to Colorado to visit her son. It's just something simple with burgers and fries. But he won't have to spend the evening alone. 

Now onto today's card. This one I made for a Throwback Tuesday post on the CottageCutz Blog. The throwback twist is using the Goldfish & Bowl die from an older CottageCutz collection and the newer Nested Rectangles Slimline dies.  

For my card layout, I am using the Splitcoaststampers sketch challenge #854. I thought the fish bowl would work well for element 3 of the sketch.
I chose some Stampin'-Up pool party (a soft blue) dotted paper for the card background. It's cut with the 2nd largest Nested Rectangles Slimline die. It measures 3 1/4" x 8 1/4". I cut a white card base the same size as the designer paper and secured with double sided tape.

I cut my Goldfish and bowl and added those to the card center. For element 4 of the sketch I used a couple more Goldfish. Stamped the punny sentiment and scattered a few white sequins to finish off this card. 

Well, that's it for me for this post. So until next time.......God bless. 

dies I used to create card:


I am also entering:
1.  AAA Birthday has a birthday challenge. They are celebrating their 2nd birthday and with prizes. 
2.  A Bit More Time to Craft has an anything goes challenge. 
3.  A Perfect Time to Craft has an anything goes challenge.
4.  Classic Design Challenge has an anything goes.  
5.  Crafts Galore Encore has an anything goes challenge. 


Saturday, May 22, 2021

Happy Birthday from the Circus Animals

Hello Blogger Friends! Thanks for taking the time to stop and visit with The Charmed Life Blog today.

It was a beautiful Saturday here in Pittsburgh. We have been having warm weather all week and we even had to turn our air conditioner on mid week. Sometimes that bothers me to go from having the heat running and then a few days later the air. But for some reason this year it doesn't seem to matter. 

We are having friends over for dinner tomorrow. I am so looking forward to it. We plan on having friends over at least twice a month all summer. It's been too long that we have been shut up in our home and not seeing friends. 

I decided on Lasagna, meat balls and salad for the main course. We will start off with some appetizers.  For that I am preparing a charcuterie board with Calabrese Salame, Prosciutto, olives, grapes and 3 different kinds of cheeses. 

I made the sauce for the lasagna and meatballs today. In fact it's on the stove simmering as I type this post. I like to make it the day before so the flavors have a chance to meld together. I don't usually add meat to the sauce but for this one I added sweet Italian sausage. I thought that would work well for the lasagna. 

Well enough about food, let's move onto my post for today. This card I created for my weekly DT post on the CottageCutz Blog. Today for your viewing pleasure I have a slimline birthday card using the Circus Train Animal dies + the Scalloped Stitched Rectangle Slimline die.
 
I have a lot of nieces and nephews with young ones and I always seem to need a kids birthday card. These animals are perfect for a kids card. So let's get started on some details of how I created my card.

Design Steps:

I started my card this week with the layout. I saw this sketch #854 on Splitcoaststampers and I thought the layout would work well for the dies I am using.
Next, I selected the background designer paper. I wanted something fun and found this bright dotted paper.
I cut it with the largest Scalloped Stitched Rectangle Slimline (3 1/4" x 8 1/4") die. The card base is at 6 1/2" x 8 1/4" and then scored at 3 1/4". I used pacific point cardstock (royal blue) cardstock.
Then, I cut my animal images. The designer paper colors of blue, rose red and yellow would work for the hats and neck scarves the circus animals are wearing. I used different colors of cardstock to cut the animals. You could also cut in white and color with any medium you like i.e. Copic markers, Prismacolors pencils or distress inks. I forgot to take a photo of this step (lol)!

For element 3 of the sketch I used the largest Scalloped Circle die and then cut a portion off the bottom to give it a straight edge. I stamped my sentiment in pacific point ink. It's a long one line sentiment but with the help of my MISTI, I stamped on 2 lines.
I started the assembly of my card. For element 2 of the sketch I cut another piece of pacific point designer paper 1" x 8", I attached the circle with double sided tape and then secured to the designer paper panel.
Then I attached three of the Circus Animals in the circle using dimensional adhesive. The seal is attached in the corner for element 4 of the sketch. Instead of him balancing a ball, I have him holding a balloon. It's cut from the Clown with Balloons die.
To finish off my card, I attached the image panel to the card base with double sided tape. For the 2nd instance of element 4, I cut a spray of stars from the Circus Side Show die and attached to the right corner. I thought the middle looked empty so I added some rose red enamel dots.
Well that's it for me for this post. So until next time......God bless.

Dies I used to create card:


I am also entering:
1.  Allsorts has an anything goes with happy, bright and sunny colors. 
2.  2 Crafty Critter Crazies has an anything goes with a critter. 
3.  Animal Friends has a bear challenge. 
4.  Crafty Animals has an anything goes challenge. 
5.  Sweet Stampers has an animals, critters or birds challenge.
6.  Crafty Catz has an anything goes with optional as cute as you like.  


LinkWithin

Related Posts with Thumbnails