Sunday, November 28, 2021

S'more Fun

Hello Blogger Friends! Thans for taking the time to stop and visit with The Charmed Life Blog this last Sunday in November. 

Hope you all had a great Thanksgiving celebration. Ours was such a wonderful and thankful celebration with family. And, now I am looking forward to Christmas. I got all my Fall decorations put away yesterday. I like to leave them up through Thanksgiving. I started the Christmas decorating and plan to finish up this week. Then I have to get to work on my Christmas cards. 

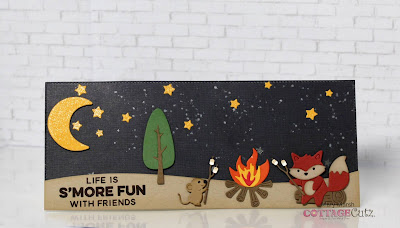
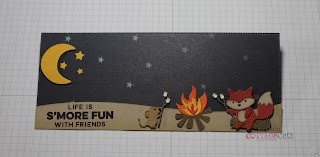
But for today I have a birthday card that I created for a special little girl who turns 4 next month. We had s'mores with them this past summer so I thought this would be a cute reminder for her of the fun we had. Today for your viewing pleasure, I have a design featuring several of the new Campin' Out dies. They are part of the CottageCutz Black Friday release. Let's get started on some details of how I created my card. 

Design Steps:
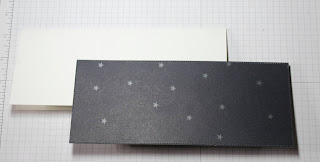
I decided to make a nighttime card in the slimline design. I found some perfect designer paper for the background. It already had the night sky and stars on it. I cut it from the largest Nested Stitched Rectangles Slimline die. The card base is white and measures the same size as the designer paper.

white card base: 3 1/2" x 8 1/2"
designer paper: 3 1/2" x 8 1/2"
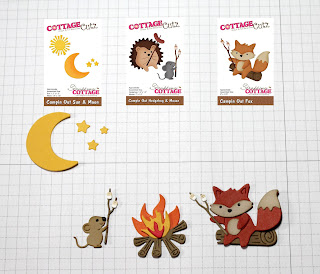
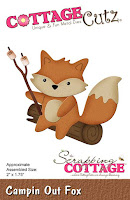
Next, I cut the images. I used the Campin' Out Fox, Campin' Out Hedgehog and Mouse and the Campin' Out Sun & Moon.
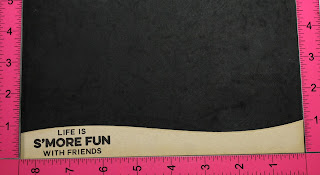
For the next step, I used the Hills Slimline die to cut a slope for the ground. I stamped the sentiment in chocolate chip ink.
Now that all the elements are prepared, I am ready to start card assembly. I attached the slope with double sided tape and the images with dimensional adhesive.
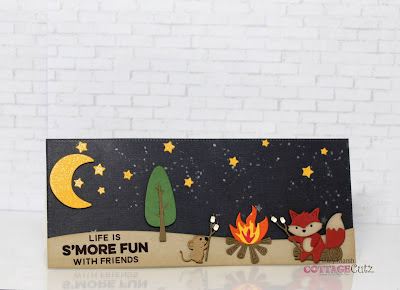
I thought the card looked like it needed something else so I cut a tree from the Campin' Out Trees die. Took some white acrylic paint and splattered it around the card, added a few more yellow stars and some sparkle with clear wink of stella.
And, that's my card for this post. So, until next time.......God bless. 

dies I used to create card:


I am also entering:
1.  A Gem of a Challenge is anything goes. 
2.  Crafter's Castle has an anything goes. 
3.  Creative Fingers has an anything goes. 
4.  Creative Moments has an anything goes challenge. 
5.  Simon Says Stamp has an anything goes challenge. 


Thursday, November 25, 2021

More 2021 Thanksgiving cards

Hello Blogger friends! Happy Thanksgiving Day to you all. 

Things are under control in my kitchen so I thought I would make a quick Blog post. I am expecting 10 people for dinner and also expecting a great family time. I spent all day in the kitchen yesterday prepping for the meal. So today is just a matter of roasting the turkey and baking all the sides. Dessert is pumpkin and apple pies plus a pumpkin roll. 

I wanted to post more of the Thanksgiving cards I made this year. These ones were from the Stampin'-Up Paper Pumpkin Kit - Hello Pumpkin. It's last year's kit but I finished all the cards and even made some favors from it. Forgot to take pictures of the favors.  


So I hope your Day is a blessed one and remember to give thanks for something or someone. So until next time......God bless. 

I am also entering:
1. Crafty Gals Corner has a thanks/thankful challenge.
2. Creative Moments has an anything goes challenge.  
3. Fab 'n' Funky has a checks and/or plaids challenge.
4. Simon Says Stamp has an anything goes challenge. 
5. Lemon Shortbread has an anything goes challenge. 


Saturday, November 20, 2021

Magic of Christmas

Hello Blogger Friends! Thanks for taking the time to stop and visit with The Charmed Life Blog today. 

It's the weekend before Thanksgiving and I have lots to do here. My son came over to help us mount a TV upstairs, and we thought originally he was going to go up in the attic. Well the access to the attic is from the closet in my craft room. 

So I had to take out the storage unit and everything that was on it. Then the plans changed, and he didn't have to go up there. So now I have to get the shelving unit back in the closet and everything put back on it. It is a good time to go through everything and get rid of the stuff that I don't use anymore. I can see it will be an all day project. 

So let's move onto my card for today. This one I created for my weekly DT post on the CottageCutz Blog.  

Design Steps:

I started my card this week with the layout. I liked the sketch #880 on Splitcoaststampers. I thought it would work well for the oval shape of the die.
I looked through my designer paper for a background pattern that might fit and not overwhelm the die scene. I found this "all is calm" collection from Stampin'-Up. It's a subtle snowflake pattern that I only had pieces of, but I had enough to use for the three horizontal layers.
 
Soft Sky Card Base: 4 1/4" x 5 1/2"
All is Calm Designer Paper Layer: 3 7/8" x 3 11/16"

Layer under DSP: 4" x 3 11/16"  
Next, I cut the image from lost lagoon cardstock. Then I used the 2nd largest die from the Oval die set to cut a snowy background from white glitter paper.
I cut the Christmas sentiment using the Merry Christmas w/Shadow die. The shadow is the soft sky (card base) and the Christmas phrase is the lost lagoon shade.
Now that all my card elements are prepared, I am ready to start card assembly. I attached the designer paper layers to the card base using double sided tape. 
I attached the image panel to the white glitter panel with Art glitter glue. Then I attached to the card base with dimensional adhesive.
To finish off my card I attached the Christmas phrase with glue dots and added a few snowflakes for element 4 of the sketch. And, that's it for me for this post. So until next time.......God bless. 
I am also entering:
1.  Creative Fingers has an anything goes challenge. 
2.  Jingle Belles has a Banner Holiday challenge. Inspiration is the blog banner. My designer paper has the snowflakes and the trees.
3.  Aud Sentiments has an anything goes + a sentiment.  
4.  Crafty Creations has an anything goes challenge. 
5.  Paper Shelter has a say something challenge. 


Tuesday, November 16, 2021

Happy Holidays

Hello Blogger friends! Thanks for taking the time to stop and visit with The Charmed Life Blog today. 

We just returned from a weekend trip to San Francisco. It was a quick trip to visit with my son and his family. We haven't seen them since Christmas 2019. They were going to come this summer and then my precious little granddaughter had an unfortunate accident and the trip was canceled. They were so excited to see us and we them. It was a wonderful family time and already we are anticipating their Christmas visit. 

I am now in Thanksgiving mode. We are having 12 people for dinner and since Thanksgiving was canceled last year, I am so looking forward to the celebration.  

I did some shopping today since the media has been saying that turkeys may be hard to get. My store had 3 freezer bins full of them So no shortage here in Pittsburgh. I picked up a few other things I will need but since I went shopping without a list, I don't have everything I will need. 

Now onto my card for today. This one I created for the color challenge #867 on  Splitcoaststampers. Karen was our hostess and she chose mint macaron, petal pink and pool party for her color trio. Optional this week is metallic.
pool party, petal pink, mint macaron

I thought these colors were perfect for a Christmas card. I even had the designer paper with the challenge colors. I don't have petal pink cardstock so I subbed blushing bride.

I went with a fun fold for my card - it's called the split panel fold. The panels are joined together with an acetate window sheet. I didn't see a tutorial on SCS for this fold. But I did make a card using this fold before. You can find the tutorial on this Blog post. If you like watching videos I found this one on YouTube from Wow NOLA Creations

I used the Stampin'-Up set poinsettia petals and coordinating dies for my card. For the scalloped edge I used an old Stampin'-Up punch. Cut the poinsettia in blushing bride cardstock and the leaves are mint macaron. I sponged them to get a deeper shade. For the poinsettia center I used some beaded pearls from Stampin'-Up.

I cut another leaf and stamped my Christmas sentiment to complete my card. To get the pool party color in there I scattered a few enamel dots. They were white and I colored them with a pool party Stampin' blend alcohol marker. 

Well, that's it for me for this post. So until next time........God bless. 

card details:
Stamps: poinsettia petals (Stampin'-Up)
Paper: mint macaron, blushing bride, brushed metallic, window sheet, whimsy & wonder dsp (Stampin'-Up)
Paper Size: A2
Ink: mint macaron (Stampin'-Up), tuxedo black (Memento)
Accessories: poinsettia dies, beaded pearls, white enamel dots, pool party stampin' blend (Stampin'-Up)
Techniques: split panel fold
I am also entering:
1.  Allsorts has a Christmas challenge.
2.  CHNC #268 has an anything goes challenge.
3.  Creative Creases has a die cuts only challenge. 
4.  DragonFly Dreams has a Christmas/Winter challenge.
5.   Alphabet Challenge is "P" for patterned paper.  

Saturday, November 13, 2021

Santa Gnome in Present

Hello Blogger Friends! Thanks for taking the time to stop and visit with The Charmed Life Blog today. 

It's a cold one here in Pittsburgh. We even had snow showers early this morning. With the wind chill it's a 28° "feels like temp", although the actual temp is 36°. 

One of those days when a pot of soup or chili is a good meal. I am actually going to make chili. And, I have corn bead in the freezer so I am good to go. Now let's move onto my card for today.

This one I created for my weekly DT post on the CottageCutz Blog. Today for your viewing pleasure, I have a design featuring the whimsical Santa Gnome in Present die from the Christmas Part 2 collection. We have so many cute gnomes in the collection this year. Here is a card I made using another one of them.


So let's get started with some details on how I created this card.

Design Steps:
I started my card this week with the layout. As I have said so many times before having the sketch in mind helps start as well as simplify the card making process for me. I liked the sketch #869 at Splitcoaststampers. I thought it would work well for this cheeky little gnome.
Then I also used the colors from the Splitcoaststampers color challenge #869. We were to use cherry cobbler, gold and shaded spruce. Perfect colors for the Christmas gnome.
cherry cobbler, gold, shaded spruce

I had the perfect designer paper that had all the challenge colors. It's from the Stampin'-Up "wrapped in plaid" collection. My card is a 5 1/4" square. For the diamond shape, I used the largest Stitched Square (3.5") die and the circle is the 2nd largest (3 1/4") from the Circle set.

cherry cobbler base: 5 1/4" square
gold layer: 5" square
designer paper: 4 7/8" square
Next, I cut the Santa Gnome in the challenge colors. I used Art glitter glue to assemble the image. I like this one because it dries clear.
I stamped my sentiment on an angle in the circle using the shaded spruce ink. I used my MISTI for placement. The stamp set is from the Hero Arts Christmas Messages set. 
Now that my card elements are prepared, I am ready to start card assembly. I used double sided tape to attach the panels. The Gnome is attached with dimensional adhesive. I also changed the Christmas ornament, I decided to cut it from the designer paper to give a bit more contrast against the green present box.
To finish off my card, I attached the panel to the cherry cobbler card base and also scattered a few gold sequins. And, that's it for me for this post. So until next time.......God bless. 


dies I used to create card:


I am also entering:
1.  Alphabet Challenge is "P" for patterned paper.
2ABC Christmas Challenge is "W" for whimsical.
3.  The Male Room Challenge #156 is "gnomes". 
4Christmas Crafts All Year Round -something that starts with U,V, or W.  - Whimsical and White bearded gnome
5.  Merry Little Christmas Challenge is anything goes. 


Saturday, November 6, 2021

Santa Gnome & Silly Reindeer

Hello Blogger Friends! Thanks for taking the time to stop and visit with The Charmed Life Blog this first Saturday in November. 

The holidays are quickly approaching so time to finish up your Thanksgiving cards and move onto Christmas. My Thanksgiving cards are done and I will be putting them in the mail sometime next week.

Today for your viewing pleasure, I a CAS design featuring the whimsical Santa Gnome w/Silly Reindeer and the Merry Christmas w/Snowflakes dies. So let's get started with some details on how I created this card. 

Design Steps:

I started my card this week by cutting the images. The packaging had the perfect Christmas colors so I went with those. 
Then I looked through my designer papers for a paper that had a snowy background scene. I found this one and thought it was just perfect. With the right designer paper I think you can make a more simple design but still have the wow effect. 
I didn't want to cut too much off this paper so I decided to go with a square card. 

Navy Blue card base: 5 3/4" x 5 3/4"
Designer paper Layer: 5 1/2" x 5 1/2"
I cut the Merry Christmas sentiment in navy blue cardstock.
Now that all my card elements are prepared, I am ready to start card assembly. I attached the designer paper to the card base with double sided tape. The images are attached with dimensional adhesive. Lifting them slightly off the background gives your card more depth.
To finish off the card, I added the sentiment using Art glitter glue. This one is my new fave and it dries clear. Well, that's it for me for this post. So until next time.......God bless.

dies I used to create card: 

I am also entering:
1. CHNC #567 has an anything goes Christmas challenge.
2.  Just Us Girls  word week is "Merry" challenge.
3.  The Fairy and the Unicorn has an anything goes challenge. 


LinkWithin

Related Posts with Thumbnails