Sunday, September 26, 2021

Give Thanks

Hello Blogger Friends! Thanks for taking the time to stop and visit with The Charmed Life Blog today.

We are having such a beautiful Fall day here in Pittsburgh. Blue skies and lots of sunshine but a bit on the cool side. I guess Fall is working it's way in gradually. It just jumped so quickly from hot and humid to these cool temps. And, I am not putting my heat on when I just had the air running for most of the summer (LOL)!!! And we had big electric bills to prove it.  

Anyway, let's move onto my card for today. This one I created for the color challenge #860 on Splitcoaststampers. Jeanne was the hostess and she chose pumpkin pie, crushed curry, balmy blue and early espresso for her color combination. Optional was to make a Fall card. 

The watering can tulips, cornucopias and oval dies from CottageCutz were used to create a fall card. The background striped paper in crushed curry is from the Stampin'-Up "follow your art" collection.

I used a pumpkin embossing folder for the center panel. The leaves are sponged with fossilized amber, carved pumpkin and spiced marmalade distress inks. They match the Stampin'-Up shades for this week.

For the watering can, I cut in gray granite (neutral) and added some balmy blue for trim. I sponged the cardstock with the same shade of ink. The sentiment is from the "Autumn Greetings" stamp set from Stampin'-Up. 

And, that's my post for today. So until next time......God bless. 

I am also entering:
1.  Lil Patch of Crafty Friends has an anything goes challenge.
2.  Allsorts has an anything goes with option of nature.
3Alphabet Challenge has a motivational/encouraging sentiment. 
4Cards 4 Galz has an Autumn/Fall leaves challenge.  
5.  Crafty Gals Corner has a Hello Fall challenge.  


Saturday, September 25, 2021

High Flying Snowman

Hello Blogger friends! Thanks for taking the time to stop and visit with The Charmed Life Blog this last Saturday in September. 

The weather has taken a jump to the cooler side these past couple of days. We even needed a blanket to cover at night. But during the day I have been able to shut my air off and open the windows. I love the breeze blowing through my home. It just seems to freshen everything up.

I finished my Fall decorating the other day. Still processing the garden harvest and today there are more tomatoes that I will roast and freeze. We have a bunch of banana peppers still on the vine. They are producing at an incredible rate this year. I may just take some of these to church tomorrow and give them away. We have eaten so many and I have so many in the freezer for winter enjoyment. 

Anyway, let's move to my card for today. This one I created for my weekly DT post on the CottageCutz Blog.  There was a new release of Christmas dies and I am the High Flying Snowman for my card today. 

Design Steps:
I started my card this week by selecting my designer paper. I wanted something with a snowflake theme background. I found this one from the Stampin'-Up joyous noel specialty collection. I also had the matching cardstock base.

Tranquil Tide card base - 5 1/2" x 4 1/2"
Designer Paper - 5 3/8" x 4 1/4"
Then I cut the flying snowman images in colors that coordinated with the designer paper. The plane trim and banner are tranquil tide the color in the designer paper and card base. The plane itself is red because that makes it so Christmas. You can also follow the colored image on the packaging which is always a good guide.
I wanted both clouds and a snow bank on my card for interest and also because the designer paper pattern was a bit busy. I used the Hills Slimline & Clouds Slimline dies. I cut them the full 9 1/2" and that way I could decide what part of the pattern I would use.
Next, I stamped my sentiment on the snowbank in the same ink (tranquil tide) as my card base. The sentiment is part of the Hero Arts Christmas Messages set.  I trimmed the snowbank down to 5 3/8" and also added some white glitter to the top of the bank.
Now that all my card elements are prepared I am ready to start card assembly. I attached the clouds and snowbank with dimensional adhesive. Also, sponged broken china distress ink on the clouds for added interest. I used dimensional adhesive to attach the flying snowman image for more depth. Looks like I forgot to give this little guy his carrot nose.
To finish off my card I attached the image panel to the card base. Scattered some white snowflakes on the clouds and some red glitter dots on the snowbank. I think this new die is just too cute and will make a great card for someone on my list that is out of state.

Well that's it for me for this post. So until next time.......God bless. 

dies I used to create card:


I am also entering:
1.  CHNC Christmas challenge is to use the word JOY. 
2.  Sweet Stampin' has a Christmas in September challenge. 
3.  Gem of a Challenge has an anything goes.  
4.  Crafty Calendar Challenge is anything goes. 
5.  Crafter's Castle has an anything goes. 


Friday, September 24, 2021

Home Sweet Home Christmas

Hello Blogger friends! Thanks for taking the time to stop and visit with The Charmed Life Blog today.

It's such a sunny and warm day here in Pittsburgh. My hubby and I went out for a 3 mile walk this morning and the skies were so blue not a cloud in sight. We are winding down for summer and in fact  the Fall season officially started on September 22. Our gardens are still going strong but should start slowing down in the next couple of weeks. We had a bountiful harvest this year. 

I am starting my Fall decorating today and I wanted to get this Blog post done before that. I decorate for each season and the Fall stuff will stay up until Thanksgiving and then I start Christmas. 

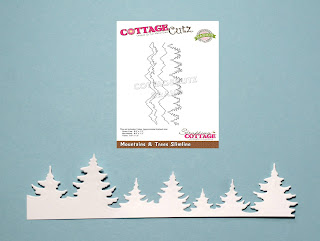
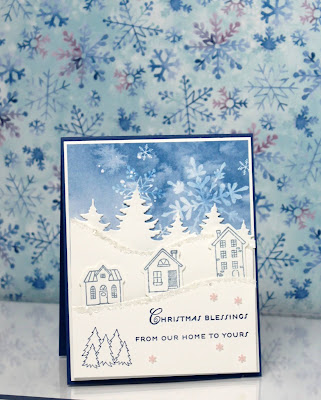
I decided to create a card using one of the new stamp sets from Lil' Bluebird Designs - a Scrapping Cottage Brand.  I was thinking of those of you out there they may not like coloring images. So I thought I would show you a card that required no coloring. I have created a Christmas card using the new Home Sweet Home stamp & die set + the Mountains & Trees Slimline & Hills Slimline dies.

So let's get started on some details of how I created my card.

Design Steps:

I started this card by looking for some designer paper with a darker snowy background which would allow me to keep my houses and trees white. I found this snowflake pattern. So far so good!

Blueberry card base: 4 3/8" x 5 1/2"
White Layer Panel : 4 3/16" x 5 5/16"
Designer Paper: 4 1/4" x 5 1/4"
I stamped my houses in stormy sky distress ink. The color matched nicely with the designer paper. 
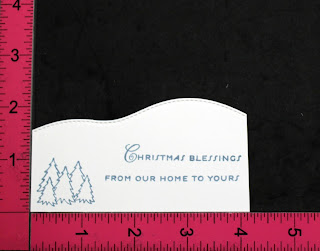
The pine trees and snow banks I cut in white cardstock. The hills die is 9 1/2" so I was able to get 2 snowbanks at 4 1/4" each from the single cut. 

On the bottom snowbank I stamped my Christmas sentiments. It's 2 different stamps from Papertrey Ink "holiday home" collection. I used my MISTI for placement and just in case it needed a 2nd inking- which it did. 

Card elements are ready and now I can start the assembly. I decided to add some chunky glitter to the snowbanks for added interest. I took this photo and I thought the bottom snowbank wasn't quite right and when I tried to lift it, the cardstock bent. So I redid the bottom panel and used less glitter. I like it so much better. Just forgot to take another photo of my re-do.
 I attached the snowbanks with dimensional adhesive and then the house images with glue dots. To finish off my card, I attached the image panel to the card base and scattered some iridescent snowflakes. And, that's it for this Blog post. So until next time........God bless. 

Stamps & dies I used to create card:


I am also entering:
1.  Jingle Bells has a dashing through the snow challenge. 
2.  The Holly and Ivy Christmas challenge is anything goes. 
3.  ABC Christmas Challenge is "T" for two. I have 2 snowbanks + 2 different sentiment stamps.
4.  CHNC has an anything goes Christmas.


Saturday, September 11, 2021

Celebrate in the City

Hello Blogger friends! Thanks for taking the time to stop and visit with The Charmed Life Blog today. 

It's a solemn day of remembrance for the terrorist attacks that took place 20 years ago in the US.  There were memorial services held in NY, Washington DC at the Pentagon and also in Shanksville Pa where Flight 93 went down. 

I remember 20 years ago watching in shock at what was going on in NY as the buildings collapsed and the terror on the streets. Then hearing a plane had hit the Pentagon and then Flight 93 going down in Shanksville. It's something that I would never want to see repeated here. 

Now onto my card for today. This one I created for my weekly DT post on the CottageCutz Blog. Today for your viewing pleasure I have created a slimline card featuring the new City Skyline Slimline + Pinking Shear Edge Slimline dies. For my sentiment, I chose the new Celebrate w/Shadow die.

I needed a birthday card for my nephew. I like to create his card with patriotic colors of red, white and blue. He is a vet and served 4 tours of duty in Iraq. And, I am proud of him and like to honor his service. So let's get started with some details on how I created my card.

Design Steps:

I wanted a fireworks background for my city skyline scene but I didn't have any of that type paper in my stash. So I looked on Pinterest and found some Fireworks paper that you could download for free. Whoo-hoo it was just what I was looking for! I printed it on 8 1/2" x 11" cardstock. So I will have some left to use on another project.

I decided I wanted the pinking sheer edge to frame my city scene. So I used the largest die 3 1/2" x 8 1/2" and cut in red cardstock. Then I took the next size die and cut again to get my frame. I like how it adds to the festive appeal of my card. The card base is also red.

Red card base: 3 1/2" x 8 1/2"
Designer Paper: 3 1/4" x 8 3/8"
Pinking Shear Edge: 3 1/2" x 8 1/2"
Next, I cut the city skyline in a royal blue cardstock. And the Celebrate phrase in red and the shadow in white for contrast.
I decided to stamp some sentiments directly on the designer paper. I used the "celebrate" & "birthday wishes" words from the Lil' Bluebird Designs Happy Birthday set. And the word "party" from the Kitty Love set.

Now that all my card elements are prepared, I am ready to start card assembly. I attached the designer paper to the card base with double sided tape. The city skyline is also attached with double sided tape.
For the pinking shear frame, I used Tombow Mono liquid glue.
I added my celebrate phrase and scattered some sequins to the center of the fireworks.
And that's my card for this post. So until next time.......God bless

Stamps and Dies I used to create card:


I am also entering:
1.  Crafty Catz has a masculine birthday challenge. 
2Aud Sentiments has a birthday sentiments challenge. 
3.  Seize the Birthday has an anything goes birthday challenge. 
4Addicted to Stamps and More has a birthday challenge. 
5.  Mod Squad Challenge Blog has a slimline card challenge. 


Saturday, September 4, 2021

Pet Sympathy Card

Hello Blogger Friends! Thanks for taking the time to stop and visit with The Charmed Life Blog this first Saturday in September. 

It's the Labor Day weekend holiday so hope you have some fun and celebrations with friends or family planned.  I am off to a baby shower for a good friend's daughter in a bit. So I wanted to get this Blog post finished before I leave. 

I made this card for my weekly DT post on the CottageCutz Blog. And, here are the details on how I created it. 

Design Steps:
Having a layout in mind at the card start is always a big boost for me. That way I can just choose the card colors and designer paper, and I am good to go. I liked this week's Sketch #869 from Splitcoaststampers. I thought it was a great layout to use several of the stamps.
I found this dog themed paper in my collection. I liked all the "dog" words and the distressed appeal of the paper. Even with the diamond shape you can still read though a lot of the words.

Maraschino red card base: 4 3/4" square
Designer Paper Layer: 4 1/2" square
Diamond Layer (Element 2) - 2nd largest Stitched Square die
Circle Layer: 3rd largest Circle Set
Next, I stamped and colored the images from the set that I was using for my card. I used both Copic markers and Prismacolor pencils for my color medium.


I used a stamp that had the words "sending big" and masked off the words I didn't need. Used my MISTI just in case a double inking was required and it did need it.
Now I am ready to start card assembly. I attached the card layers with double sided tape.
To finish off my card front, I attached the images with dimensional adhesive. The "hugs" phrase is attached with glue dots.
To complete the inside, I stamped a pet sympathy sentiment. I used the paw print from this stamp set just for a little added interest.
Well, that's it for me for this post. So until next next time......God bless. 

Stamps & Dies I used to create card:


I am also entering:
1.  Crafter's Castle has an an6ything goes challenge.
2.  Creative Fingers has an anything goes challenge. 
3.  Polkadoodles has an anything goes challenge. 
4.  Aud Sentiments has a thinking of you/get well/sympathy sentiments
5.  Cardz 4 Gals has a National Dog Day challenge. I think this pet sympathy card fits. 


LinkWithin

Related Posts with Thumbnails