Friday, November 27, 2020

Love You Tons

Hello Blogger Friends! Thanks for taking the time to stop and visit with The Charmed Life Blog this  Black Friday in November. 

I didn't go out to do any shopping today. Didn't have anything in particular that I was looking for and nobody gave me any Christmas ideas as yet. I usually have to keep nudging for those. For one of my daughters-in-law I am already finished shopping. She like various body treatments and make-up. One of her faves is Josie Maran and QVC always has such great buys on her body creams and body butters. So I picked up stuff during the Christmas in July specials. 

We had a delicious Thanksgiving dinner yesterday. Everything turned out perfect. Something that was a bit different this year was sharing different side dishes with my neighbors on either side of me.  For one of them, I shared mashed potatoes, homemade cranberry sauce and pumpkin pie. To my other neighbor I shared mashed potatoes and stuffing.

Then they shared with me, glazed carrots, green beans, homemade rolls, apple pie and pumpkin roll. I loved doing that and am hoping that we can do it again for another meal. It helped make the day special since none of us had any additional family here celebrating with us. 

Now onto my card for today. It might seem odd posting a Valentine's Day card when Christmas hasn't arrived yet but I have good reason. This card is part of a group post on the CottageCutz Blog. There is a new release of Safari dies and they are on sale at some great prices. 

So using the Safari Elephant die, I decided to create a card for Valentine's Day. My background paper is from the Stampin'-Up "From My Heart" collection. I paired it with flirty flamingo and real red cardstocks, colors that coordinate with the designer paper.  

The layout is from the latest MojoMonday #550 sketch.
I decided to go with a punny sentiment and used a stamp from the Lawn Fawn "love you tons' set. I stamped in basic gray ink. The Valentine Phrase is from the CottageCutz "Valentine Phrase & More" die. 
 
Well, that's it for me for this post so until next time.......God bless. 

dies I used to create card:


I am also entering:
1.  Crafty Creations has an anything goes challenge. 
2.  2 Crafty Critter Crazies has an anything goes challenge. 
3.  A Bit More Time to Craft has an anything goes challenge. 
4Crafts Galore Encore challenge is anything goes. 
5.  Crafty Animals has an anything goes challenge. 


Thursday, November 26, 2020

Thanksgiving Owls

Hello Blogger Friends! Thanks for taking the time to stop and visit on this Thanksgiving Day 2020. 

It's a bit of a different celebration for most of us this year with the pandemic. But it's still a day that was set aside by President Lincoln as a national holiday and celebrated on the 4th Thursday of November. Hope your celebration will be filled with thanks.

My card today is one that I made using the CottageCutz Pilgrim & Indian Owls die. I sent this out to a family that hold a special place in my heart. They have 2 little boys who loved the owls dressed as a Pilgrim and Indian.

The background paper is from the Stampin'-Up "plaid tidings collection. Used pumpkin pie ribbon as an accent.

The oval image panel is embossed with the pumpkin harvest embossing folderI thought the plaid paper had the perfect colors for a Fall themed Holiday card. I stamped my Thanksgiving greeting on the inside of my card.

Well, that's it for me for today. Time to get back in my kitchen. So until next time......God Bless and Happy Thanksgiving.

card details: 


Paper: rich razzleberry, pumpkin pie, very vanilla, plaid tidings dsp (Stampin'-Up)
Paper Size: 4 1/2" x 5 3/4"
Ink: baked brown sugar
Accessories: pilgrim & indian owls, oval dies (CottageCutz)
I am also entering: 
2.  Fab 'n' Funky has a Thanksgiving challenge. 
3 Simon Says Stamp has an anything goes challenge. 
4.  Paper Funday has an anything goes. Optional Thanks or Thankful.
5.  Lemon Shortbread has an anything goes challenge. 

Monday, November 23, 2020

Gingerbread Baker

Hello Blogger Friends! Thanks for taking the time to stop and visit with The Charmed Life Blog. 

Just a few days until Thanksgiving 2020. It's going to be a bit of a different one and scaled back for most people that I know, including me. But, it's still Thanksgiving and a time to give thanks for all the blessings that we do have. 

I am going shopping tomorrow for the additional items I need for my dinner. I bought my turkey the other day and it's thawing in my refrigerator now. I love preparing this meal and don't intend to cut back on anything even though it's just my hubby and I. 

Now onto my card for today. this one I created for the color challenge #818 on Splitcoaststampers. Jeanne was the hostess and she chose real red, cinnamon cider and purple posy for her color trio. Optional was to create something gingerbread. 

For the card layout I used an older sketch SC827 from Splitcoaststampers. The option was offered to make a pocket card and I decided to do that. This photo shows the pocket and the inside tag.

My Gingerbread Baker is a new die from CottageCutz. I cut her in baked brown sugar (neutral) and then used the challenge colors for her hat, scarf, rolling pin and spoon.

To complete my card I added a few real red glitter enamel dots. This photo shows the tag inside the pocket. 


Well, that's it for me for this post . So until next time.......God bless. 

card details:
Paper: real red, purple posy, cinnamon cider, baked brown sugar, toile tidings dsp (Stampin'-Up)
Paper Size: A2
Accessories: gingerbread baker, merry christmas love dies (CottageCutz), glitter enamel dots, real red curly ribbon (Stampin'-Up)
Techniques: card pocket
Dies I used to create card:

I am also entering:
1.   Dream Valley has a lots of layers challenge. 
2.  Incy Wincy Designs has a tag or pocket challenge. 
3Stamping Pals has a Christmas challenge. 
4PolkaDoodles has an anything goes. 
5Dragonfly Dreams has a Christmas/Winter challenge. 


Saturday, November 21, 2020

Night in Bethlehem Easel Card

Hello Blogger Friends! Thanks for taking the time to stop and visit with The Charmed Life Blog today. It's the Saturday before Thanksgiving- one of my favorite holidays. No matter what is going on in this country or the world, we can still take time to stop and give thanks for the blessings we have.  

Do you believe that I just got around to mailing my Thanksgiving cards today. I have had them made for weeks so I am not sure why I procrastinated and didn't send them out sooner. Most of them are going to family locally but I did have 3 that went out of state. Hopefully they will arrive by Wednesday. 

Anyway, let's move onto my card for today. This one I created for my weekly DT post on the CottageCutz blog. I used the new Night in Bethlehem die to create a circular Easel card. 

Design Steps:
I followed a video tutorial from YouTube. Here is the link to the tutorial.  Now to create the card base, I used the largest Scallop Circle die. I laid it just slightly over the edge of the cardstock. You don't want the fold to cut. This gives you the card "hinge".
Then I took the same die and cut another scalloped circle. This will cover the flat part of the cardstock and it's where I will attach my images.
Next, you fold the top half of the card base making sure to line up the scallops. I added double sided tape to just the lower part of the fold and attached the 2nd scallop circle that I cut.
For my background for the Bethlehem images, I had this watercolor galaxy paper. Using the largest Circle die to cut the layer for the card front. 
The images are cut from blueberry cardstock and adhered with dimensional adhesive to the designer paper. 
Attached the image panel to the card base with double sided tape. I decided to change the star color and cut it from a white glitter cardstock. I just adhered it over the blue star. I cut another circle from a kraft cardstock and then used just a section for the ground. 
For the card inside, I cut another piece of the galaxy designer paper. Stamped my sentiment in blueberry ink and secured to the designer paper with dimensional adhesive. This will serve as the card stop when the easel is opened.
That's my card for this post. This was my first attempt at a circular easel card and I can say it wasn't difficult to complete. And, I think it makes a nice presentation for the Bethlehem images. So until next time.....God bless. 


dies I used to create card:


I am also entering:
1.  CHNC #517 is\a anything goes Christmas. Optional something with letter R.
2Crafty Catz has an anything goes with optional Christmas. 
3.  C.R.A.F.T.  has a Christmas challenge #577. 
4.  Craft Rocket Challenge is Christmas/Winter.
5.  Crimbo Crackers has an anything goes challenge.
6.  ABC Christmas Challenge has a "X" for xtra special. My circular easel card and the Bethlehem scene are extra special.
7.  Simon Says Stamp Wednesday challenge is Christmas. 


Thursday, November 19, 2020

Give Thanks

Hello Blogger Friends! Thanks for taking the time to stop and visit with The Charmed Life Blog today.

Well, it's one week until Thanksgiving. Our governor is restricting gatherings because of a resurgence of the China virus. My son and his family have cancelled out on us. My hubby's family have decided not to come either. My Mother-in-Law is 90 years old and doesn't feel safe going out.  

Looks like it will just be hubby and myself. But, we both have decided that our celebration will go on. Even amidst a pandemic we can still give thanks for blessings. 

Now onto my card for today. This one I created for the color challenge #814 on Splitcoaststampers. LeAnn was the hostess and she chose bumblebee, pretty peacock, and shaded spruce for her color trio. Optional was to use a die or punch.

I decided to keep it simple and let the background paper be the star of this card. I have had this designer paper from the Stampin'-Up "come to gather" collection for a couple of years and have wanted to use it for a Thanksgiving card. And, then LeAnn chose the colors on the paper. Whoo-hoo!

I die cut a stitched oval die and added some stalks of wheat cut from bumblebee cardstock. The wheat stalks are from the CottageCutz die with the same name. It's a retired die and out of stock. 
Stamped my sentiment in shaded spruce ink. This stamp is from the September 2020 Paper Pumpkin kit. To complete the card, I scattered a few bumblebee enamel dots.

Well that's it for me for this post. So until next time.......God bless. 

card details:
Stamps: Hello Pumpkin (Stampin'-Up PP Kit Sept 2020)
Paper: pretty peacock, whisper white, bumblebee, come to gather dsp (Stampin'-Up)
Paper Size: A2
Ink: shaded spruce
Accessories: stitched oval, wheat stalks dies (CottageCutz), stitched rectangle die (MFT), in-color enamel dots (Stampin'-Up)
I am also entering:

1.  Crafty Gals Corner has a Thankful challenge. 
2Fab 'n' Funky has a hand stamped or die cut sentiment challenge. 
3.  Mod Squad has a Thanksgiving challenge.
4.  Double Trouble has a tic-tac-toe board. I used pumpkin, leaf and die. I also have a sentiment
5.  A Bit More Time to Craft has an anything goes challenge. 


Saturday, November 14, 2020

Pocket Fold Christmas card


Hello Blogger Friends. Thanks for taking the time to stop and visit with The Charmed Life Blog this Saturday in November. 

Can't believe we have reached the mid-point in November already. It's only 2 weeks until Thanksgiving. It's one of my favorite holidays although this year our celebration will be a bit smaller than in previous years. My Mother-in-law who is 90 years old will not be coming. And, since she lives with my sister-in-law she won't be coming either. I completely understand that decision. We have to protect the elderly during this pandemic. 

Now let's move onto to my card for today. This one I created for my weekly DT post on the CottageCutz Blog. I made a pocket card and used the new Santa & Reindeer Truck die. So let's get started with some details on how I created this card. 

Designs Steps:
I started my card this week with the Splitcoaststampers sketch #827. I noticed the option of doing a pocket card and I thought this die would be cute on a tag to fit in the pocket. Here is a link to a YouTube video for step by step instructions. 

I cut my shaded spruce (green) cardstock to 4 1/4" x 11". I scored at 5 1/2" and then again on one side at 1 1/4". Then fold at the score lines with a bone folder for a nice burnished edge. I used a corner rounder and rounded the flap and the top portion of my card.
Next, I added Scor-tape or any strong adhesive to the outer edges of the top portion of the card. That forms the pocket. I decorated the front panel with a plaid designer paper and layered with a brushed gold cardstock. Attached with double sided tape.

Gold panel: 4 1/8" x 4 1/16"
Designer Paper Panel: 4" x 3 15/16"
I wanted to use ribbon but not make a bow like they did in the tutorial. I attached a 3/8" cherry ribbon and secured it underneath the flap. Then added more Scor-tape to the top of the flap to seal it.


For element 4 of the sketch, I used the Santa's Express Tag die from the Christmas Part 1 release. I cut it once in white cardstock and then again in cherry cardstock. I did a die inlay technique and added the cherry letters to make the white tag pop. The card pocket is finished.
Now I am ready to start the tag that will be placed on the inside of my card. I cut the images using the cardstocks cherry cobbler & shaded spruce to match the card front designer paper. I cut a tag using the mail tag set using some snowflake designer paper. This piece had the background colors I was looking for.

Looks like this die is out of stock but what you could do is cut a piece of cardstock 3 1/4" x 5" for the image. That's what the tutorial shows to do. I wanted mine to be a tree decoration, and the friend I am sending this too likes these tags for her Christmas tree. 

I resized this tag to make it 5 1/4". Here is some info on how I did that. I cut a piece of cardstock to 5 1/4". Taped it on the cutting plate of my Big Shot.
Ran it through leaving about 3/4" uncut.
Then I moved the die to the end of the cardstock and I made sure to line up the edges of the die with the already cut edges. I turned it around so the uncut edge would go through the Big Shot on this pass. Sorry I forgot to take a photo of this part of the process. But here is a photo of the finished tag with the die to show the difference in length.
This is what the card looks like when it is together. I originally had just cherry cobbler ribbon  on the tag and then changed it to the cherry ribbon with the gold cord tied in a bow. I like it better this way. 


Well, that's it for me for this post. So until next time......God bless.

dies I used to create card:

I am also entering:
152 Christmas Card Throwdown has a color challenge of red & green.
2.  CHNC Christmas challenge is anything goes.  
3.  The Fairy and the Unicorn has an anything fantasy goes challenge.  
4 Craft Rocket has a Christmas/Winter challenge. 
5.  ABC Christmas Challenge - X for xtra special. My pocket card is an xtra special gift.  
6.  The Holly and Ivy Christmas challenge is anything goes.  


Monday, November 9, 2020

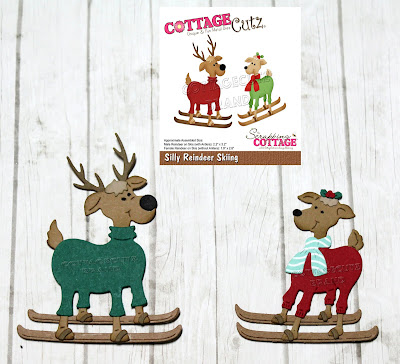
Silly Reindeer Skiing

Hello Blogger Friends! Thanks for taking the time to stop and visit with The Charmed Life Blog today.

We have had some unseasonably warm temperatures the past several days. It's been in the 70° range and for November in Pittsburgh that is a bit unusual.  But, I am not complaining at all. I had the windows open yesterday to enjoy the warmth. On Saturday we drove to WVA to a state park and did some hiking. That was a great day to be outside in the sunshine. 

Today, I had to get some dental work done and right now I am just relaxing. Once the novocain wore off I had a slight headache and some pain in my mouth. I took a couple of ibuprofen and turned on the Hallmark channel to watch Christmas movies. I watched two of them and then decided I should get my blog post done. 

So this card I created for my weekly DT post on the CottageCutz Blog. I am featuring the new Silly Reindeer Skiing die. This die is too cute, and I thought it would be perfect for a family member who likes to ski. So let's get started with some details of how I created my card. 

I knew I wanted to make a snowy scene with the reindeer, so, I looked for some background designer paper. I found this paper from the Stampin'-Up "Christmas around the World" collection. I paired it with a white layer panel and then a red card base. I made this slightly larger than the A2 size card.

Red Card Base: 4 1/2" x 5 3/4"
White Layering Panel: 4 1/4" x 5 1/2"
designer Paper Layer: 4 1/8" x 5 3/8"

Next, I cut the reindeer in colors to match the designer paper. I used Stampin'-Up shaded spruce & real red cardstock because these are Christmas reindeer after all!
I cut a couple of snow slopes for the reindeer to ski down. I added some chunky white glitter to put some sparkle on the slopes.  I attached these to the designer paper with double sided foam adhesive to lift the slopes off the background.
Now the reindeer images are ready to be attached. I also used the double sided foam adhesive to attach. After I attached the snow slopes I realized I forgot to stamp my sentiment. Fortunately, The dimensional adhesive was used on the top of the slope and the bottom part was flat. I used my MISTI to stamp the sentiment in red ink and it only required one inking for a good impression.
To finish off my card I attached the image panel to the white layer with double sided tape. Then it was attached to the red card base. I used a few red glitter enamel dots for some added interest.
And that's my card for this post. So until next time........God bless.

die I used to create card


I am also entering:
1.  2 Crafty Critter Crazies has an anything goes with a critter. 
2.  Christmas 24 has a Christmas landscape challenge. 
3.  Merry Little Christmas has an anything goes challenge. 
4.  Papercraft Business Challenge is Christmas. 
5.  Stamping Pals has a Christmas challenge. 


LinkWithin

Related Posts with Thumbnails