
Hello Blogger Friends! Thanks for taking the time to stop and visit with The Charmed Life Blog today.
We have had some unseasonably warm temperatures the past several days. It's been in the 70° range and for November in Pittsburgh that is a bit unusual. But, I am not complaining at all. I had the windows open yesterday to enjoy the warmth. On Saturday we drove to WVA to a state park and did some hiking. That was a great day to be outside in the sunshine.
Today, I had to get some dental work done and right now I am just relaxing. Once the novocain wore off I had a slight headache and some pain in my mouth. I took a couple of ibuprofen and turned on the Hallmark channel to watch Christmas movies. I watched two of them and then decided I should get my blog post done.
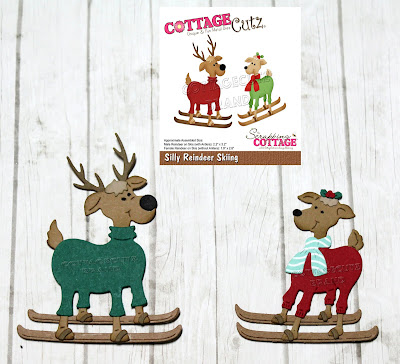
So this card I created for my weekly DT post on the CottageCutz Blog. I am featuring the new Silly Reindeer Skiing die. This die is too cute, and I thought it would be perfect for a family member who likes to ski. So let's get started with some details of how I created my card.
Red Card Base: 4 1/2" x 5 3/4"
White Layering Panel: 4 1/4" x 5 1/2"
designer Paper Layer: 4 1/8" x 5 3/8"

Next, I cut the reindeer in colors to match the designer paper. I used Stampin'-Up shaded spruce & real red cardstock because these are Christmas reindeer after all!
 I cut a couple of snow slopes for the reindeer to ski down. I added some chunky white glitter to put some sparkle on the slopes. I attached these to the designer paper with double sided foam adhesive to lift the slopes off the background.


Now the reindeer images are ready to be attached. I also used the double sided foam adhesive to attach. After I attached the snow slopes I realized I forgot to stamp my sentiment. Fortunately, The dimensional adhesive was used on the top of the slope and the bottom part was flat. I used my MISTI to stamp the sentiment in red ink and it only required one inking for a good impression.


die I used to create card

I am also entering:
1. 2 Crafty Critter Crazies has an anything goes with a critter.
2. Christmas 24 has a Christmas landscape challenge.
3. Merry Little Christmas has an anything goes challenge.
4. Papercraft Business Challenge is Christmas.
5. Stamping Pals has a Christmas challenge.


Such a sweet scene you created. love the design. Thanks for joining Christmas 24 challenge. Anesha
ReplyDeleteI love these reindeer!!!
ReplyDeletec'est trop chou Mary, ils sont si fun, merci de jouer avec nous chez Christmas 24, biz
ReplyDeleteFun! Love those sweater clad deer! Thanks for playing along at Christmas 24!
ReplyDeleteThanks for joining us this time at Christmas 24 - your card is beautiful - Jacqueline DT x
ReplyDeleteSuch an adorable card! Hope you feel better soon!
ReplyDeleteWe are so happy you could join us & we hope to see you again in the next Papercraft Business Challenge!.
Anna – Design Team member at Papercraft Business
Visit my blog - Crafty Anna Studio.
You can also find me on Instagram - CraftyAnna Studio
Thank you!
Such a fun card - this one made me laugh! Love those skiing deer! Sorry to be so late commenting. Thank you so much for playing along with our Christmas Landscapes theme at Christmas 24 Challenge. Deborah, DT.
ReplyDelete