
Hello Blogger Friends! Thanks for taking the time to stop and visit with The Charmed Life Blog today.
The month of March is winding down. It came in like a lamb but going out like a lion. Just the opposite of what's supposed to happen. But our winter season here in Pittsburgh was mild so maybe our Spring is going to be a different one.
The Spring flowers are in bloom and the trees are budding. We have lots of Robins flying around our yard. We usually get a nest underneath our deck. Last year Momma Robin had trouble getting it to stay put as she was building.
So, hubby came to the rescue and her nest was completed. I just forget what he did to help. And when he was out in the yard working, she didn't fly out of the nest in fear but would stay put. Now when I came out, she did fly away. I guess she somehow knew that he was a helper to her.
Now onto my card for today. This one I made for my son's birthday. I liked how this funfold turned out and he did as well.

Then I cut my card base and layers.
Turquoise card Base: 4 1/4" x 5 1/2"
Red Layering Panel: 41/8" x 5 3/8"
White Image Panel: 4" x 5 1/4"
Turquoise card Base: 4 1/4" x 5 1/2"
Red Layering Panel: 41/8" x 5 3/8"
White Image Panel: 4" x 5 1/4"


I started with decorating the four inside panels. This is a die from Divinity Designs- the Twist & Pop with Layers die. If you don't have this die here is a link to a YouTube video that gives step by step.
I used the guitar image from the Fifties Phrases #2, the Jukebox die and the "you rock" phrase from the Fifties Phrases #1 die. I layered the images on white panels and then attached to a black rectangle panel. This will get attached to the pop-up mechanism.
White Image Panels: 1 3/4" x 2 3/4"
Black rectangle panel: 8" x 3"
This is the pop our mechanism that's part of the die. The die embosses the "x" pattern and you just fold it. Then you pinch this panel in, so it forms a sort of arrow shape.
 Then to attach this to the inside of the card you use a strong adhesive (I used Scor tape) and attach to the top and bottom of the triangle areas only. Then lay it inside the card at the top of the card and close it. The photo below shows the mechanism open without the image panels attached.
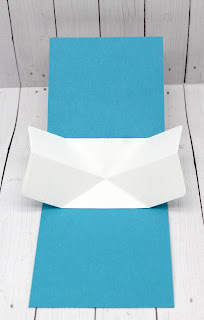
White Image Panels: 1 3/4" x 2 3/4"
Black rectangle panel: 8" x 3"

This is the pop our mechanism that's part of the die. The die embosses the "x" pattern and you just fold it.


Now I am ready to attach my image panels to the mechanism. You use a strong adhesive- again I used Scor-tape on the bottom right and top left part of the mechanism only. Then the image panel is attached to the mechanism, and you fold and close it.
 This is what it looks like when it's opened. To finish off my card I added another sentiment and layered in red and black cardstock.

Well that's it for me for this post. So until next time.......God bless.


Here is a short video that shows the card open & close.
Well that's it for me for this post. So until next time.......God bless.
I am also entering:
1. Cutie Pie Challenge is something with a "B".
2. Creative Creases #53 has an anything goes with a fun fold.
3. Creative Finger Challenge #251 is anything goes.
4. Cut It Up #274 is add embellishments and a die cut.
5. Simon Says Stamp has an anything goes challenge.


Mary, that is such an interesting die and your creation rocks! Thank you for playing at Creative Creases.
ReplyDeleteKaren, DT
Hi, Mary! I'm a bit late getting here, however now I can tell you that not only do I absolutely love this card, but now I can say that you are a winner over at Creative Creases! This card is just too cool and retro to not get a shout-out. Love the fun fold, which I need to do again soon. Perfectly done! Thank you for playing with Creative Creases Challenge. I hope you can join us again soon.
ReplyDeleteDebbie DT
Secrets To Stamping
Such a fun card and great embellishments. Thank you for joining our Cut it Up Add Embellishments challenge.
ReplyDeleteHugs,
Larelyn (CIU owner)
Wow! I saw this card over at Creative Creases and wanted to get a look at the inside! So many fun details, and I love the twist and pop fold! Congratulations on being a winner at CC this time!
ReplyDelete