Hello Blogger Friends! Thanks for taking the time to stop and visit with The Charmed Life Blog.
It's July 4th weekend so hope you have some fun plans to relax and enjoy this Independence Day celebration. We will be with family having a cookout. And tonight, we are going to watch our community fireworks display. My hubby loves to watch fireworks.
We just returned home from a beach vacation in the Isle of Palms South Carolina. It was a great family time - rest, relaxation, good food, beach, sand and sun. I just loved it! We had great weather and no rain. The condo we rented was beach front so that was good as well.
Now onto my card for today. This one I created for my weekly DT post on the CottageCutz Blog. Today for your viewing pleasure I am featuring the new Strawberries w/Mouse die and the Berry Phrases die, and I created a fun fold birthday card. So, let's get started with some details of how I created my card.
Design Steps:
I found a cute fun fold idea on Pinterest and decided to use it for my card today. Here is a link if you would like to watch a video. I had this strawberry paper in my stash and thought it would work well for a strawberry themed birthday card. After the card was done, I wasn't sure about the paper with the card front. My hubby wasn't real wild about it. Here are the card details. All paper is Stampin' Up.
Poppy Parade Card Base: 4 1/4" x 5 1/2"
Fun Fold Flap: 3" x 3 3/4"
Berry Delightful Designer Paper: 1 1/2" x 4 1/8"
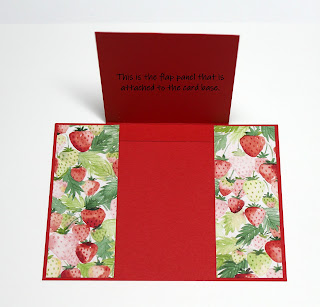
I took the 3" x 3 3/4" piece of cardstock and added glue to the scored part. This piece will create the flap. I glued it to the red card base. Then I added the 2 sections of designer paper using double sided tape.
I used another piece of designer paper cut at 2 7/8" x 4 1/8" for the front of the flap. This pattern is from the "see a silhouette" collection.
I set the card base aside to start cutting my images.I cut the mouse image and berries from cardstock that matches the designer paper used. The berry phrase was cut in pacific point, poppy parade and garden green cardstocks. I attached the phrases with Art Glitter glue. I like this one because it dries clear.
This panel was attached to the card front flap. I attached the image panel to a white card base measuring 4 3/8" x 5 5/8".
I also decided to finish off the card inside. I cut a piece of white cardstock measuring 2 7/8" x 4". I stamped my birthday sentiment and added a few additional strawberries.
Well, that's it for me for this post. So until next time......God bless. Happy 4th 0f July!!!
I am also entering:
1. Alphabet Challenge is "G" for giggle (Something humorous) I thought this little mouse was funny.
2. Gem of a Challenge has an anything goes.
3. Krafty Chicks has an anything goes challenge.
4. Crafty Gals has an anything goes challenge.
5. Simon Says Stamp has an anything goes challenge.


So fun and that mouse gave me a smile too! Thanks for sharing with us at the Alphabet Challenge and at Krafty Chicks!
ReplyDeleteLove it - that little mouse definitely made me smile! Thanks for joining us at the Alphabet Challenge. Deborah DT
ReplyDeleteWhat a sweet card. Your background and pattern paper work well together. Thanks for joining the challenge at Crafty Gals Corner.
ReplyDelete