Monday, June 28, 2021

May Good Things Grow

Hello Blogger Friends Thanks for taking the time to stop and visit with The Charmed Life Blog today. Hope you all had a great weekend.  

We just did our usual things - morning 3 mile walk and then hubby was in his gardens all day. Saturday is usually my cleaning day so I did that. Then on Sunday we went to church. It was a great service. We had an evangelist who had just come back from Africa preaching. 

Then on Sunday night we had our prayer meeting here in our home. There are 6 couples and a couple of singles who join us every other week. We are praying for America and for issues in our local community.  If you would like us to pray for you just send me an email. 

Now onto my card for today. This one I created for the color challenge #844 on Splitcoaststampers. LeAnn was our hostess and she chose so saffron, pool party and mint macaron for her color trio. Option was to use dots. I did use one faceted enamel dot in the center of my flower.

For this card I used the contents of the March 2020 Paper Pumpkin kit - No Matter the Weather- from Stampin'-Up. The background was in the kit as were the so saffron rain boots. These kits are great because they give you all that you need to create a card including the adhesive. If you would like to order a kit or any other Stampin'-Up merchandise, I have a friend who is just starting out as a demonstrator and could use some customers. Here is a link to her Stampin'-Up site. 

I cut some flowers from the Spring Teacup Bouquet die by CottageCutz. I used so saffron cardstock then sponged with so saffron and fossilized amber ink to get a deeper color shade. The leaves are cut in mint macaron and then sponged with the same ink to get a deeper color.

The sentiment is from another Paper Pumpkin kit  - "may good things grow". I stamped in basic gray ink and my card is finished. That's it for me for this post. So until next time.......God bless. 

card details:
Stamps: may good things grow (Paper Pumpkin Kit)
Paper: whisper white, basic gray, so saffron, mint macaron (Stampin'-Up)
Paper Size: A2
Ink: so saffron, mint macaron (Stampin'Up), fossilized amber distress (Ranger)
Accessories: no matter the weather paper pumpkin kit, faceted dots (Stampin'-Up), spring teacup bouquet die (CottageCutz)

I am also entering:
1.  Sweet Stampin' has a something beginning with "B" challenge. I have boots & blooms. 
2.  Crafty Catz has an anything goes w/optional of summer. 
3.  Daring Cardmakers has an into the garden challenge. 
4.  A Bit More Time to Craft has an anything goes challenge.
5Crafts Galore Encore has an anything goes challenge. 

Saturday, June 26, 2021

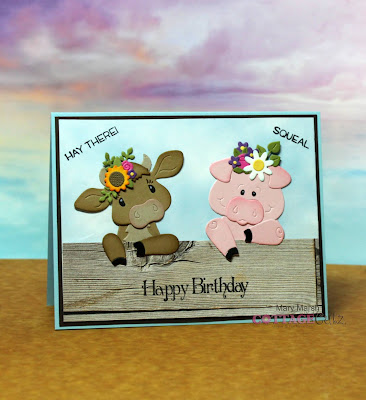
Hay There

Hello Blogger Friends! Thanks for taking the time to stop and visit with The Charmed Life Blog this last Saturday in June. This month just flew by- don't you think? 

But I can say I am enjoying these days of summer. It's been warm and sunny here in Pittsburgh. Just perfect conditions for our vegetable gardens and also for all the local farms. Soon the local sweet corn on the cob will be available. One of the many treats of summer I so look forward to.

Now onto my card for today. This one I created for my weekly DT post on the CottageCutz Blog. I am featuring the new Farm Cow Peeker + Farm Pig Peeker and created a birthday card. So let's get started with some details on how I created my card.

Design Steps:

I started off by cutting the cow & pig images. I used various colors of Stampin'-Up cardstock but you could always use white cardstock and then color the images with your favorite coloring medium. 
Since these are peeker images I decided to have them peeking from behind a "wood" themed paper. I wanted to create the idea of barn wood or a fence. It's cut at 1 5/8". For the top part I used a blue sky themed designer paper and attached it under the wood paper. It's cut at 2 3/4". I cut the papers and used double sided tape to attach them to a piece of white card stock. This entire panel is 4 1/4" x 5 1/2".
Next I started the card assembly. I attached the cow & pig peekers behind the wood paper panel. Then, I attached a dark brown layering panel. It measures 5 5/8" x 4 1/4". This was attached to a medium blue card base. This measure 5 3/4" x 4 1/2".
To finish off my card, I stamped sentiments in the top corners of the card and then the happy birthday sentiment on the wood paper. The top sentiments are from the MFT set "the whole herd" and the happy birthday sentiment is from a set from MFP (no longer in business) - "north american woods".
And that's it for me for this post. So until next time......God bless!

dies I used to create card:


I am also entering:
1.  Cute Card Thursday has an anything goes challenge. 
2.  Seize the Birthday has an "anything goes" birthday challenge. 
3.  Bastel-Traum has an animals challenge. 
4.  Crafty Animals has an anything goes. 
5.  Daisy Chain Challenge is cute animals.
6.  Die Cut Divas has a birthday challenge. 


Wednesday, June 23, 2021

Joy Snowman

Hello blogger friends! Thanks for taking the time to stop and visit with The Charmed Life Blog today.

Well I was back in the kitchen making pesto again today. I still have one more batch to make and will do that tomorrow. I have 4 containers in my freezer for fall or winter enjoyment. That always makes me happy on a cold winter day. 

My day started early (7:30 am). I usually am not up that early except on Sundays for church. I was able to get out to the grocery store early and then to my gym appointment with my trainer. I am feeling a bit sluggish right now, but that should go after I get dinner made and I eat something. If not, I will be in bed a bit earlier tonight.

Now onto my card for today. This one I created for the color challenge #849 on Splitcoaststampers. Karen was our hostess and she chose Granny apple green, poppy parade, coastal cabana and mango melody for the color combination. Optional was to use designer paper. 
Well my card took so many twists and turns today and I ended up with a Christmas card, and I had in my mind a floral card (LOL)!!! When I thought of Christmas I had a completely different idea than what I am showing. I started getting frustrated so I cased this card of mine. It was just one of those days. So now I have my first Christmas card of the season.

Anyway, I used the CottageCutz Joy Snowman die and cut the letters in poppy parade and the snowman is sporting the other challenge colors.

My background designer paper is from the Stampin'-Up "follow your art" designer paper. Even that changed from what I was originally going to use.

The image panels are embossed with the Stampin'-Up "softly falling" folder. To finish off my card, I added some coastal cabana ribbon and scattered some snowflakes. The larger ones are from the Nov 2019 Paper Pumpkin kit.

Well, that's it for me for this post. Time to get dinner started. So until next time........God bless.

card details:
Paper: coastal cabana, poppy parade, mango melody, granny apple green, black, soft suede, whisper white (Stampin'-Up)
Paper Size: A2
Accessories: Joy Snowman (CottageCutz), coastal cabana ribbon, adhesive backed snowflakes, softly falling ef, snowflake die cuts (Nov 19 Paper Pumpkin)(Stampin'-Up)
I am also entering:
1.  The Holly and Ivy Christmas Challenge is anything goes. 
2.  CHNC Christmas Challenge is anything goes. 
3ABC Christmas Challenge is "L" for letters. 
4.  Fezziwigs Festive Frolics has a cold and frosty challenge. 


Tuesday, June 22, 2021

Happiness Blooms Within

Good morning Blogger friends and a happy Tuesday to you all. We just came back from our 3 mile walk so I thought I would get my post finished early.   

I have a busy kitchen day planned. My husband has cut the last of his garlic scapes and I will be making pesto with them. Since it's so much I just put it in the freezer for enjoyment later in the summer or in the winter. If you don't know what garlic scapes are check out this blog post for more info. I can tell you they make some delicious pesto.

Now onto my card for today. This one I created for the color challenge #831 on Splitcoaststampers. Karen was our hostess and she chose flirty flamingo, mango melody and pear pizzaz. Optional was to add a stitched die to your card. 

I started my card of encouragement by stenciling a background with pear pizzazz ink using both a blending brush and a stencil brush. This is the first time I have tried the Bristol smooth cardstock and I really like how it accepts color.

I used the Poppy Stamps Massa Leaf  and chloe stems dies cut with mossy meadow cardstock and then added a stitched frame also in mossy meadow.

The stitched tulip is a die from CottageCutz, I added a few butterflies and some flirty flamingo enamel dots. The sentiment is part of the blooming sentiments stamp set from Penny Black.

Well that's my card for today. So until next time.......God bless. 

card details:
Stamps: blooming sentiments (Penny Black)
Paper: flirty flamingo, pear pizzazz, mango melody, mossy meadow (Stampin'-Up)
Paper Size: 4 1/2" x 5 3/4"
Ink: mossy meadow
Accessories: massa leaf, chloe stem dies (Poppy Stamps), Stitched Tulip & Daisies, Stitched Wide Square dies (CottageCutz), flirty flamingo enamel dots (Stampin'-Up), Clarity Stencil Brush, Picket Studio Blending Brush. Heidi Swapp Stencil
Techniques: stenciling
I am also entering:
1.  Always Fun challenge wants us to add a window. 
2.  Double Trouble has a "hip to be square" challenge. I am hip to be square!
3.  A Place to Start has a create your own challenge. I used card, encouragement and stencil.
4.  Creative Fingers has an anything goes challenge. 
5.  As you Like It challenge is a favorite tip and why. My tip is using Bristol smooth cardstock and blending and/or stencil brushes. Both of these items make for smooth and even ink blending.  


Monday, June 21, 2021

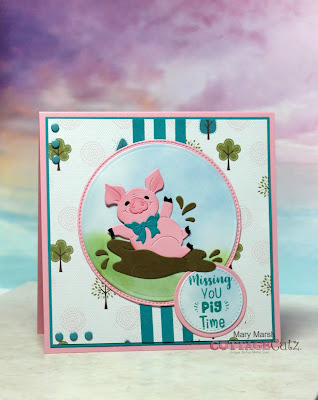
Miss you "pig" Time

Hello Blogger Friends! Happy Monday and thanks for taking the time to stop and visit with The Charmed Life Blog today. Hope you all had a great weekend and were able to celebrate Father's Day in some way. 

Ours was a quiet one although both of our sons did check in with my hubby with Father's Day wishes. We went out to brunch after church at a local restaurant. It was nice to  see the place busy with customers. Hopefully business is picking up for these establishments.

Now onto my card for today. This one I created for my Monday post on the CottageCutz Blog. I used the new Playful Piggies die to create a missing you card for my precious little granddaughter out in San Francisco. She loves pigs and will definitely like this card. I thought we might get to see them this summer but I am not sure at this point. 

My card started with the layout. I found this sketch online and thought it would work well for the image I am using.
I had this designer paper in my collection. I liked the trees with the farm image piggy.
designer paper is 5" square 
teal layering panel is 5 1/8" 
pink cardstock base is 5 3/8" square
I cut teal cardstock for the 3 background strips. They are 1/4" x 5". I used teal enamel dots on the left side and bottom of the designer paper. The punny sentiment is stamped in teal ink. It's part of the "lost without moo" stamp set from Darcie's Stamps.

Well that's it for me for this post so until next time........God bless. 

dies I used to create card: 


I am also entering:
1.  Sweet Sketch Wednesday 2 - I used sketch 209.
2.  Lil Patch of Crafty Friends has an anything goes challenge. 
3.  Crafty Catz has an anything goes with optional twist of animal. 
4Simon Says Stamp has an animal antics challenge. 
5.  2 Crafty Critter Crazies has an anything goes with a critter. 
6.  Crafty Animals has an anything goes challenge. 


Saturday, June 19, 2021

Beautiful Baby Boy

Hello Blogger Friends! Thanks for taking the time to stop and visit with The Charmed Life Blog today. 

It's a rainy day here in Pittsburgh. We were getting ready to start our daily 3 mile walk this morning and the rain came pretty quickly and heavy. Fortunately we were still in our front yard and that ended the walk for a bit. We were able to get out about an hour later and got in 2 miles before the rain started up again.

I did get my home workout in while we waited for the rain to stop. I have a trainer and see him once a week along with a friend of mine at a private training facility. He has worked out a routine for me to do at home with the equipment I have. 

Now onto my card for today. This one I created for my weekly DT post on the CottageCutz Blog. I am featuring the new Curly Sheep & Lamb die and created a card to welcome a new baby boy. A young couple from church just had their 3rd baby and I want to send them a card. So let's get started with some details on how I created my card.

Design Steps:
I started my card this week by picking the colors. I wanted to use some colors that are typical boy colors. I found this cute designer paper in a royal blue and decided to go with it. I decided to add some ribbon and went with this white flax ribbon.

Pacific Point (Blue) Card Base: 4 1/4" x 5 1/2"
White Layering Panel: 4" 1/8" x 5 3/8"
Designer Paper Layer: 3 7/8" x 5 1/4"
White image panel: 2 3/4" x 3 3/4"
Blue Image Layering Panel: 2 7/8" x 3 7/8"
Next, I cut my sweet Mama sheep and Baby lamb dies. They are so, so cute. I just love how they turned out.
Then I stamped my "beautiful baby boy" sentiment on the white cardstock die cut image panel. I used the 3rd largest die from the rectangle set and stamped in pacific point (blue) ink to match the cardstock and designer paper panels.
I attached the sheep & lamb image with dimensional adhesive. Then the blue layering panel that was cut with the 2nd largest Stitched Rectangle die was attached with double sided tape to the image.
I attached the designer paper to the white layering panel and the white flax ribbon with double sided tape. I used a foam adhesive sheet to attach the image panel. I wanted that lifted slightly off the designer paper.
To finish off my card, I attached the panels to the card base and scattered a few pacific point hearts. I am happy with how the card turned out and I think my friends will like it as well. So until next time.......God bless. 

dies I used to create card:


I am also entering:
1.
  Gem of a Challenge is anything goes. 
2.  Sweet Stampin' has a something beginning with B challenge.
3.  Taylormadecards4u has a use your words challenge.  
4.  Alphabet Challenge is "F" is for furry.
5.  Crafty Catz has an anything goes challenge with optional of animals. 


Friday, June 18, 2021

Dad's Tools

Hello Blogger Friends! Thanks for taking the time to stop and visit with The Charmed Life Blog today. It's Father's Day weekend. We don't have any plans for Sunday as yet. Our son and daughter-in-law usually call at the last minute with an invite or a suggestion for plans.

Tonight we are going to a concert in the Park in our area. They are having a group come in that plays oldies which my hubby loves. And one of the guys in the group happens to be the sound man at our church. So we have a few couples that are going to spend a summer evening together. Hopefully, the rain holds off. Because they are calling for major storms right at concert time.  

Now onto my card for today. I made this card for my hubby using the colors from the challenge #846 at Splitcoaststampers. We were to use cinnamon cider, misty moonlight and evening evergreen. Optional was to make a masculine card. 
My card is using a tool die from CottageCutz. My thought on this was to create a pegboard to hang the tools. But the tools were a bit small so I took another route. I placed them in the circle die with the pegboard in the background.

For the pegboard, I used cork paper and a polka dot background die from MFT. I layered kraft paper underneath that.

I don't have the new in-color papers or inks as yet so I subbed mossy meadow for the green. My sentiment is from an old Waltzingmouse set. To finish off the card I added some misty moonlight enamel dots.

My hubby doesn't consider himself a "handyman" type. But, I have watched him take on projects over the past several years that he wouldn't even consider touching when we first got married. Just the other day he hung new blinds in our bathroom. I was just so proud of him for undertaking the project because he originally asked someone else. 

Well that's it for me for this post. So until next time........God bless. 

card details:
Stamps: man of the hour (Waltzingmouse)
Paper: mossy meadow, misty moonlight, cinnamon cider, very vanilla, smoky slate (Stampin'-Up),cork paper, kraft (Recollections) ,
Paper Size: A2
Ink: mossy meadow
Accessories: Dad's Tools die (CottageCutz), polka dot cover-up die (MFT), in-color square enamel dots (Stampin'-Up), paper crimper (inknown)
I am also entering:
1.  Aud Sentiments has an anything goes + a sentiment. 
2.  Stinkin' Inkers has a "you're the man" challenge. 
3.  Crafty Gals Corner has "one for the boys" challenge. 
4.  The Male Room has a "Dads and Grandads" challenge. 
5.  Try It On Tuesday has a "for the man in your life" challenge. 

Wednesday, June 16, 2021

A Succulent Thank You

Hello Blogger Friends! Thanks for taking the time to stop and visit with The Charmed Life Blog today. 

I had a busy day in my kitchen making pesto. We had our first basil harvest so I turned that into pesto. The basil was enough to make one batch and that's an 8 oz cup. But when I take it from the freezer, I will add the parmesan cheese and more olive oil so I will have enough to use it for a couple of meals. My hubby also cut his garlic scapes and I turned that into pesto. I have more to make but I ran out of lemon, and I use that in the garlic scape pesto. 

In case you are wondering what garlic scapes are, we didn't know either until my hubby started planting garlic. They are the long slender flower stems that grow from the top of the garlic bulb. They need to be cut so the bulb will get larger. The garlic bulbs will be harvested in late July or early August. 

Now onto my card for today. This one I created for a friend who needed some thank you cards. I made her 10 of them but this was the only one I took a photo of. Not sure why I didn't photo all the others?

I used the contents of the February 2019 Stampin'-Up Paper Pumpkin Kit. The designer papers that were part of the kit were so pretty I didn't want to cover them up. So I kept the card on the CAS side. I also used the colors from the color challenge #832 on Splitcoaststampers. The colors were blackberry bliss, garden green and rich razzleberry. 
The succulent background designer paper had the colors for the challenge. My card base is rich razzleberry. The light gray layering panel is a card base from the kit.

I stamped my sentiment and added the blackberry bliss bow and this card is complete. I needed a simple thank you card and the kit worked out great.

Well that's it for me for this post so until next time........God bless. 

card details:
Stamps: blissful blooms (Paper Pumpkin Aug 2018)
Paper: rich razzleberry, garden green, Paper Pumpkin Kit (Feb 2019)
Paper Size: 4 1/2" x 5 3/4"
Ink: rich razzleberry (Stampin'-Up)
Accessories: Paper Pumpkin Kit Feb 2019, Blackberry Bliss Bakers Twine (Stampin'-Up)
I am also entering:
1.  Paperminutes has a keep it simple challenge. 
2.  A Bit More Time to Craft has an anything goes challenge. 
3.  Crafts Galore Encore has an anything goes challenge. 
4.  Crafty Hazelnut's Patterned Paper Challenge is anything goes. 
5.  Love to Craft Challenge is anything goes. 

Sunday, June 13, 2021

Party Till the Cows Come Home

Hello Blogger Friends! Thanks for taking the time to stop and visit with The Charmed Life Blog this Sunday in June. 

Hope you all had a great week-end and had time to do something fun. Definitely spending time in your craft room is loads of fun! We spent yesterday with the Marsh Family celebrating my Mother-in-Laws 91st birthday. 

It was a good time with family and we had some delicious food. My sister-in-law made us filet mignon and side of baked rigatoni and meatballs. I made a tossed salad which everyone enjoyed as well. We had a birthday cake from a local bakery so known for their delicious cakes. 

Now onto my card for today. This one I created for my weekly DT post on the CottageCutz Blog.  I am featuring the new Country Farm Cows and created a birthday card for a fun loving friend.. So let's get started with some details on how I created my card.

Design Steps: 
I started my card design by cutting the cow images. I used different shades of cardstock. You could also cut in white cardstock and then color the cows with your favorite coloring medium.
Next, I cut 3 grassy slopes from designer paper. On the bottom slope I stamped my sentiment in black ink. I used my MISTI for placement and also because sometimes the clear stamps require a second inking. In this case it did.
I stenciled clouds onto my image panel with tumbled glass distress ink. I cut 3 grassy slopes from designer paper and the sun is from the clouds & sun die.
Now I am ready to start card assembly. I attached the slopes to the image panel with double sided tape and dimensional adhesive.
 Next, I attached the cows to the grassy slopes using dimensional adhesive.
To finish off the card I attached the image panel to a blue card base. The base is 5 3/4" x 4 1/2". I scattered a few enamel dots and the card is complete.
Well, that's it for me for this post so until next time.......God bless

dies I used to create card:


I am also entering:
1.  Crafty Catz has an anything goes with optional to make a scene. 
2.  Creative Knockouts has an anything goes challenge. 
3.  Creative Moments has an anything goes challenge. 
4.  Simon Says Stamp has a create a scene challenge. 
5.  2 Crafty Critter Crazies has an anything goes challenge. 


LinkWithin

Related Posts with Thumbnails