Tuesday, March 30, 2021

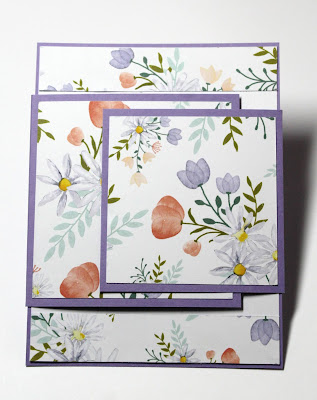
Brighten Your Day

Hello Blogger friends! Thanks for taking the time to stop and visit with The Charmed Life Blog today.

Getting so close to wave goodbye to the month of March and welcoming April. Spring is sprouting up all over our area. Today I saw the first butterfly of the season. 

And we have so many robins in our neighborhood. They usually make a nest on the support beams underneath our deck. Nothing has started as yet, but I expect to see Mama Robin begin her building process soon. I just love the new life that is represented in this Spring season.

Now onto my card for today. This one I created for color challenge #836 on Splitcoaststampers.  Jeanne was our hostess and she chose highland heather, pineapple punch and granny apple green for her color trio. Optional was to use dots. I used enamel dots.

For my card I used elements from the April 2019 Sentimental Rose paper pumpkin kit. I stamped the rose image in highland heather ink and then fussy cut. The leaves are stamped in granny apple green and also fussy cut.

My background text paper was part of the kit. I cut it on an angle and layered it on whisper white cardstock. To join the 2 panels I used yellow ribbon.

The sentiment is from the June 2020 paper pumpkin kit- "a box of sunshine". I stamped in highland heather ink. I am sending this off to a good friend in Arizona who was just involved in a car accident that totaled her car. I just want her to know that I am thinking and praying for her. 

To finish off my card I scattered a few pineapple punch enamel dots. And that's it for me for this post. So until next time.......God bless. 

I am also entering:
1.  The Creative Crafters has an anything goes challenge.  
2.  Gem of a Challenge has an anything goes. 
3Sweet Stampin' has a "for a special woman" challenge. 
4.  Lil Patch of Crafty Friends has an anything goes challenge. 
  

Friday, March 26, 2021

Easter Bicycle Scene

Hello Blogger Friends! Thanks for taking the time to stop and visit with The Charmed Life Blog today. Hope your day is going well and that you are getting to enjoy this Spring season in your little spot in the world. 

Our area is starting to bring forth all the Spring blooms. In my yard there are crocus, daffodils and Lenten rose in bloom right now. The tulips have pushed through but it will be a few more weeks before we see the blooms. 

Today we had some crazy high winds early in the day. Even the birds didn't show up at our feeders for awhile. But it seems to have quieted down now. I get concerned with the high winds that our power will go out. That happened last year at the start of the pandemic and both our freezers were filled to capacity. But today nothing happened just the winds. Whew!!!

Now onto my card for today. This one I created for my weekly DT post on the CottageCutz Blog. I used the new Spring Bicycle die to create an Easter card for my bike riding friend. So let's get started on some details of how I created this card.

Design Steps: 
I started my outdoor scene by stenciling some clouds with 2 shades of blue distress inks. I used a blending brush and peeled paint distress ink for the ground area. The colors I used are a little peek of what's coming for this week's Splitcoaststampers color challenge.
Next, I started my die cutting. The Spring Bicycle is cut in Stampin'-Up pacific point cardstock. I decided to add some tulips and a garden fence as well. The tulips and tree are from the Spring Bloom Cottage and the fence is from the Picket Fence Border die.
I stamped my sentiment directly on the image panel using pacific point ink. It's two separate stamps so I used my MISTI to line everything up. I attached the fence with glue dots and the tree + flowers with Ranger multi medium matte. I rolled up adhesive dots and attached to the bicycle image. I wanted it lifted off the background scene slightly.
To complete my card I attached to the royal blue card base. Scattered a few sequins and added 2 little bunnies. They are cut in a light gray cardstock from the Bunny Gnome 1 & Bunny Gnome 2 dies. I attached them with dimensional adhesive.
Well, that's it for this post. So until next time.......God bless. 

Dies I used to create card:


I am also entering:
1.  Aud Sentiments has an animals challenge + a sentiment. 
2.  C.R.A.F.T. challenge is Spring/Easter. 
3.  Cute Card Thursday has an Easter challenge. 
4.  Crafty Creations has an anything goes challenge. 
5.  Creative Moments has an anything goes challenge. 

Saturday, March 20, 2021

Some Bunny Loves You

Hello Blogger Friends! Thanks for taking the time to stop and visit with The Charmed Life Blog this Saturday in March. 

It's the first day of Spring today. And we welcomed it in Pittsburgh with blue, sunny skies. It's a bit cold but the temp is supposed to warm up to 57°. 

My hubby is busy cleaning out his garden beds and getting ready for the upcoming growing season. He already planted his lettuce and onions. We had a nice harvest of many vegetables last year and are looking forward to another this one.   

The tulips are pushing their way up through the ground. The deer are already on the hunt. He has been spraying them with an organic fertilizer that deters them from eating the tulips. But they found some under the oak trees in our front yard that weren't sprayed and they promptly ate them last night. 

Now onto my card for today. This one I created for my weekly DT post on the CottageCutz Blog. I used the new Bunny w/Butterfly die to create an Easter card for the two little ones that live next door to me. So let's get started with some details on how I created my card.

Design Steps:
I started my card this week with my layout. I found this sketch #845 over on Splitcoaststampers and decided to use it. The layers would allow me to use designer paper to create a fun Spring card.
I looked through my designer papers and decided on these two coordinating patterns. I used the largest Stitched Square die for layer #2 and the largest Square die for layer # 3. For the background layer #1 I found this piece of light gray card patterned paper. I cut it to 4 1/4" x 5 1/2" and secured it to a white card base.
For layer #5 I used a piece of light purple cardstock and cut it to 3/4" x 3 1/2". I stamped my sentiment in a grape ink on this panel using my Stamp-a-ma-jig to get the placement. Sentiment is from Great Impressions Stamps. 
Next, I cut the bunny and butterfly images. I used colors that complimented my designer paper.
Now that all the card elements are prepared I am ready to start assembly. I secured the gray patterned paper to the card base first with double sided tape. Next, I attached layers 2, 3 and 4 secured to the card base. Added the sentiment strip with double sided tape.
I attached the bunny image using dimensional adhesive. I scattered a few enamel dots to finish off this card.
Well, that's it for me for this post. So until next time.......God bless.

dies I used to create card:


I am also entering:
 
1Creative Fingers has an anything goes challenge. 
2.  Crafters Castle has an anything goes challenge. 
3.  Daring Cardmakers has a Spring Things challenge. 
4.  Creative Knockouts has a "Spring is in the air" challenge.
5.  Simon Says Stamp has a 2 or more patterned papers challenge. I used 3 papers. 
6.  2 Crafty Critter Crazies has an anything goes with a critter.  


Thursday, March 18, 2021

Bunny Kisses

Hello Blogger Friends! Thanks for taking the time to stop and visit with The Charmed life Blog today. 

It's a rainy and damp today here in Pittsburgh. In fact it's supposed to rain for the next 4-5 days. But we have made the switch to daylight savings time so the daylight hours are longer. That always makes me happy. 

Today I had a bunch of errands to run and then I met hubby for lunch at a local diner. We have only been to this place 2x but they have some incredible burgers and fries. Not such a healthy lunch so walking and working out to make up for it. Not today though (LOL)!

Now onto my card for today. This one I made for the color challenge #835 on Splitcoaststampers. I was the hostess and I chose purple posy, night of navy and coastal cabana for my color trio. Optional was to use designer paper. 
For my card I started off stenciling a brick background with  the MFT small brick stencil.  I used soft suede ink (neutral) on crumb cake paper(neutral). I used the Bunny Tree Cottage die from CottageCutz to create the window scene. I cut in the challenge colors . I used designer paper on the bunny outfits and the wallpaper (it's a bit light in this photo). The paper is from the Stampin'-Up "oh so ombre" collection and the "playing with patterns collection. 

I cut grass using the CottageCutz Spring Grass die in mossy meadow (neutral) and added some Easter eggs and tulips (2018 Mr Peter Rabbit die). My bunny kisses phrase is from the 2019 Bunny Kisses & Easter Wishes die and it's cut in coastal cabana and shaded with the same color ink.
The card base is 4 1/2" x 5 3/4". I didn't have cardstock that size so I used a hinge technique to make it larger. Instructions for the technique are here.

Well that's it for me so until next time.........God bless. 

dies I used to create card:


card details:
Paper: purple posy, coastal cabana, crumb cake, soft suede, mossy meadow, playing with patterns dsp, oh so ombre dsp (Stampin'-Up)
Paper Size: 4 1/2" x 5 3/4"
Ink: coastal cabana, soft suede (Stampin'-Up), shaded lilac distress (ranger)
Accessories: bunny tree cottage, bunny kisses & easter wishes, hello spring, spring grass dies (CottageCutz), brick stencil (MFT)
Techniques: stenciling

I am also entering:
1.  Cute Card Thursday has a Spring Fever challenge. 
2Stinkin' Inkers has a "hop to it" challenge. 
3.  Crafty Creations has an anything goes challenge. 
4.  Mod Squad has a Springtime challenge. 
5.  Paper Craft Crew has a critters challenge. 
6.  Simon Says Stamp has a 2 or more patterned paper challenge. 


Saturday, March 13, 2021

Fox in Airplane

Hello Blogger Friends! Thanks for taking the time to stop and visit with The Charmed Life Blog today.

It's a beautiful sunny day here in Pittsburgh. Spring is just about a week away and this weekend we switch the clocks to daylight savings time. I am going out with a friend today to do some shopping and then have lunch. It's something that we haven't done for a year. It's all the little things in life you take for granted until you don't have it. But life is starting to return to a somewhat normal state and that makes me very happy.

Now onto my card for today. This one I created for my weekly DT post on the CottageCutz Blog. I used the new Fox in Airplane die and created a card for my precious granddaughter in California.  It's a non-traditional Easter card. So let's get started with some details of how I created my card.

Design Steps:

I started my card by cutting the Fox in Airplane image. Used the package coloring because they would work well with the outdoor scene I was creating. 
Next I started my stenciled background. I used a cloud stencil, a layered mountain stencil with pine trees along with various distress and die inks. Here are my supplies: I used the MFT mini cloud stencil and a layered mountain scene stencil from Altenew. 
And this is my finished scene with my stamped sentiment. The sentiment is from the MFT "lots of hugs" stamps set. 
Next, I attached the Fox and Airplane image using dimensional adhesive. I wanted it lifted off the background for more depth.
To complete my card, I attached the image panel to an apple green card base and scattered a few sequins.
Well, that's it for me for this post. So until next time......God bless. 

die I used to create card:
I am also entering:
1.  Cut It Up has a "just for kids" challenge. I made this card for my little granddaughter.
2.  Crazy for Challenges has a stencil challenge. 
3.  2 Crafty Critter Crazies has an anything goes with a critter challenge. 
4 Crafty Animals has an anything goes challenge. 


Tuesday, March 9, 2021

Easter Tulips

Hello Blogger Friends! Thanks for taking the time to stop and visit with The Charmed Life Blog today. 

Just came back from a 3 mile walk with my hubby. It is around 50° now and the sun is peeking through. So the walk was definitely easier than when it's in the mid-30's. I took several weeks off when it was mid-teen temperatures but I am ready to get back into a daily walk routine. 

I also wanted to get this Blog post done before I start my day. My craft room needs straightened up and I have some household chores to get taken care of. I have a few errands to run as well. Dinner will be simple tonight. We are having tacos. I just cut up a bunch of toppings (green pepper, tomatoes, lettuce), cheese, sour cream and salsa and we build our own. It's always a big hit with my hubby. 

Now onto my card for today. I am slowly getting some Easter cards made. This one I made for the color challenge #834 on Splitcoaststampers.  Chris is the hostess and she chose soft seafoam, cinnamon cider and mossy meadow for her color trio. Optional was to use a shade of pink. I picked up on the optional and used 3 shades of pink for my tulips. 
I just purchased the Exotic Tulips stamp from Altenew. I love their 3 step stamping setsThe images are beautiful and you always get such color depth. The tulips are stamped in pretty in pink, melon mambo and magenta madness. The stems are stamped in soft seafoam and then mossy meadow (stamped off once).

I kept the optional coloring rolling by using magenta madness for my card base. The next layer is soft seafoam. Designer paper is from the Stampin'-Up "tranquil textures" collection.

My Easter greeting is stamped in cinnamon cider. I had it stamped directly on the background and then it smeared. So I stamped again in a circle to cover my ink smear. Love it when mistakes can be corrected. 

Finished off my card by scattering a few enamel dots. Well, that's it for me for this post. So until next time.....God bless. 

card details:
Stamps: exotic tulips (Altenew), blessings (MFP)
Paper: magenta madness, soft seafoam, whisper white, tranquil textures dsp (Stampin'-Up)
Paper Size: A2
Ink: pretty in pink, melon mambo, magenta madness, soft seafoam, mossy meadow, cinnamon cider (Stampin'-Up)
Accessories: stitched rectangle, stitched circle dies (CottageCutz), in-color enamel dots (Stampin'-Up)
Techniques: layered stamping
I am also entering:
1.  Try it on Tuesday has a "say it with flowers" challenge. 
2.  Crafting Happiness Challenges has a flowers challenge. 
3.  Daisy Chain Challenges has a flowers challenge. 
4.  Challenge Up Your Life has a flowers challenge. 
5.  Crafter's Castle has an anything goes challenge. 


Saturday, March 6, 2021

Overlapping Fun Fold with Bluebells


We have been having lots of sunshine here the past few days. You may think that's not a biggie but if you live in Pittsburgh, it definitely is. We don't get a lot of sun in the wintertime. So when it comes it's so enjoyable. 

Today as I type this post we have a tree company here trimming back our Pinoak trees. This type of oak drops half its leaves in the fall then the other half in the Spring time. So to get them trimmed you have to wait until the sap stops flowing so it doesn't damage the tree. 

They are huge trees and my hubby contemplated taking them out. But the expense of that was craziness. So he opted for the trim. This company comes highly recommended and they did a trim on a Pinoak in our neighborhood and did a tremendous job on it.  

Now onto my card for today. This one I created for my weekly DT post on the CottageCutz Blog. I am featuring the new Bird w/Bluebells die. I created an Easter card with this sweet image and also a new to me fun fold technique. So let's get started with some details on how I created my card.

Design Steps:
I started my card this week with the layout. I found this cute fun fold technique on YouTube and thought I would give it a try. I will be showing photos and panel sizes but if you want to see a YouTube video from the stamper who created the idea-click here.

Panel sizes:
Lemon-Lime card base: 4 3/8" x 5 5/8"
Heather layer panel: 4 1/4" x 5 1/2"
White inside sentiment panel: 4" x 5 1/4"
Designer Strips: 3/4" x 4"
Left panel: 3 1/2" x 4"
Designer Paper: 3 1/4" x 3 1/4"
Right panel: 3" x 3 1/2"
Designer Paper: 2 3/4" x 2 3/4"

I cut my white sentiment panel and adhered the 3/4" strips of designer paper to the top and bottom of panel. I was thinking of stamping a Happy Easter Sentiment then decided on this phrase from the 2019 die - He is Risen Cross die. I cut it in the highland cardstock that coordinates with the designer paper I used.
Next, I cut the side panels for my card. Sizes are above. The idea is to make the panels a square so you make the one side a 1/2" larger for the flap. I scored the left panel at 3 1/2" - it created my flap and now it's a square. I repeated this for the right panel as well. 
The designer paper is attached with double sided tape. The designer paper is from the Stampin'-Up "naturally eclectic" collection. 
And, for the flaps I used Scor-Tape. It's a stronger adhesive and I want to be sure the panels won't come off in the mail.
Now, I am ready to attach the side panels to the card base. The left side is attached first then the right side is centered and overlaps the left panel.
Next, I cut my bird & flower images. I used cardstock that matched the designer paper. 
    
I was going too add the images directly on the cardstock but the background was just a bit too busy. So I cut a white square at 2 1/4". I didn't want to cover up all the designer paper on this panel because its to pretty. The images are attached with Ranger multi medium matte. I used dimensional adhesive on the little bird. The lemon-lime base panel was added to cover up the panel flaps on the rear of the card.
Here is a photo of the card inside with the flaps open.
Well, that's it for me for this post. So until next time......God bless.

die I used to create card:
I am also entering:
1.  Alphabet Challenge is "X" for x-tra folds.
2Crafty Catz has an anything goes with optional die/punches.
3.  Creative Fingers has an anything goes challenge. 
4.  C.R.A.F.T. has an anything goes challenge.  
5.  Cute Card Thursday is anything goes. 
6.  Simon Says Stamp has a beautiful blossoms challenge. 


LinkWithin

Related Posts with Thumbnails