Saturday, May 26, 2018

Welcome Owl Baby

Hello Blogger Friends! Thanks for taking the time to stop and visit with the Charmed Life Blog on this Memorial Day weekend.
 
It's always considered the official start of summer. My hubby has already been working in his yard and gardens. He has everything looking so nice and now it's just waiting for the perennials to start blooming. There are different flowers for early and late spring as well as early and late summer. I enjoy going out and cutting them for bouquets.
 
We have no plans for this weekend. My Mother-in-law is coming to spend the day with us. She has moved in with my sister-in-law and although things are going smoothly, they both need a break from each other. So I wanted to get this post done and some other things before she comes over later this morning.
 
This card I made for my weekly DT post on the CottageCutz Blog. I used this sweet Mama Owl and Baby that was actually part of the Mother's Day release to welcome a new baby. I like to have some of these type of cards on hand for either a baby shower or to send out to congratulate on a new birth. So let's get started with some details on how I created my project.

Step 1: I started by picking my card colors this week. I wanted to use some soft baby boy colors. So I chose coastal cabana, brown sugar (soft brown), and a designer paper that has both of these colors for the card base.  I also had some of the coastal cabana twine that I decided to use. Thought it would fit well with these owl images. Twine and dotted paper - I like the combo for a baby boy
card.
Card Base: 4 1/4" x 5 1/2"
Brown Sugar Panel: 4" 1/8" x 5 3/8"
designer Paper Layer: 3 7/8" x 5 1/4"
 

 Step 2: Cut my Mama & Baby owl. For baby, I used the coastal cabana cardstock and sponged his wings with the same ink for a bit of color variation. Mama was cut in a cantaloupe shade and her wings and eyes are cut in coral cardstock.  They are so, so cute. I just love how they turned out.
 Step 3: Stamped my welcome baby sentiment on white cardstock that was cut with the 3rd largest pierced rectangle die.
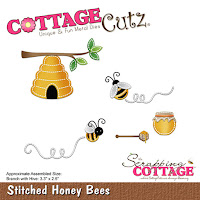
 I layered that onto another rectangle cut with the coastal cabana cardstock.  Added a branch for the owls to perch on. It's from the stitched honey bees set.
 Step 4: Added the blue twine to the background panel and attached to card base.
 I used mounting tape to attach the image panel. I wanted it lifted somewhat from the twine. I dimensional adhesive only on the top and bottom of the panel.  No need for the dimension where the panel sits on the twine, since that's already raised.
I finished off this week's card by adding a few hearts cut from the Coastal Cabana cardstock.
Well, that's my card for today. So until next time...…..God bless.
dies I used to create card:
http://www.scrappingcottage.com/search.aspx?find=mama+owl+%26+baby


http://www.scrappingcottage.com/cottagecutzstitchedhoneybees.aspx
I am also entering:
1.  Crafting with Friends has an anything goes challenge.
2.  PolkaDoodles has an anything goes challenge.
3.  Cute Card Thursday has a little boy blue challenge. I thought my baby boy card fit.


Thursday, May 24, 2018

Birthday Bouquet

Hello Blogger Friends! Thanks for taking the time to stop and visit with the Charmed Life Blog today.
 
It's a beautiful Spring day here in Pittsburgh. Our gardens are coming to life after a long winter. My hubby has planted his peppers and basil yesterday. Looking forward to the first basil cutting already. Pesto is one of my summer delights.
 
I am also finished with Pre-School and enjoyed my first week of summer vacation. I have made a to-do list of things I want to accomplish over summer break. The biggest one is my craft room. Looking to give it a bit more organization. Hopefully, I get my list completed. I am determined so that always helps.
 
Now onto my card for today. This one I made for the color challenge #688. Stef is the hostess and she chose smoky slate, watermelon wonder and old olive for her color trio. Optional was to use a die cut.
smoky slate, watermelon wonder, old olive
For my card layout, I used the Jan 2018 cardmaps sketch. I somewhat modified it and left off the ribbon and bow. These sketches are published quarterly and for the January quarter they had 10 different sketches to choose from along with samples from designers. I will be using these again for sure.

 The background old olive designer paper is from the Stampin'-Up "merry little Christmas" collection. The watermelon wonder flags were cut from the Stampin'-Up "color me irresistible" collection. I used the MFT flag stax.

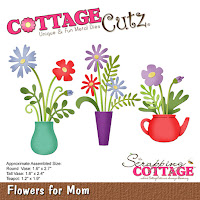
My vase of flowers is the "Flowers for Mom" die from CottageCutz. It's a versatile die that can be used all year round. I turned it into a birthday bouquet.

The sentiment is from the Verve set "be blessed". Added a few metallic enamel shapes to complete the card. Now I have an extra birthday card on hand for some upcoming summer birthdays.
 
Well, that's it for me for this post. So until next time...….God bless.
 
card details:
Stamps: be blessed (Verve)  
Paper: whisper white, watermelon wonder, smoky slate, old olive, merry little Christmas & color me irresistible dsp (Stampin'-Up)  
Paper Size: A2  
Ink: watermelon wonder (Stampin'-Up), tuxedo black (Memento)  
Accessories: Flowers for Mom, circle dies (CottageCutz), flag stax, bracket tab dies (MFT), metallic enamel shapes (Stampin'-Up) 
 
CottageCutz dies used:
http://www.scrappingcottage.com/cottagecutzflowersformom.aspx
http://www.scrappingcottage.com/cottagecutzstitchedcirclesetbasics.aspx
 
I am also entering:
1.  Crafty Creations has an anything goes challenge.
2.  Crafty Gals has an anything goes challenge.
3.  Inspiration Destination has an anything goes challenge.  
 

Saturday, May 19, 2018

Get Well Bouquet

Hello Blogger Friends! Thanks for taking the time to stop and visit with the Charmed Life Blog on this 3rd Saturday in May.
 
It is royal wedding day. Prince Harry and Megan Markle were married today in Windsor Castle. It was on much to early for me so I set the DVR and watched when I awoke at 8:00 am. She was such a beautiful bride and I loved the ceremony. They had an American Bishop deliver a sermon and then the marriage ceremony performed by an Anglican minister.
 
Such a fairy tale come true for Megan. She marries into British royalty in a marriage that was approved by the Queen. Something as Americans that we don't quite understand but nonetheless it is fascinating to us. 
 
The only thing I really didn't like was the media commenting more than once about the A-list Hollywood celebrities that were in attendance. I didn't really care that George Clooney and his wife or Oprah were in attendance. I am not a big fan of the out of touch Hollywood crowd.
 
But, anyway it was nice to view the wedding and I wish the new couple years of happiness. o let's move onto my card for today.
 
This one I created for my weekly DT post on the CottageCutz Blog. I am featuring the Mom's Garden Bouquet die and I created a get well card. I never seem to have any of this type of card on hand when I need one. And, this die has such pretty flowers that it will brighten anyone's day.  So let's get started with some details on how I created my project.

Step 1: I started my card by choosing my layout. This sketch is an older one from Splitcoaststampers. I thought it would work well to show off the floral image, allow me to use  patterned paper and possibly some ribbon.
Step 2: Once the layout was decided on, I chose my card colors. I found this floral patterned paper in my stash and that determined my card colors. 
Vanilla Card Base: 4 1/4" x 5 1/2"
Baja Breeze Layer 1: 4 1/8" x 5 3/8"
Springtime Vintage Designer Paper Layer 2: 3 7/8" x 2 1/2"
Vanilla Embossed Layer 3: 2 7/8" x 4 1/8"
Always Artichoke Oval Layer 4: 4th largest oval die
Vanilla Oval Layer 5: 4th largest stitched oval die


 Step 3: I cut the pieces in the garden bouquet. Used a rose red, saffron (light yellow) and sugarplum cardstocks for my flowers. Used Ranger multi medium matte to secure.
 I assembled the bouquet in the pitcher according to the packaging photo.
 Then attached it to the oval using dimensional adhesive.
 Step 4: Now that all the elements of my card are cut, I am ready to start card assembly.
 Attached the panels using double sided tape.
 I decided to go with ribbon and used this baja breeze pleated ribbon
Attached the oval panel using dimensional adhesive on the top and bottom of the oval. This way it will sit evenly on the ribbon.
For my sentiment, I decided to use the "feel better" phrase from the "Ouch with Tooth" die. I cut it in rose red cardstock 2x to give it a bit more dimension. Used the multi medium matte to attach to bottom of card. To complete I cut a few of the flower centers and added to the top of my card. 
 
And, that's it for me for this post. Hope your weekend is a great one. So, until next time.........God bless!!!
 
dies I used to create card:


I am also entering:
1.  Crafty Friends has a "B" is for....challenge. Mine is a bouquet and baja breeze paper.
2.  Creative Fingers has an anything goes challenge.
3Kitty Bee Designs has a Mom/feminine challenge.


Friday, May 18, 2018

Tulip Birthday

Hello Blogger Friends! Thanks for taking the time to stop and visit with the Charmed Life Blog today.
 
Well, another school year is finished. We had our pre-school program last night and the children were so cute. We put together a presentation so the kids could show off some of what they learned this year. At 3 years old they love to sing and perform on stage. Sometimes they wave at their parents or do a little of their own thing. The parents love seeing their kids on stage as well.
 
We had a nice cream social afterwards and the teachers were able to mingle with both the parents and students. So now summer vacation has officially started. I have a big to do list and hope to get it all accomplished before school starts again in September.
 
Now let's move onto my card for today. This one I created for the Splitcoaststampers color challenge #687. Karen was our hostess and she chose calypso coral, peekaboo peach, pear pizzazz and crushed curry for her color palette. Optional was to create a pocket of some sort.
calypso coral, peekaboo peach, crushed curry, pear pizzazz
For my card, I used the new Bouquet of Tulips die from CottageCutz to create a birthday card.
The tulips and vase are cut in 3 of the challenge colors. I think the colors make an attractive bouquet. This card is also part of the DT group post on the CottageCutz Blog.

The background striped designer paper is from an older Stampin’-Up collection “Springtime Vintage”. I liked the stripes and didn’t want to cover them up completely, so I used vellum for another layering panel.

I cut the vellum panel with a stitched scallop rectangle die also from CottageCutz. Stamped my birthday sentiment from the Verve "Be Blessed" set. I finished off the card by adding a few crushed curry enamel dots.
 
That's it for me for this post. So until next time.........God bless.  
 
card details:
Stamps: be blessed (Verve)  
Paper: pear pizzazz, calypso coral, peek-a-boo peach, springtime vintage dsp (Stampin’-Up), vellum (Paper Reflections)  
Paper Size: A2  
Ink: tuxedo black (Memento)  
Accessories: bouquet of tulips, stitched scallop dies (CottageCutz), regals enamel dots (Stampin’-Up)
 
dies I used to create card:
http://www.scrappingcottage.com/cottagecutzbouquetoftulips.aspx
 
http://www.scrappingcottage.com/cottagecutznestedstitchedscalloprectangleset.aspx
 
I am also entering:
1.  Alphabet Challenge has a "D" for dots.
2.  Fussy & Fancy has a favorite florals challenge. Tulips are my fave springtime flower.
3.  Polkadoodles has an anything goes challenge.
4.  Crafting with an Attitude has an anything goes challenge.
5.  Always Happy Birthday has a birthday challenge with optional of flowers.


Saturday, May 12, 2018

Mom - Enjoy your Day

 
Hello Blogger Friends and a happy Saturday to you all. Thanks for taking the time to stop and visit with the Charmed Life Blog this Saturday in May.
 
It's Mother's Day weekend and always a special time for me. My son who lives in California sent me a beautiful bouquet of flowers and some delicious chocolate candy.
 
Then tomorrow I will do the Susan Komen walk in the "race for a cure"  in Pittsburgh. My son and his family take part in this also. We started this tradition about 4 years ago when my niece was battling breast cancer.
 
She is in remission and doesn't want to do this any longer. So we decided to keep it up and then we go and have a Mother's Day brunch afterwards.  Hopefully the rain holds off and we get to walk in dry conditions.
 
Now let's move onto my card for today. This one I created for my Saturday DT post on the CottageCutz Blog. Here are the details on how I created my project.
 
Step 1: I started my card by choosing my layout. I saw this one on Splitcoaststampers on Wednesday and knew it would work well for my card idea. I love using tilted panels on a card. I think it's such a fun idea.
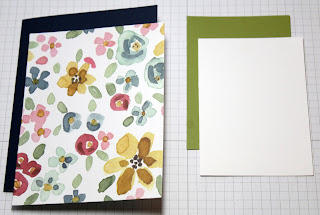
Step 2:  Once the layout was decided on, I chose my card colors. I am using designer paper from the Stampin'-Up "English Garden" collection. It has a lot of pretty colors that I like. I thought all the other elements on the die could be cut in the corresponding cardstocks and give me a feminine looking card.
For the card base I used night of navy and the angled panels old olive and white.

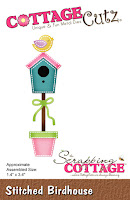
The birdhouse is cut with a navy designer paper and a melon mambo roof. The bird in hello honey cardstock, flower pot in melon mambo and the trim in mint macaron. The pole is in soft suede and the bow in mint macaron. The Mom phrase is in night of navy.  
Step 3: Before I started card assembly, I wanted to stamp an additional sentiment. Sometimes along with the die cut sentiment, I like to add a stamped sentiment to complement the die cut phrase. I don't always have one that will work but this one was a good fit.
It's a 1-line stamp and  there really wasn't room for it on one line. So I pulled out my MISTI and masked the stamp to work it onto 2 lines.  
 Step 4: Time for card assembly. For the #4 layer of the sketch I used melon mambo ribbon.  And for the #5 element I used the bow that is part of the birdhouse. I moved this element to the left side so it would be part of the birdhouse. You can always tweek the sketch to fit your card. As long as it basically looks like the sketch given you are good.
To complete this card, I added my Mom phrase and some melon mambo enamel dots. My last Mother's Day card completed - right under the wire (lol)!! Never seems to be enough hours in the day to get everything I want to do accomplished.
Well, that's it for me for this post. So until next time.......God bless.
 
Dies I used to create card: 
http://www.scrappingcottage.com/cottagecutzstitchedbirdhouse.aspx

http://www.scrappingcottage.com/cottagecutzmomwheart.aspx
 
I am also entering:
1.  Alphabet Challenge has a "D" for dots. I used enamel dots on my card.
2.  Crafting with Friends has an anything goes challenge.
3.  PolkaDoodles has an anything goes challenge.
4.  Aud Sentiments has a cute + a sentiment challenge.
5.  Crafting with an Attitude has an anything goes challenge.


LinkWithin

Related Posts with Thumbnails