
Hello Blogger Friends! Thanks for taking the time to stop and visit with the Charmed Life Blog on this Saturday in November.
We are having some really cold temperatures here this weekend. We went from having some record warm weather a couple of weeks ago to some record cold temps. It was 10° with the wind chill overnight. Then mid-week we are back to 50° weather. Crazy!!!
Perfect day for staying in-doors and crafting. That's my goal for today especially since my hubby is at work until 11:30 tonight. So the card I am showing today is one that I created for my weekly DT post on the CottageCutz Blog.
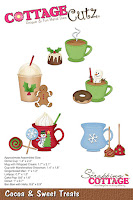
Today, I am showing another of the new 2017 Christmas dies released by CottageCutz This one the is Cocoa & Sweet Treats die. There are 3 different cup designs plus lollipops, candy apples, a donut, gingerbread man and a Christmas cake in this super cute set. The set also includes other Christmas icons - a tree, snowman and holly.
I know I will need some Thank You type cards after Christmas so that's the idea behind this week's card. Let's get started with some details on my card for today.
Step 1: I started my card by choosing my colors. I like making Christmas cards in non-traditional colors but this year I seem to all about the red & green. When I looked through my Christmas papers I found this piece with a circle background. I liked the whimsical appeal and thought it would work well with the images I planned on using.

Cherry Red Card Base: 4 1/4" x 5 1/2"
Patterned Paper Layer: 4 1/8" x 5 3/8"
I cut the die images I was using for my card. The cup was cut in a rich, cherry red cardstock that matches the designer paper. I wanted to layer the cup inside a circle image and decided on using the largest of the Sweetheart Doily dies. I cut in a vanilla cardstock.


Step 3: To finish off my card, I added a gold cord bow and some green sequins. I hope I have given you an idea for a card using this cute new set. Have a great week-end and I will see you next Saturday.


I am also entering:
1. Crafty Friends Challenge has a Christmas challenge.
2. Jingle Belles has a thankful for the holiday challenge.
3. Polka Doodles has an anything goes challenge.
4. Craft Rocket Challenge has a Christmas is coming challenge.


Your cup of cocoa is just too cute ... so very glad you joined us at jingle belles.
ReplyDeleteThis is just beautiful.
ReplyDeleteThanks for playing along with us at our present challenge at Craft Rocket and good luck! Hope you will join us next year again.
Your card would fits our theme at Do-Al(l) Kreatives, too. Would love to see you there again.
Hugs
Alex
*DT* Craft Rocket Challenges {#43 –Christmas is coming}
*DT + Admin* Do-Al(l) Kreatives {#11 – Pre Christmas Session }
*DT* Kreativ-Tanten Challenge {#11 – Zooanimals}
Alex' Kreative Seite
what a gorgeous holiday thank you card design, i love those dies and you did a brilliant job of piecing them! so pleased you could join our fun at JINGLE BELLES! ♥
ReplyDeleteFab make. Thanks for joining us in our Anything Goes challenge at Polkadoodles
ReplyDeleteAnjie (DT)