Hello Blogger Friends and a happy Saturday to you all! Thanks for taking the time to stop and visit with the Charmed Life Blog.
Another weekend is upon us. Hope you have some fun plans. Today, I am going to the Honda dealer to attend a class covering features of the CRV we just purchased. Nearly everything on the newer cars is programmable which I didn't have on the 2004 model we traded in. They will cover all the features and then answer questions. If time permits they will sit in your card to show you exactly how a feature works.
Tomorrow I am attending a baby shower for my niece. I haven't purchased a gift yet so that is on the agenda for today as well. Hopefully, there is something left on her registry.
Now onto my card for today. This one I created for my weekly DT post on the CottageCutz Blog. So lets get started with some details on the card I am showcasing today.
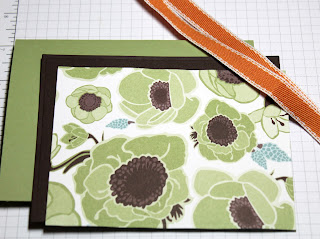
Step 1: I start my cards each week in several different ways. Today, I started with my card colors. That made it easy because these are the ones the Bride has chosen for her wedding. I looked through my paper stash for colors that matched along with patterned paper. I chose a soft green, a rich espresso brown and peach as my accent colors. I am also using a peach ribbon. I assembled these parts of the card at this point.
Step 1: I start my cards each week in several different ways. Today, I started with my card colors. That made it easy because these are the ones the Bride has chosen for her wedding. I looked through my paper stash for colors that matched along with patterned paper. I chose a soft green, a rich espresso brown and peach as my accent colors. I am also using a peach ribbon. I assembled these parts of the card at this point.
Green Card Base: 5 1/2" x 4 1/4"
Espresso Layering Panel: 5 3/8" x 4 1/8"
Patterned Paper Panel: 5 1/4" x 4"
Step 2: I decided to use the Mr & Mrs with Hearts and frame it with the Nested Stitched Doily dies. I assembled this part of my card and attached to the base panel. I used dimensional adhesive to attach it to card. It adds depth to your card.
Step 3: I also wanted to finish the inside of my card. I don't usually do this with anything more than a sentiment. The exception is wedding cards. I like to add other embellies to make it a little more special for the couple. So for this card I used the Rose with wedding rings, Love Phrase.and the Nested Scallop Rectangle dies.
I adhered the images to the scallop panel. Take notice of the wedding rings that are part of the rose die. The hearts were leftover when I cut the Mr & Mrs phrase.
Attached the decorated panel to the card inside. The espresso is such a rich shade of brown and complements the green nicely. The bride chose some beautiful colors for her wedding.
I decided to add a bow to the card front. It just seemed a little more complete. I don't have to mail this card so no worries that my bow will get ruined. And this completes my card for this post. I hope I have given you another idea on how to use these new wedding dies. So until next time.........God bless.
Dies I used to create card:


No comments:
Post a Comment