Hello Blogger Friends and a Happy Wednesday to you. I just realized today that our new Pre-School year starts in about 3 weeks. I have been off since the end of May but it certainly doesn't seem like it.
Still not sure how the summer months went by so quickly. I received an email yesterday from QVC reminding me that Christmas is only 4 months away. Yikes, I would like to put the brake on time. If only that were possible (lol)!!
Anyway, let's move to my post for today. Today is my DT post on the CottageCutz blog. I have made 2 tags so let's get started on my creative process this week.
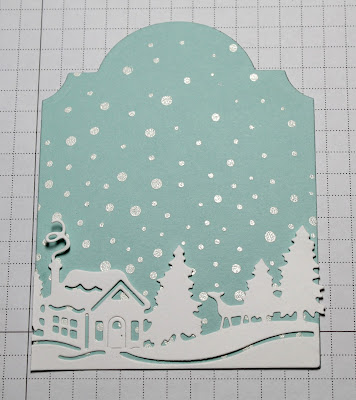
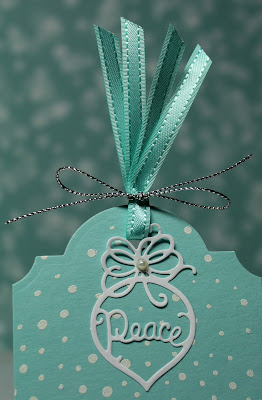
For the first tag I used the Winter Cabin Border and the Ornament Trio dies. To create this tag, I used the CottageCutz Rectangle Die-the largest one in the set. I then stamped the background snowflakes with Versamark ink and embossed with white embossing powder on pool party cardstock.
I didn't want to have a square topped tag so here's what I did to make a pretty tag top. My rectangle base is 3" wide, so I needed a die wide enough to only cut the top of the tag. I ended up using the Spellbinders Labels 28 die.
I placed the cardstock so the side edges are not on the cutting edge of the die.
Now on to decorating the tag. I cut both the Winter Cabin Border die and a single ornament from the Ornament trio dies in white cardstock.
To complete this tag I punched a hole at the top and ran my pool party ribbon through. I tied it with silver cording. I attached my ornament, added a pearl to finish the tag off.
Now onto my 2nd tag. For this one I used the Merry Christmas Santa die. I cut my tag in red cardstock, found the patterned paper I wanted to use and cut my Santa image. I also used the Stitched Circle Dies and cut a circle with the 5th largest die to position Santa in the center of it.
I added a little snow mound at the bottom of the circle for Santa to stand on. For the mound I used the sand from the seagull die. Just another way to get additional use out of your dies. I used glue and sprinkled some chunky glitter on the snow mound.
I used the same chunky glitter and added it to Santa's hat, belt, arm cuffs and hat. Isn't he such a cute Santa image?
To complete this tag, I stamped a sentiment on olive cardstock and cut it in a flag shape. I embossed the sentiment to make it stand out on the tag. Sentiment is from the MFT gift tag greetings set. I added white satin ribbon and tied it with Stampin'-Up real red striped ribbon.
Thanks for staying with me through the entire post today. Hope I gave you some ideas for your own Christmas tags. Also, as a remind our our current challenge is going on for August. The theme is birthday and you can get more info here.
Until next time.......God bless.


Such cute new dies! Love all of your samples with them, all are really awesome.
ReplyDeleteHi Mary, how are you?! I know it's been a while, but I have gotten some cards done and restarted up my blog. I hope you find a minute to stop by. These tags are GORGEOUS, love them! So much detail in such a tiny project, nice job! Hope all is well with you! xoxo~Cheryl (CherCroppin)
ReplyDeleteThese are lovely. Thanks for sharing! CottageCutz has some of the cutest dies! I'm wondering where you got the stamp for the snowflake background on the first tag? I'd love to purchase one!!
ReplyDelete