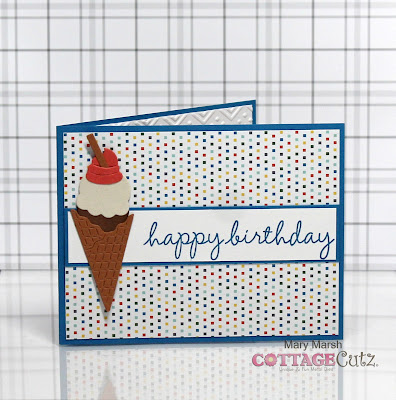
Card front
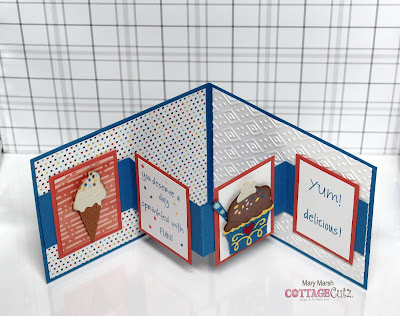
Card inside
Hello Blogger Friends! Happy Sunday to you. Hope you're having a great weekend.
Things are on the quiet side here. My hubby went to take care of his Mom this weekend. She lives with his sister, and she wanted to go away this weekend. So he stayed there on Friday and Saturday nights. We can't bring her to our home because she can't walk steps. He will be home sometime this afternoon.
I went to dinner with some of my friends on Friday night. And then yesterday I stayed home and did some chores and cleaned my craft room. That seems like a never-ending job- the craft room that is. But it's all straightened out and ready for this week's design efforts.
Now onto my card for today. This one I made for my weekly DT post on the CottageCutz Blog. Today for your viewing pleasure I have created a birthday fun fold card. This fold is called a W-fold. I am using the new Build An Ice Cream Cone and the Ice Cream Sundae dies for my card. So let's get started with some details of how I made this card.
Design Steps:
Since I knew the fun fold I was going to use, I selected my card base and designer papers as my first step. I looked for a fun design and decided on this one. My fold is on the left side of my card. Blue card base: 4 1/4" x 11" - scored at 5 1/4"
Designer paper Layer (outside) - 4" x 5 1/4"
I decided to stamp my sentiment on the card front at this point. I cut white cardstock at 1" x 1 5/8" and a blue layer at 1 1/8" x 5 1/4" and stamped the "happy birthday" sentiment in blue ink to match the cardstock. The Stamp set is from Hero Arts - Big Candles.
Now onto the card inside. I added the same designer paper to the left side of the panel only. 4" x 5 1/4" for both panels. For the right side I decided to emboss a white panel for added texture. It's the Boho Chic folder from Stampin' Up.
Next is the card bridge.
Cardstock is 1 3/4″ x 11″
score at 2 3/4″ x 5 1/2″, 8 1/4″.
Fold at the 5 1/2" score line and then bring the 2 end panels over to create a rectangle.
score at 2 3/4″ x 5 1/2″, 8 1/4″.
Fold at the 5 1/2" score line and then bring the 2 end panels over to create a rectangle.
I attached double sided tape to the two end panels only. The bridge center of the "W" should line up with the center of the card base and this forms the "W" fold.
For the inside decorations: I cut an ice cream cone and an ice cream sundae. I layered these on coral cardstock measuring 2" x 2 3/4" and the white image panel is 1 3/4" x 2 1/2". Used double sided tape to attach. Tape is on the center of the panel only. The camera angle on this photo makes it appear that the centers don't line up. They do or card won't close properly.
To complete my card, I added an ice cream cone to the card front.I cut another piece of white cardstock 5 1/4" x 4" and attached to back of card for a personal note and to sign my name. I could have signed the yum - delicious panel but decided to leave that as is.
Well, that's it for me for this post. So, until next time........God bless.dies I used to create card:
1. Allsorts has anything for a birthday challenge. They are celebrating their 13th.
2. Polkadoodles has an anything goes challenge.
3. Alphabet Challenge is "D" for die-cuts.
4. Creative Creases has an anything goes with a fun fold.
5. Creative Knockouts has a finish the inside challenge.


Great fold and love all the ice-cream images.Thank you for playing at Creative Creases
ReplyDeleteCarol GD x
Great fold card and I am loving the ice creams - yum. Thanks for taking part in Allsorts 13th birthday challenge week.
ReplyDeleteA deliciously fun card! And thank you for measurements and step-by-step, too. Thank you for joining the birthday celebration at Allsorts.
ReplyDeleteWhat a fabulous card Mary and the inside panels are fabulous too!
ReplyDeleteThank you for joining us this week at Creative Knockouts- Good Luck!
Oh, what a cheerful card! Love the papers and the great fun fold to show all of the great elements. Now I want some ice cream! Thank you for playing in my Creative Creases Challenge and hope you can join in again soon.
ReplyDeleteDebbie
Secrets To Stamping
A great card - thanks for sharing it with us at the Alphabet Challenge.
ReplyDeleteHelen x
DT