Saturday, October 31, 2020

Snowman Cupcake + Fun Fold

Hello Blogger Friends! Thanks for taking the time to stop and visit with The Charmed Life Blog this last day of October. 

I can't believe how quickly the month has gone by. It's a beautiful fall day here. A crisp and cold day but the sun is shining. We had a heavy frost last night so I am sure that our dahlias are done for this season. My hubby pulled the last of our tomatoes the other day. There were about 100 on the vines in different stages of ripening. I roasted some of them yesterday and have the others on the window sills to wait for them to get ripe enough to roast. 

Now let's move onto my card for today. This one I created for my weekly DT post on the CottageCutz Blog. I am featuring the new Snowman Christmas Cupcake die. This is such a cute die that I just couldn't resist making a card with it. My granddaughter's 10th birthday is in December, and I thought this would be a perfect winter themed birthday card for her. So let's get started on some details of how I created my card.

I decided to do a fun fold for my card this week. I saw this fun fold on Pinterest and thought it would be a cute one for my Snowman Cupcake. I started with my card base of 5 1/2" x 8 1/2". I scored it at 4 1/4" and then at 5 1/2".
Then I used 1/8" Scor-Tape to seal the left section of the card base closed.

 This is the photo of the card base after it's secured with tape. It's like a book-binding.

Next, I chose two winter themed designer papers for the card front.  They are from the Stampin'-Up "let it snow" collection. The larger piece is 2 3/4" x 5 1/4" and the smaller is 1" x 5 1/4".
I cut the snowman cupcake image in colors to match the designer paper.

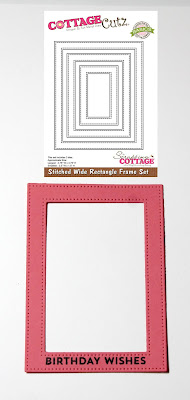
I wanted to frame the cupcake image and decided on the Stitched Wide Rectangle Frame. I used the 2nd largest die and cut in flirty flamingo cardstock. It's one of the shades in the designer paper. 
I stamped my birthday wishes sentiment in coastal cabana ink. It is also one of the colors in the cardstock. I used my MISTI and inked 3x to get a bolder image.
Next, I attached the snowman cupcake using dimensional adhesive. In the frame corner I added the happy phrase. It's from the Festive Birthday Greeting die. 
 To complete my card I added some bakers twine and bow in the flirty flamingo shade. That's it for me for this post. So until next time........God bless
dies I used to create card:

I am also entering:
1.  CraftyHazelnuts patterned paper challenge has an anything goes challenge. 
2Just Us Girls has a word die cut challenge. 
3.  Sweet Stampin' has a children's birthday challenge. 
4.  Crimbo Crackers has an anything goes challenge. 
5Simon Says Stamp has an anything goes challenge. 


Saturday, October 24, 2020

Sledding Penguins

Hello Blogger friends! Thanks for taking the time to stop and visit with The Charmed Life Blog this Saturday in October. It's a bit of a chilly one today after the last couple of very warm days. But it is Fall and this is the type of weather changes we get here in PA. 

Going out for a walk as soon as I get this post finished though. I didn't get to do that yesterday because of some other things going on. Then this evening we are going to do a take-out from a local restaurant and enjoy some family time with my son, daughter-in-law and grandsons. We so appreciate the times we can get together now in these days.

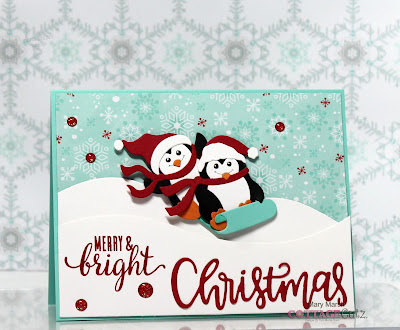
Now let's move onto my card for today. This one I created for my weekly DT post on the CottageCutz Blog.  Today, I have for your viewing pleasure a card featuring the new Sledding Penguins dies. This is such a cute die I couldn't resist making a Christmas card with it. I have a family member that loves penguins and has a collection so this card will be perfect for her.

I knew I had several different snow themed designer papers. I just had to pick the one that I wanted to use. Decided on this one from the Stampin'-Up "let it snow" collection. I liked the combination of coastal cabana with touches of white and red. I also cut 2 snow slopes for the penguin sledders.

Coastal Cabana card base: 4 1/4" x 5 1/2"
Let it snow designer paper: 4 1/8" x 5 1/4"
Next, I cut my penguins in different cardstocks. I gave them red hats and a coastal cabana sled to match the designer paper.

For the card sentiment, I decided to do a combo of die cut phrase and a stamped sentiment. For the Christmas phrase I used the new Merry Christmas Love die and cut in red cardstock. The Merry & Bright phrase is stamped in red ink. 
I am now ready to start card assembly. I attached the snow slopes to the designer paper. The bottom larger slope is attached with dimensional adhesive and the top slope I used double sided tape.
I attached the Penguins to the snow slopes again using dimensional adhesive. I wanted them lifted slightly off the designer paper.

 
To complete my card, I attached the image panel to the card base. For some added interest I scattered a few red glitter enamel dots. And, that's my card for today. Hope you all have a great weekend and get to do something fun. So until next time......God bless. 


dies I used to create card:

I am also entering:
1.  Jingle Bells has a not a creature was stirring challenge. 
2.  Winter Wonderland has a Penguins challenge. 
3.  Crimbo Crackers has an anything goes Christmas challenge. 
4.  Fab 'n' Funky has a Christmas challenge. 
5.  The Holly and Ivy has an anything goes Christmas challenge.


Tuesday, October 20, 2020

Snow Babies


Hello Blogger Friends! Thanks for taking the time to stop and visit with The Charmed Life Blog today. 

It was a rainy but warm day here in Pittsburgh. Hubby & I still went for our walk this morning under our umbrellas. We have been going 5-6 times a week and averaging 2 to 2 1/2 miles on each walk. I have definitely noticed a difference the way my clothes are fitting around my hips  especially in my jeans. 

He has walked for years but during our lockdown I decided to join him to get out of the house. I don't mind walking and I even go myself if he isn't around. Hopefully I will keep it up though the winter. 

Then I spent the day in the kitchen - roasting tomatoes and stuffing banana peppers from our garden. Besides the peppers in the phot below,  I stuffed another dozen of peppers that I put in the freezer. It will be a meal for another day.  It's definitely not the end of our garden yet. Just depends on when we get a frost. 
Stuffed Banana Peppers - tonight's dinner

Now onto my card for today. This one I made for my post on the CottageCutz Blog. This die is just so cute and I couldn't resist making a card for my sweet little 5 year old niece.
We all look for card ideas that we can put together quickly and reproduce multiples of at Christmas. This one was one of those cards with the help of my designer paper.

I have in my collection some winter themed scenic designer papers and I thought this die would be perfect to sit in the middle of one of the scenes. The paper is part of the Feels Like Frost collection from Stampin'-Up. 

The papers are a 6 x 6 size. I didn't want a square card so I cut the designer paper to 4 1/2" x 6" and then for each layer I added an 1/8". It's a different size than I usually make but it will work in a 5 x 7 envelope and I shouldn't have to pay extra postage to send it.

I cut the little girl image in 3 shades of Stampin'-Up purple cardstock- purple posy, highland heather and gorgeous grape. The Husky or Sled Dog is cut from Stampin'-Up smoky slate cardstock. I stamped my Merry Christmas sentiment in a grape ink and this card is completed.

Well, that's it for me for this post. I am ready to kick back and watch one of the many Hallmark movies we have on our DVR. So until next time.......God bless.

Die I used to create card:

I am also entering:
1.  The Holly and Ivy Christmas challenge is anything goes. 
2.  2 Crafty Critter Crazies has an anything goes challenge.
3.  Sweet Stampin' has a girly but no pink challenge.  
4.  Crafty Animals has an anything goes. 
5Merry Little Christmas challenge is anything goes. 


Saturday, October 17, 2020

Dashing Through The Snow

Hello Blogger Friends! Thanks for taking the time to stop and visit with The Charmed Life Blog on this Fall Saturday. 

We had our first frost last night. It took out our Zinnias. My hubby covered our tomato plants because we still have about 50 or so on there. He also covered the Dahlia plants. They love the cooler temps and are producing quite a bit of deep red flowers. They make for an excellent cut flower and  I love bringing them indoors to display.  

Now onto my card for today. This one I made for my weekly DT post on the CottageCutz Blog. I created a slimline design card using a couple of the new Christmas dies. We all look for card ideas that we can put together quickly and reproduce multiples of at Christmas. I thought this one would be easy to do just that.

I started off by selecting the designer paper I was going to use for my background. I wanted something snowy and I had several papers in my collection to choose from. I thought this dark blue one would work great for a nighttime scene. It's a paper from BoBunny and part of the Fa La La collection.  Now you could create your own snowy background but if your looking to make multiples quickly a designer paper is the way to go.

White Card Base: 9 1/4" x 4"
Designer Paper Layer: 9" x 3 3/4" 
I decided to cut the images and the sentiment from white cardstock because it would make a nice contrast against the dark blue background. I also cut 2 snow slopes from white cardstock. 
I attached the snow slopes to the designer paper with double sided tape. I let them overlap a bit because that's where I intended to place the one leg of the horse.
I used a combination of Ranger multi medium matte and mini glue dots to attach the images to the designer paper. I like the Ranger glue because it dries clear and makes a secure bond. 
Next, I attached the sentiment. I decided to cut another set to make it really pop against the blue background. I used just the Ranger multi medium matte.
To finish off my card I attached the image panel to the white card base. I added some glitter to both ends of the snow slopes for a bit of an icy look. I am not sure why I did that or even if I liked it once it was done, but it's there now. All in all I am pleased with the way the card turned out.

And, that's it for me for this post. So until next time.......God bless.

dies I used to create card:


I am also entering:
1.  CHNC challenge #512 is anything goes. 
2Alphabet Challenge is "N" for navy blue.
3.  2 Crafty Critter Crazies has an anything goes with a critter. 
4.  A Bit More Time to Craft has an anything goes. 
5 C.R.A.F.T. Challenge is anything goes w/optional twist of Christmas. 


Sunday, October 11, 2020

Gather Together

Hello Blogger Friends! Thanks for taking the time to stop and visit with The Charmed Life Blog today. 

We had our yard sale today at my son's home. I did sell a few things but not as much as I thought I would. But, we have a group in our community where you can post items you no longer need and if someone is interested they respond to your post. You aren't selling the items just giving them away. And that works fine for me. 

So as soon as I came home I took photos and posted them on the site. I had immediate responses for all the items I listed. I didn't get any of the Christmas stuff listed but that will happen tomorrow. I feel today was a win-win for everyone. 

Now onto my card for today. This one I created for the color challenge #811. I was the hostess and I chose rich razzleberry, old olive and whisper white. Optional was to use enamel dots. 

I wanted to make a Fall or Thanksgiving card with these colors so I started off with the leaves. I used a die from CottageCutz and watercolor paper. I sponged rich razzleberry and old olive ink first. Then I pressed them into a Versamark pad and embossed with clear embossing powder. IRL they have a lot of shine which doesn't show up in the photo very well.

The background paper is from the Stampin'-Up "into the woods" collection. I found the acorn enamel dots in my stash. They were off white so I colored them with Copic markers.
The sentiment is from the Stampin'-Up "painted harvest" set. I also used the stitched labels set as the backdrop for my leaves and sentiment.

card details:
Stamps: painted harvest (Stampin'-Up)
Paper: rich razzleberry, old olive, whisper white, into the woods dsp (Stampin'-Up)
Paper Size: A2
Ink: rich razzleberry, old olive, choc chip, (Stampin'-Up), versamark (Tsukineko)
Accessories: rich razzleberry ribbon, stitched nested label dies (Stampin'-Up), fall leaves die (CottageCutz), copic markers E44, E47, E57, acorn enamel dots (unknown)
Techniques: embossing
I am also entering:
1.  The Crafter's Castle has an anything goes challenge. 
2.  Crafty Friends has a use more than one die challenge. 
3My Time to Craft has an autumnal colors challenge. 
4.  Stinkin' Inkers has a shades of fall challenge.
5. Crafty Gals Corner has a Fall colors challenge. 

Friday, October 9, 2020

Kitty & Jack-O-Lantern

Hello Blogger Friends! Thanks for taking the time to stop and visit with The Charmed Life Blog today. 

Hope your day is going well. We had a beautiful fall day here in Pittsburgh- warm and sunny. I didn't get to enjoy the day because I was getting ready for a garage sale we are having tomorrow. 

It's a multi-family one with my son and daughter-in-law and some of her family. We are supposed to have great weather so hopefully it's a successful sale. And, we will be outside for 5 hours so I will get to enjoy the warm weather tomorrow. 

Now onto my card for today. This one I created for the color challenge #810 on Splitcoaststampers. Chris was the hostess and she chose soft suede, terracotta tile and flirty flamingo for her color trio. Optional was anything round. 
terracotta tile, soft suede, flirty flamingo

I used enamel dots and there are circles in my background designer paper to cover the optional item.

I decided to try and create a Halloween card using these colors. It worked out ok for me with the help of some neutral shades. My card layout is from the Splitcoaststampers sketch challenge #819.


I cut the pumpkin from terracotta tile cardstock and the pumpkin vine in mossy meadow (neutral) "magnolia lane" designer paper. For the cat's scarf I used flirty flamingo cardstock. The soft suede color is in my card base, the designer paper and the card layers.

The background designer paper is from the Stampin'-Up "coffee break" collection. The rectangle layer is from the "pressed petals" collection.

I finished off this card with a few terracotta tile enamel dots. Well that's it for me for this post so until next time........God bless. 

card details:
Stamps: pretty pumpkin (MFT)
Paper: soft suede, terracotta tile, flirty flamingo, basic black, basic gray, whisper white, coffee break dsp, pressed petals dsp (Stampin'-Up)
Paper Size: A2
Ink: VersaMark
Accessories: Black Cat w/Jack-o-Lantern, oval, rectangle and square dies (CottageCutz), terracotta tile enamel dots (Stampin'-Up)

I am also entering:
1.  Aud Sentiments challenge is to use a fall/halloween sentiment. 
2.  Moving Along with the Times has an animal/bird challenge. 
3.  Creative Craft Challenge  has a spooky and/or cute challenge. 
4.  Mod Squad has a hello pumpkin challenge.
5.  Paper Funday has an anything goes challenge. Optional is Halloween.  

Thursday, October 8, 2020

Heartfelt Sympathy

Hello Blogger Friends! Thanks for taking the time to stop and visit with The Charmed Life Blog today. I can't believe almost  3 weeks have gone by and I haven't posted on my Blog. It's not like I haven't been creating because I have. 

It's still harvest time in our garden and that has taken a lot of my time. When I finish the garden stuff and then make dinner I am usually pretty exhausted. But things are coming to an end in the garden so my time should free up. 

Today I roasted another batch of tomatoes. And I still have at least 2 more batches to go. But this winter I will be so grateful for a bountiful harvest. Even if it takes a lot of time and work, it's a blessing from God to have a garden that produces. 

We are also having a garage sale at my son's home this coming Saturday so I have been pricing items that I am selling. They are a lot of work so I hope what I have will be sold. If not, we have a group here in our community where you can give items away that you don't need any longer. It's a successful group and everything I have listed always gets taken. It helps if you are giving away things that are in good condition. 

Anyway, let's move onto my card for today. This one I created for the color challenge #807 on Splitcoaststampers. Karen was the hostess and she chose rococo rose, highland heather and pear pizzazz. Optional was to use a rose. 
rococo rose, highland heather, pear pizzazz

I have needed some sympathy cards lately and I didn't have any on hand. It's always best to make them when you don't need them.

I like to keep sympathy cards on the clean and simple side. So for this card, I used some Stampin'-Up designer paper from the "Timeless Elegance" collection and colored the rose with Stampin' Blends. The Blends are Stampin'-Up's version of alcohol markers. 

For the leaves I used a Copic Marker in a shade close to pear pizzazz. I decided not to color the other flowers on the paper. Stamped my sentiment in black ink and added a few rococo rose enamel dots to complete my card.

Well, that's it for me for this post. So until next time .........God bless.

card details:
Stamps: with heartfelt (Rubber Cottage)
Paper: basic black, highland heather, timeless elegance dsp(Stampin'-Up)
Ink: tuxedo black (Memento)
Accessories: highland heather stampin' blends, in-color faceted enamel dots (Stampin'-Up), Copic G20,
I am also entering:
1.  Crafty Creations has an anything goes challenge. 
2.  Creative Moments has an anything goes challenge. 
3.  A Bit More Time to Craft has an anything goes challenge. 
4.  A Perfect Time to Craft has an anything goes challenge. 
5.  Crafty Hazelnut's Patterned Paper Challenge is anything goes with patterned paper. 

LinkWithin

Related Posts with Thumbnails