Saturday, December 23, 2017

Silent Night, Holy Night

Hello Blogger Friends! Thanks for taking the time to stop and visit with the Charmed Life Blog. It's now 2 days before Christmas and all my gifts are wrapped. I am ready for our Christmas Day celebration.
 
I am showing a card today that I created for my weekly DT post on the CottageCutz Blog. So let's get started with some details on how I created this card.
 
Step 1: I don't have many photos to show today but I will give the steps I used to create this card. Started by sponging my background on white cardstock with several different die inks.
I used Stampin'-Up inks- pacific point, berry burst and rich razzleberry. Once the sponging was complete, I took some white acrylic paint and a toothbrush and flicked it on the background to resemble stars.

Step 2:  I cut my image from black cardstock. I thought this would accent it nicely against the sponged background. 
I used berry burst and pacific point cardstocks to layer and as the card base. The cardstock matches my ink colors.
Berry card base:  4 1/4" x 5 1/2"
Blue layering panel: 4 1/8" x 5 3/8"
Sponged panel: 3 7/8" x 5 1/8"
Step 3: I completed the card by stamping my sentiment on the sponged background panel. The sentiment is a stamp set from PaperTrey Ink. The panels are attached with double sided tape.  Well, that's it for me for this post. I would like to extend a Merry Christmas to all my blog friends. Until next time.......God bless.
 
Dies I used to create card:
http://www.scrappingcottage.com/cottagecutzbabyjesuswithanimalselites.aspx


Saturday, December 16, 2017

We Three Kings

Hello Blogger Friends! Thanks for taking the time to stop and visit with the Charmed Life Blog this Saturday in December.
 
Hope your Christmas plans are going well. Mine are just a bit behind. But today, I will finish up the cards and get them addressed and I will be on schedule. I have one more card to make and then I will be officially done this year. Nothing like waiting until the last minute. Each year I say that I am going to make cards all year but it doesn't happen. Maybe this coming year it may work. 
 
Now onto my card for today. This one I created for my weekly DT post on the CottageCutz Blog and also for the IC628 challenge on Splitcoaststampers.
 
Today for your viewing pleasure, I created a card using the Nativity - Three Kings die. I had this idea to use this Three King's die and a background of sheet music. Well fortunately for me, Pam my DT sister, directed me to where I could get these vintage printables for free. And, my card came to life. So let's get started with some details on how I created this card.

Step 1: My first step was die cutting the 3 Kings. I wanted them to have colorful outfits so I used bright colors for their Kingly attire.
I colored two of the faces with Copic E00 (skin white) and E02 (fruit Pink) for some shading. For the 3rd King I sponged a medium brown ink on white cardstock and then die cut from there.
The die pieces were adhered with Ranger Multi Medium Matte. I like this adhesive when using die cuts because it dries clear.
 
Step 2: The vintage song sheet can be sized however large you need it. I used my photo editing software to size it to 4 x 6 and then printed on parchment paper. Then I cut it down to 3 7/8" x 5 1/8". If you are interested here is the Pinterest link for this song printable. I used gold foil as my layering panel and the card base is a berry shade. It's the same color I used for the Kings garments.

Berry Card Base: 4 1/4" x 5 1/2"
Gold Foil Layer: 4 1/8" x 5 3/8"
Song Panel: 3 7/8" x 5 1/8"
Step 3: Time for card assembly and I used double sided tape to attach the panels.
The Kings were attached with dimensional adhesive. I wanted them raised up from the panel for depth.
Once they were on the panel I decided the Bethlehem Star would look good. I wanted something small as an embellishment. So I used the Three Kings Peace ornament and cut just the star. I wanted more depth here as well so I cut 2 more and layered them.
That complete my card for this post. It's a simpler one, but I like how it turned out. So until next time.......God bless.

Dies I used to create card:
http://www.scrappingcottage.com/cottagecutznativity-threekings.aspx
 

http://www.scrappingcottage.com/cottagecutzthreekingspeaceornamentelites.aspx

I am also entering:
1.  A Gem of a Challenge has anything goes Christmas.
2. Crafting By Designs has a Christmas challenge.
3.  Jingle Belles has a holiday wrap-up challenge.
4 C.R.A.F.T. challenge is Christmas.
5.  Creative Knockouts has a Christmas Delights challenge.

Sunday, December 10, 2017

Christmas Eve Santa

Hello Blogger Friends! Thanks for taking the time to stop and visit with the Charmed Life Blog this Sunday in December.
 
It is cold and blustery today but we aren't having snow like other areas of the country. it's one of those days when I start thinking of comfort food. So for brunch, after church, we had pumpkin pancakes and eggs. The pancakes with real maple syrup really satisfied on a cold day.
 
Busy day for me again today. I have some DT cards due so I will be working on those most of the day. My hubby went to help his Mom get her home decorated for Christmas so I don't have to fuss over dinner.
 
But, before my day starts I wanted to post another Christmas card.  I made this one for the color challenge #650 on Splitcoaststampers. I was the hostess and I chose tranquil tide, crumb cake, soft suede and very vanilla as the color palette. Optional on this palette is ribbon or twine.
tranquil tide, crumb cake, soft suede, vanilla
I decided to try and come up with a Christmas card with these colors. Yay! I was successful.

I used the CottageCutz Christmas Eve die and cut in very vanilla cardstock. Looks like this die is sold out but here is another very similar that would work for this card as well. It's the Santa's Best Friend's die.  Layered that over Stampin'-Up tranquil tide designer paper from the delightful daisy collection. It reminded me of a nighttime sky.

I paper pieced the deer with soft suede cardstock. They are part of the die. I tried sponging but it was just a bit too light so I used cardstock.

For the moon I wanted some definition, so I inlaid silver (neutral) cardstock. I created a snowbank and added chunky glitter.

To finish off the card, I stamped my sentiment and added a linen thread bow to the lamppost. The sentiment is the wandering words stamp from Stampin'-Up.

Well that's it for me for today. So until next time........God bless.

card details:
Stamps: wandering words (Stampin'-Up)  
Paper: tranquil tide, crumb cake, very vanilla, soft suede, delightful daisy dsp (Stampin'-Up)
Ink: tranquil tide  
Paper Size: A2
Accessories: Christmas Eve die (CottageCutz), in the meadow die (PTI), linen thread, chunky glitter (Stampin'-Up) 

I am also entering:
1.  Addicted to Stamps has a Season's Greetings challenge.
2.  Come and Get It has a Christmas Challenge.
3.  Dragonfly Journeys has a Here come Santa Claus Challenge.
4.  Pile It On has a non-traditional holiday colors challenge


Saturday, December 9, 2017

Merry Christmas Shaker

Hello Blogger Friends! Thanks for taking the time to stop and visit with the Charmed Life Blog this Saturday in December.
 
I can't believe it's just a little more than 2 weeks until Christmas. My house is decorated and I just have to finish up my Christmas cards. That is my goal for this weekend. Which is why I am showing you a Christmas card today.
 
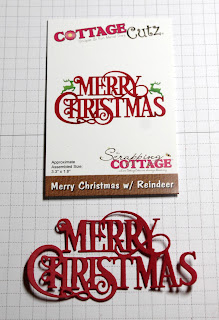
This one I made for my weekly DT post on the CottageCutz Blog. I created a Christmas shaker card. I used the Merry Christmas w/reindeer and Mistletoe & Bells dies. So let's get started with some details on how I created this card.

Step 1: Shaker cards are not difficult to make. And the following tutorial will show you how simple they really are. I started by cutting my circle in the image panel. Used the 3rd largest of the Circle dies- it's a 2 3/4"" circle. I embossed the panel with a falling snow folder.
Image Panel: 3 7/8" x 5 1/8"
Step 2: Cut the dies I am using for my card. The pine tree inside the shaker is from the Window Christmas Friends die, also used the Merry Christmas w/reindeer and Mistletoe & Bells dies. I used the largest of the Stitched Square dies and cut the panel that would hold the shaker elements in place. I stamped this panel with some snowflakes.
Step 3: Started the assembly of the shaker part of card. Used glue dots to attach the  3 1/2" window sheet to the back side of the image panel. I took a used dryer sheet and rubbed it across the window sheet. It eliminates the static. Used dimensional foam adhesive and attached to edge of circle. I used my powder tool (EK Success) and ran it around the inside of the foam adhesive. It keeps the sequins from sticking to the adhesive.
Added some different colored sequins to the inside of the circle.
I then attached the pine trees to the square panel and then centered the panel over the sequins. 
 I used more dimensional adhesive on the back of this panel to allow it to sit evenly on the card base.
Attached this shaker panel to the red card base.
Step 4: Cut my Merry Christmas sentiment in red cardstock.
Used Ranger multi medium matte and attached to card front.
To complete my card, I added the mistletoe and bells and scattered a few red sequins. I hope I have given you some inspiration on a fun Christmas card. That's it for me for today. So until next time........God bless.
 
Dies I used to create card:
http://www.scrappingcottage.com/cottagecutzmerrychristmaswreindeer.aspx

http://www.scrappingcottage.com/cottagecutzmistletoeandbells.aspx

http://www.scrappingcottage.com/cottagecutzwindowchristmasfriends.aspx

http://www.scrappingcottage.com/cottagecutzcirclesetbasics.aspx

http://www.scrappingcottage.com/cottagecutzstitchedsquaresetbasics.aspx
I am also entering:
1.  A Gem of a Challenge has anything Christmas goes.
2.  Card Mania has a Christmas challenge.
3.  Country View Challenge has a Christmas theme.
4.  Creative Craft Cottage has a Christmas is coming challenge.
5.  Dive Cut Diva's has a Winter theme challenge.

Friday, December 8, 2017

Snowflakes with Kraft & Gingham

Hello Blogger Friends! Thanks for taking the time to stop and visit with the Charmed Life Blog.
 
It's a cold day here in Pittsburgh but no snow forecasted for us like in other areas of the East Coast. One of those perfect days for staying indoors and doing some crafting. That's my plan anyway since I have cards due for a couple of the DT's that I am on.
 
I don't think I ever mentioned on my Blog that I was selected for the Splitcoaststampers Dirty Dozen Design Team. It's a real honor and one that I am so thrilled about.
 
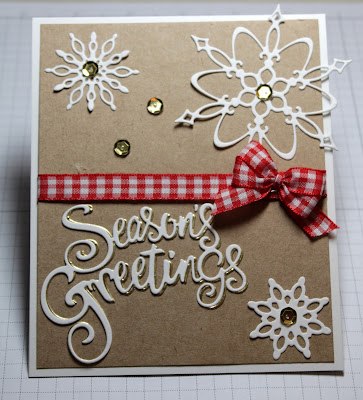
Now onto today's card. This one I created for my post on the CottageCutz Blog. I am using the Snowflakes Set and the Season's Greetings w/Snowflakes dies. So let's get started with some details on the CAS card.

Step 1: I love the look of both kraft and white cardstocks together for Christmas cards.  It just has that country look to it especially when paired with red gingham ribbon.

White Card base: 4 1/2" x 5 1/2"
Kraft Panel: 4 1/4" x 5 1/4"
Step 2: Cut the snowflakes and the Season's Greeting phrase from white card stock. I also cut another seasons' greetings in gold as an afterthought. I did a slight offset just for added interest. This is something you could leave off the card as well.
I attached them to the card base with Ranger Multi Medium Matte. I like this adhesive because it dries clear.
Once I positioned the snowflakes I added my red gingham ribbon. I decided to add a bow to give this a more finished look. But you could leave that off also if you like. Then I thought some gold sequins would also be a nice touch.
Step 3: Attached the image panel to the white card base to complete my card. I hope I have given you an idea for a quick Christmas card. If you need these dies they are available now in the online store.
Well, that's it for me for this post. So until next time.......God Bless.
 
Dies I used to create card:
http://www.scrappingcottage.com/cottagecutzsnowflakesset.aspx

http://www.scrappingcottage.com/cottagecutzseasonsgreetingswsnowflakes.aspx


I am also entering:
1.  CAS on Friday has a Christmas challenge.
2.  Aloha Friday Challenge has an anything goes w/optional of Christmas.
3.  That's Crafty Challenge Blog has a 'tis the season challenge.
4.  Winter Wonderland has an anything goes challenge.
5.  Christmas Cards All Year Round has an anything goes challenge.
 

Thursday, December 7, 2017

So Very Grateful

Hello Blogger Friends! Thanks for taking the time to stop and visit with the Charmed Life Blog today.
 
Hope your Christmas card making, decorating, baking and shopping is going well. I will finish up my decorating today.
 
Then this weekend my cards will be completed and mailed. I have about 40 made. Some people on my list who don't really appreciate a handmade card get one from my store bought stash. I mean really why spend time making a special one for someone who could care less- right! That is my thinking on the matter.
 
I am finished with the Christmas shopping also. Just have to wrap them and that will be another check off my list. I don't feel as stressed this Christmas because I am on schedule and maybe even slightly ahead.
 
Now onto my card for today. This one I made for the color challenge #660. Pam was our hostess and she chose Cajun craze, crushed curry and cherry cobbler as her colortrio. Optional was to make a card of gratitude.  
 
I started my card with my background. I used the white embossed Stampin'-Up irresistibly floral specialty dsp. It's designed for an embossed resist technique. I sponged crushed curry and Cajun craze inks.

My leaves are from the Stampin'-Up set fantastic foliage. Stamped in crushed curry and sponged the edges in Cajun craze. Then I fussy cut the 3 leaves.

Cut a flag in cherry cobbler and arranged the leaves, burlap ribbon and my tag sentiment. Cut the grateful phrase in early espresso to finish my card.

Well that's it for this post. Until next time ........God bless.

card details:
Stamps: counting my blessings (PTI), fantastic foliage (Stampin'-Up)
Paper: cajun craze, whisper white, cherry cobbler, irresistibly floral dsp (Stampin'-Up)Paper Size: A2  
Ink: cajun craze, crushed curry, early espresso  
Accessories: grateful phrase die (CottageCutz)burlap ribbon (Michael's), flag stax die (MFT), crushed curry mini clothespin, gold tag, baker's twine (Stampin'-Up) 
Techniques: sponging  

I am also entering:
1.  Addicted to Stamps and More has an anything goes challenge.
2.  Crafty Creations Challenge is anything goes.
3.  Crafty Gals Corner has an anything goes challenge.
4.  Creative Moments has an anything goes challenge.


Saturday, December 2, 2017

Joy Nativity in a Z Fold Card

Hello Blogger Friends! Thanks for taking the time to stop and visit with the Charmed Life Blog.
It's going to be a busy Saturday here at my house. I was recruited to help decorate our church this morning. Then the afternoon and evening I have plans to finish up my Christmas cards.
My hubby will be at work until 11:00 pm so I should be able to work without interruptions. 
 
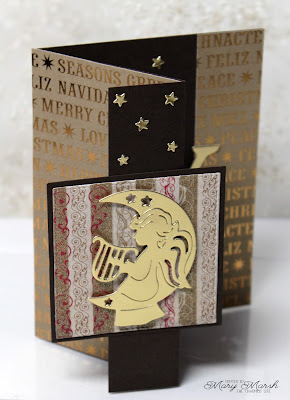
For today's card, I am showing the sample I made for my weekly DT post on the CottageCutz Blog. For this post, I decided to make a Z-Fold card and feature the Joy Nativity and Angel Trio dies. So lets get started with some details on this card.

Step 1: This week I started my card with the fancy fold I wanted to use. I like the Z-Fold and thought it would work well with the dies I wanted to showcase. This fold makes a very nice card presentation and is not difficult at all to make.

Dark Brown Card Base: 5 1/2" x 8 1/2"
Step 2: Cut 2 pieces of patterned paper- one is 3" x 5 1/2" and the other is 1 1/4" x 5 1/2".
Attach the 3" piece to the cardstock between the scored lines.
Turn the card over and line-up the 1 1/4" patterned paper to the corner of the card.
Used my bone folder and reinforced the scores that I made on the cardstock. I folded back the score line on the 1 1 /4" panel and now I have my Z-Fold card.

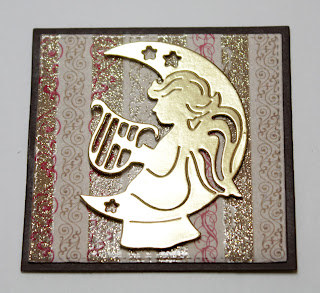
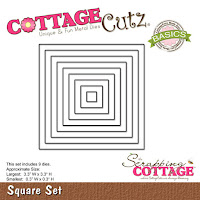
Step 3: I created the front panel for my card. I used one of the angels from the Angel Trio die and on the square panels I used the Stitched Square (4th largest) and the Square Set (3rd largest) dies.
Assembled the square panels and attached the angel with dimensional adhesive.
I used doubled sided tape and attached the panel to the 1 1/4" panel.

Step 4: Now onto the inside of the card. I used the Joy Nativity die for the inside panel. I also used another of the angels from the Angel Trio die.
Attached the pieces to the card inside with glue dots and Ranger Multi medium matte adhesive. After I attached the kneeling angel I decide to add a few pine sprays to ground the image. I also added some stars to this panel. I used the stars from the Snowglobe Friends die.
I also added stars to the front image panel to complete my card. And, that's it for me for this post. I hope I have given you an additional idea for a Christmas card. So until next time.......God bless.
 
Dies I used to create card:
http://www.scrappingcottage.com/search.aspx?find=angel+trio

http://www.scrappingcottage.com/cottagecutzjoynativityelites.aspx

http://www.scrappingcottage.com/cottagecutzsquaresetbasics.aspx

 
 I am also entering:
1.  Crafting with Dragonflies has a Christmas card glammed up challenge.
2.  Crafty Calendar Challenge has a "it's Christmas" challenge.
3.  Scrap & Craft Inspiration has a anything Christmas challenge.
4.  HIMCR #329 has a Christmas Colors challenge.
5.  Jingle Belles has a Gold, Silver, or Copper Christmas challenge.

LinkWithin

Related Posts with Thumbnails