Hello Blogger Friends! Thanks for taking the time to stop and visit with the Charmed Life Blog on this Saturday in October.
I am back from my trip to San Francisco. I went out for a week to take care of my precious granddaughter, Phoenix Daisy. The time spent with her was so wonderful and went by so quickly.
We play non-stop with her baby dolls, and she has 7 of them. I am always amazed at her creativity and the ideas she has to play with them. She told me no one plays "Babies" like I do. Of course, because that's what Grandma's do (lol)!!
It's been awhile since I have posted on my Blog. There was no time when I was away. I went to bed when Phoenix went to bed because I was so tired. Then just when my body adjusted to the 3 hour time difference, it was time to come back home.
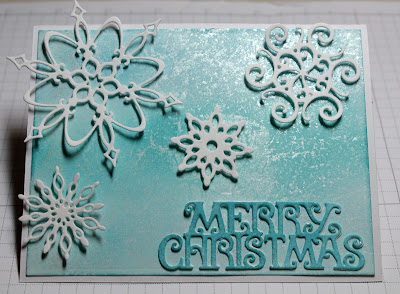
My card for today is one that I made for my weekly DT post on the CottageCutz Blog. I used a new Christmas die, Snowflakes Set for my sample card. I chose the faux mother of pearl technique for my background because it's a very simple technique to do and it has a huge impact on your finished card. I also thought it would give the illusion of a snow squall. So perfect for my snowflake images. Here is a video link to a tutorial on Splitcoaststampers.
And, I also wanted to show a card that would be easy to mass produce using this new die. So let's get started with some details on how I created my card.
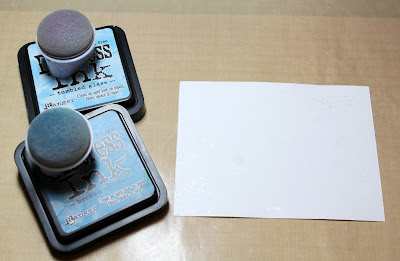
Step 1: I used some Frost White Acrylic paint from Tsunineko. It has a bit of a shimmer to it. This paint acts as a resist and shows through the colors that I will sponge on in the next step.
I put a small amount of the frost paint on my craft mat. I used a piece of cling wrap and scrunched it up and then dipped it in my frost paint. I pounced it on my craft mat to work it into my cling wrap and also to insure that I didn't have any big globs of paint.
I then dabbed it lightly on my white cardstock. I left some open space so I could sponge the colors I was going to use. There is lots of shimmer on this panel that is hard to capture in a photo. I set it aside at this point to allow it to dry.
Step 3: Once the paint was dry, I decided on the shades of distress ink with tumbled glass and broken china.
After I started to sponge the ink, I decided to add a 3rd shade of ink using peacock feathers. I liked the color variation that I achieved. You can see on the photo below the white paint has resisted the distress ink.
When I finished sponging I used a paper towel to rub off the ink that was sitting on top of the white frost paint. This allows more of the frost design underneath to come through.
Step 4: Since I was going with a turquoise card base, I decided to layer the pearl panel on white. Just for some variation between layers.
Turquoise Card Base: 5 1/2" x 4 1/4"
White Layering Panel: 5 1/4" x 4 1/8"
Background Panel Size: 3 7/8" x 5 1/8"
Step 5: I cut my snowflake images from white cardstock. They are such pretty shapes and I really like the size variation. I was able to use all 4 of the images on my background panel.
To adhere the snowflakes to the background panel, I cut small pieces of dimensional adhesive. I didn't want them laying flat against the background.
Step 6: The sentiment is from an older CottageCutz die - Merry Christmas Santa. I cut it from one of my practice panels that I made. I sponged more ink on it for more of a contrast. I also cut another phrase in white and very slightly offset it.
To complete my card I attached it to the turquoise base. I wanted some depth between these two panels so I used some white fun foam behind the image panel. It gave it just the lift I was looking for I secured it with Tombow liquid multi glue.
Well, that's it for me for this post. So until next time.......God bless.
Dies I used to create card:


No comments:
Post a Comment