Hello Blogger Friends! Thanks for taking the time to stop and visit with the Charmed Life Blog.
Enjoying my last couple days of Easter break before pre-school resumes on Thursday. It's a bright sunny day here in Pittsburgh. My grandson has a baseball game this afternoon at his school. So it will be a perfect day for it.
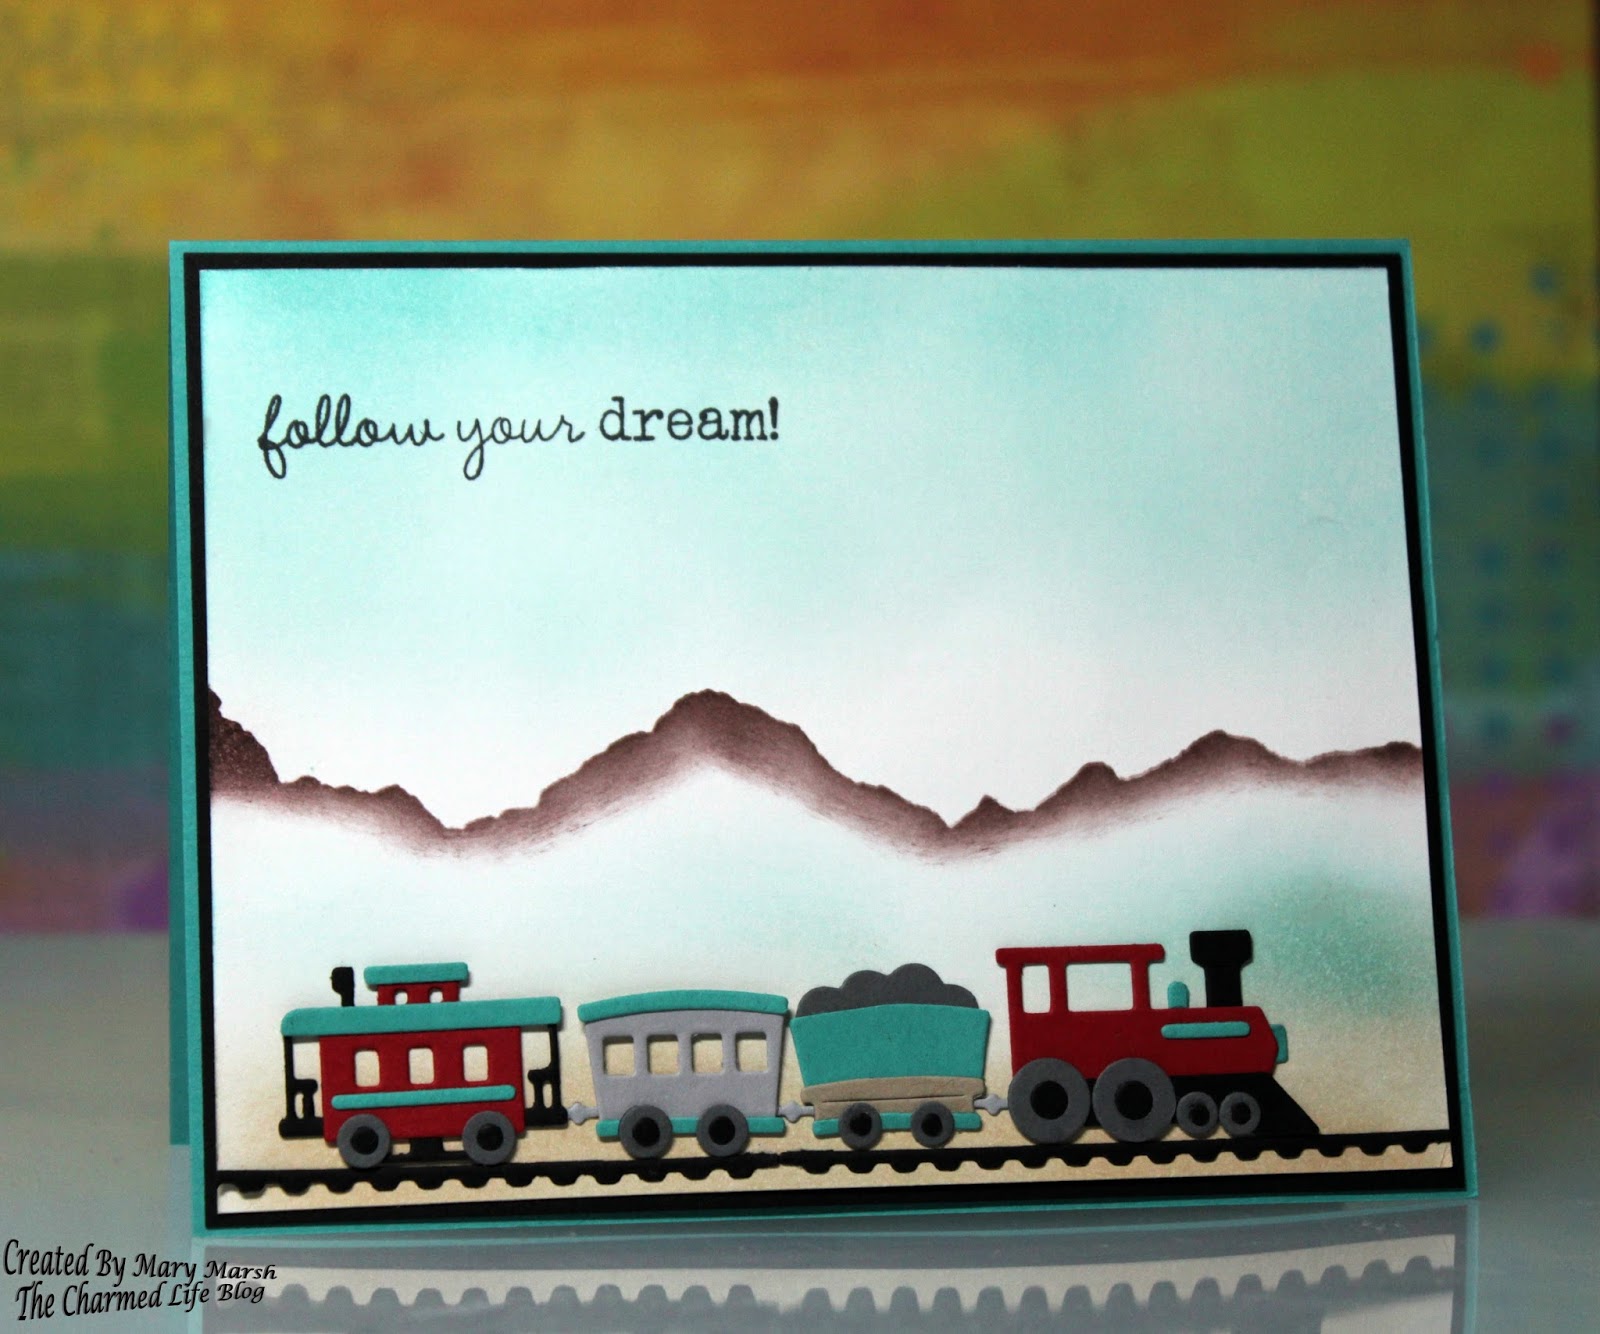
Let's move onto my card for today. This one I made for my weekly DT post on the CottageCutz blog.
And, for your viewing pleasure, I am showcasing the new Choo Choo Train dies. But, I am showing another way to use this die that isn't centered around a baby card.
So without further delay, let's get started on how I created my card.
bermuda bay card base: 5 5/8" x 4 3/8"
black Layer Panel: 5 1/2" x 4 1/4"
Image Panel: 5 3/8" x 4 1/8"
Step 1: I started my card this week by die cutting my train pieces. I used the colors from the Splitcoaststampers color challenge #631. The colors are red, crumb cake, bermuda bay and black. I also used a neutral of smoky slate and basic gray.
 |
| bermuda bay, black, real red, crumb cake |

Step 2: I decided to create an outdoor scene for my train. I started it by sponging the teal ink on the top part of my white cardstock.

I wanted some mountains in this scene so I took a post it note (it's blue) and tore it into a mountain range shape. Placed it on my cardstock to cover the card top and sponged in chocolate ink.


For the final step to the background, I sponged more teal ink and then crumb cake and tea dye distress. I was happy with how the background turned out.

Step 3: I usually stamp my sentiment as one of my last things to complete my card. But, since I had a couple of layers on this one I stamped at this point in the process. I used Tuxedo Black ink and my MISTI for placement.

Step 4: I placed my train cars, couplings and track on the completed background scene.

Step 5: I layered the black cardstock to the image panel and then to my teal card base. And, that completed this card. Here is a close-up of the card. I wanted to show the detail in the train cars -right down to the couplings that connect the train together. You can click any of the photos to make them larger.

I hope I have given you an idea for a different way to use this die. Sometimes by just thinking out of the box a bit, you can get a creative idea to use a die in a unique way. Well, that's it for me for this post. Until next time..... God bless.

Die I used to create card:

I am also entering:
1. Always Fun Challenge is anything goes.
2. Crafting From the Heart has an anything goes challenge.
3. Lost Coast Designs has a favorite background technique. Sponging is one of my faves.
4. Path of Positivity has a beauty of nature challenge.


Cute card, I like how you did the shading to create the mountains.
ReplyDeleteOoh, wonderful background for your train! Your mountains are wonderful behind the train! Thanks for sharing with us over at Path of Positivity! ~Katrina
ReplyDeleteThank you for entering the Lost Coast Portal favorite background challenge. I like how you made the mountains for you background. Cute card.
ReplyDeleteThis is fabulous, I love how you have made your background for this very sweet card. Thank you so much for joining in with us at the Lost Coast Portal To Creativity. Sue xx
ReplyDeleteGreat Tutorial! Thanks for participating in the Always Fun Challenges!
ReplyDeleteDT Waleska
What a cool background! Have never seen this technique before so thanks for sharing it on the Lost Coast Designs Challenge!
ReplyDeleteGreat technique--it looks 3D! So glad you are playing along in the Lost Coast Portal to Creativity "Favorite Background Technique" challenge. :)
ReplyDelete