Hello Blogger Friends! Thanks for taking the time to stop and visit with the Charmed Life Blog.
It's a bright and sunny day here in Pittsburgh. Such a difference from yesterday when it was cold and blustery and snowy all day. It laid on the grass and roof tops but didn't stick to the ground.
It didn't keep people from coming out to our church fish fry. We had a big crowd and another sell out on my shrimp and crab chowder. We have one more next Friday for this year. It's a lot of work but the camaraderie in our kitchen is great.
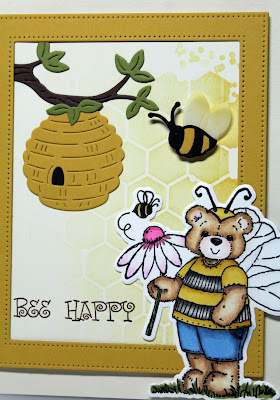
Now onto my card for today. this one I made for my weekly DT post on the CottageCutz Blog. Today for your viewing pleasure, I am showcasing another one of those dies. I present Bumblebee Ben. He will be the star of my framed card. So without further delay, let's get started on how I created my card.
Hello Honey Frame: largest wide stitched rectangle frame die 4 3/4" x 3 3/4"
Image Panel: 4 1/8" x 5 3/8"
Step 1: I used Tuxedo Black (Memento) ink on X-Press It Blending cardstock to stamp the image. I always stamp 2 just in case I make a mistake in coloring.
Today, I am using both Prismacolor Pencils + Gamsol and Stampin'-Up Blendabilities Alcohol Markers.
Gamsol is an odorless mineral spirits that helps to move the wax around in the pencils.
Blendabilities used: Melon Mambo (light & medium), old olive (light and medium), might of navy (light, med and dark )
Prismacolor Pencils: PC1082, PC947 (brown), PC928, PC993 (pinks), PC1060 (gray), Black & WhiteAfter coloring I cut Ben out with the coordinating die. It's included in the set.
Step 2: Cut the frame with the pierced wide rectangle frame set in a honey cardstock. I wanted a stenciled background for the beehive and bee. Used distress ink, honeycomb stencil and a stencil brush.
Step 3: With stenciling complete, I cut my background elements. Used an older die set "Beehives" that includes the beehive, bee and tree limb. I thought it worked well with Bumblebee Ben. Used the same honey cardstock for the beehive. Used vellum for the bee's wings and sponged lightly with honey distress ink.
Step 4: Stamped my sentiment. This is a card of encouragement so I thought this stamp would work well. I used a stamp-a-ma-jig for placement. I laid the card pieces on the background and added the frame to make sure I got the proper placement.
Step 5: I assembled my card on this step. I used mounting tape to lift the frame from the background. It adds interest to your card. Since the frame was popped up, I didn't need to do that with Ben. Here is a close up shot of the dies. Really a lot of detail in the beehive and bee and in the stitched frame. All of the CottageCutz dies have such great detail.
Well, Blogger friends that's it for me for this post - until next time.........God bless.
Dies I used to create card:
I am also entering:
1. A Gem of a Challenge has a furry friends challenge.
2. Crafty Friends has an animals or birds challenge.
3. My Time to Craft has a no designer paper challenge.
4. Creative Knockouts has an Outside Fun challenge.


Such a lovely card, this image is perfect for our theme and the honeycomb effect looks great
ReplyDeleteThank you for joining us at the Crafty Friends challenge, come back soon
Such a lovely card, this image is perfect for our theme and the honeycomb effect looks great
ReplyDeleteThank you for joining us at the Crafty Friends challenge, come back soon
What a fab encouragement card, Mary! I love the subtle stencilled honeycomb background! Thanks for joining in at My Time to Craft!
ReplyDeletelove Mags B DT x
Beautiful card! I love all of the individual layers and the bear is too cute!!
ReplyDeleteI finally have a computer again and can get back to visiting!
I feel i need this stamp in my life. Thanks so much for sharing over at "Creative Knockouts" DT: Shelley
ReplyDeleteThis is such a lovely creation. Ideal for our challenge. Thank you for joining us at A Gem of A Challenge and good luck - Michelle x
ReplyDeleteHello… Thanks for sharing your card with us at Crafty Friends Challenge Blog… your card is lovely and fits perfectly with our ‘Animals/Birds’ challenge theme… hope you can join us next time and good luck in the draw.
ReplyDelete[Diane Louise, Team Leader for Crafty Friends Challenge Blog]
What a lovely card!!!
ReplyDeleteThanks for joining Crafty friends
Laura DT