Wednesday, September 28, 2016

~Get Well Soon~

 
Hello Blogger Friends! Thanks for taking the time to stop and visit with the Charmed Life Blog.
  
We are 1 week into our fall season and our weather has been beautiful. The late season flowers are blooming like crazy in our gardens. We have dahlia's, zinnias and mums gracing our back yard.
 
My hubby brought in a beautiful bouquet of cut flowers tonight. I love being able to go right outside and get my flowers. It gives me the same feeling as going out and picking fresh vegetables to be used for dinner. So I am enjoying this season because it ends quick and the cold, rainy days of fall will be upon us before I know it.
 
Now, onto my card for today. This one I made for the color challenge #602 on Splitcoaststampers. Maura is the hostess and she chose sweet sugarplum, rich razzleberry and smoky slate. Optional was to make a thinking of you or sympathy card.
 
My layout is based on the Viva La Verve September sketch. The sketch was an angled panel, which I love, but with my diagonal background paper it just didn't look right. So I straightened out my rich razzleberry panel and then stamped my sentiment on an angle.

The background designer paper is from the Stampin'-Up 2016-2018 in-color paper pack. Cut my rich razzleberry panel and the smoky slate circles with CottageCutz stitched rectangle and circle dies.

My images and sentiment are from the Lawn Fawn "get well" set. The band aid and med bottle are stamped in sweet sugarplum ink and then I did some paper piecing. The cute little nurse birdie is colored with Stampin'-Up rich razzleberry blendabilities markers. The lightest ink is a good match for sweet sugarplum.

The "hi" word is a die from MFT. I added some wink of stella for a little pizzazz. I completed my card by adding some heart enamel dots. They are from the Stampin'-Up in-color collection.
 
Well, that's it for me for this post. So until next time........God bless.
 
I am also entering:
1.  Inspiration Destination has an anything goes challenge.
2.  Simon Says Stamp Wednesday challenge has an anything goes.
3.  The Crafty Addicts Challenge is anything goes/patterned paper.
4.  Crafty Sentiments Designs has an anything goes challenge.

Friday, September 23, 2016

Suspended Spinner Ornament Card

Hello Blogger Friends and a happy Friday to you all. Can't believe another week has come and gone. Thursday was the official start of the fall season.
 
So even though the temperatures in the high 80's are still screaming summer - it's a wrap my friends. My garden is still producing tomatoes and beans. In fact, today I will be roasting and then freezing another batch.  I will be set for this winter with fresh tomato sauce both jarred and frozen.
 
I feel like I should be showing beach style cards but Christmas is starting to knock on our doors. With that in mind today I am bringing you a Christmas card using several of the new CottageCutz Christmas 2016 dies.
 
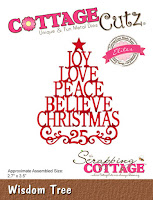
I have said before that I like making Christmas cards in non-traditional colors and that's what I have done today. My card colors are Stampin'-Up's new dapper denim, mint macaron and melon mambo. I used the Nested Ornaments : Teardrop, the bow from the Holiday Mason Jar and the Christmas word from the Wisdom Tree Die.

I also tried my hand at a suspended spinner card for the first time. I don't have a video to show you but the ornament spins nicely. It will be a fun surprise when the recipient opens the card. I did find this video on YouTube that helped me create my card. My ornaments spin just like her Christmas tree does.  So let's get started with some details on how I created my card.

Mint Macaron Card Base:  4 1/4" x 5 1/2"
Mint Macaron Designer Paper Layer: 4 1/8" x 5 3/8"

1.  I started off by cutting my teardrop ornaments. For this card I used the smallest ornament in this 3 die set. I cut those in a denim blue color. I wanted to add a flourish to the ornament so I used the wisdom tree die and cut the bottom flourish in melon mambo. My camera is almost making it look red.
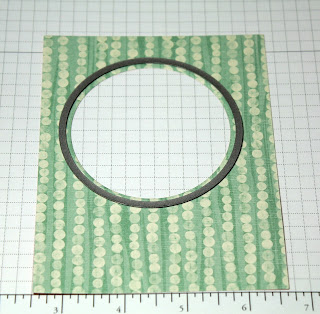
2.  The next step was to cut the opening for the spot where my ornament will suspend. I used the CottageCutz Circle Set dies (3rd largest) to cut both the patterned paper as well as my card base.
3.  Once the first opening was cut, I took the next largest circle die and this time just cut my mint macaron designer paper. I wanted to be able to see the underlying cardstock and give the appearance of a framed layer.
 
4.  Now I am ready to attach some gold metallic thread to the 2 ornaments and then adhere those together. I cut approximately a 5" piece of the gold thread and laid it in the middle of the ornaments. I used Tombow adhesive for this step. I used 2 ornaments so when it spins around you will see a finished back of the ornament. The silver dots were left after I cut the ornament tops. I thought they made a cute little embellishment.

5.  The ornament is now ready to be centered in the opening of the card base. I pulled the thread so it was taut and then taped it down and trimmed off the excess metallic thread.
 
6.  On this step, I attached the patterned paper to the card base. I wanted a bow over my ornament but did want to use ribbon. So, I used the bow that is part of the Holiday Mason Jar die set. This was cut in the melon mambo color.
 
7.    My card is ready for the sentiment. I debated on whether I should stamp a greeting or use a die cut. Once I cut the Christmas word from the Wisdom Tree die in melon mambo color my mind was made up without even trying a stamped sentiment. I really like how the pink color complimented the mint designer paper.
Well, Blogger friends that completes my card for this post. I hope I have given you some inspiration for the teardrop ornament dies. Don't forget about the newest challenge that is running right now on the CottageCutz Blog. The theme is holiday and here is a link for more information.
 
So until next time........God bless!!!


http://www.scrappingcottage.com/cottagecutzwisdomtreeelites.aspx


Friday, September 16, 2016

~Tree Tops Glisten~

 
Hello Blogger Friends! Happy Friday to you all. Don't know where this week went to so quickly.
 
We started full sessions of preschool this past Tuesday. We have a great class of 11 kids. They all seem to like the new adventure their on right now.
 
I like the cooperative spirit they all have. Whether it's time to come to circle for our good morning activities or story time, art projects, or snack or outside time they all listen and cooperate. It hasn't been like that in previous years. So our year is off to a good start.
 
It will take me a couple of weeks to settle into the routine again. Right now I am really tired after a day in class. And today is a recovery day for me (lol). I slept 10 hours last night. Today is a gym day for me so I will get energized there.
 
So let's move onto my card for today. This one I created for the Color Challenge #600 on Splitcoaststampers. This is a fun anniversary challenge that I hosted and there is still time to play along with us.
I also posted it as my DT card on the CottageCutz blog. Without further delay, let's get started on some details of how I made this card.
Today I am featuring  a Christmas card using one of the new CottageCutz Christmas 2016 dies.

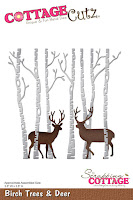
This one is the Birch Trees & Deer dies. The die cuts the trees in 4 different pieces. I think that makes it much easier for placement and attaching to your cardstock. And, I love the antlers on the deer. The die cuts so smoothly.

White Card Base:  4 1/4" x 5 1/2"
Smoky Slate Layer: 4" x 5 1/8"
Image Layer: 3 7/8" x 5"

I started my card by creating the background. It was done by using both a brayer and a large sponge dauber. My ink colors are Stampin'-Up's coastal cabana and bermuda bay.
Tips on using Brayer: I always use dye based inks because it dries quickly and when you mix the inks they will stay true to color. I use a soft rubber brayer from Speedball.
My cardstock is a smooth white cardstock. Because it's so smooth you won't get a lot of spots in your work like you would by using a textured cardstock.

When you ink up your brayer, roll in one direction. If you roll it back and forth you won't ink the entire brayer.
When I start the actual brayering, I have the brayer right next to my cardstock and roll upwards and then come back and catch the edge of the paper. And then go back and forth, back and forth.

I used the lightest shade of ink and went about 1/3 of the way down my cardstock. I repeated this several times until I got the shade and look I wanted.

Then I inked up my dauber and started sponging with the bermuda bay ink. I kept applying color until I had the shade I wanted. I didn't cover the entire background because I knew I was going to add a snowbank to this card.


Once this part of my background was complete, I pulled out a snowflake stencil to create some background snow. I secured the stencil with some painters tape. Works like a charm for me.
I used 3-D molding paste and smoothed it over the stencil with a spatula. Once I have the paste in place  I remove the tape and carefully lift off the stencil. I set it aside for about an hour to dry.
While this was drying I cut the snowbank from white cardstock and stamped my sentiment in the teal ink. Then I added some glue and chunky glitter. Just wanted a little sparkle on the card.
I cut the trees in smoky slate cardstock and my deer in soft suede cardstock. I also added chunky glitter to the treetops to make them glisten and sparkle just like my sentiment says.
Now with all the elements complete, I am ready for the card assembly. I attached the trees with Ranger multi-medium matte and I used glue dots for the deer. The image panel is layered over the light gray cardstock. And, to this layer I cut some white fun foam to lift it off the base panel. It just creates more dimension on your card. You could also use mounting tape.
Here are some close up shots of the trees and the deer. You can also see the little bit of chunky glitter I added to the treetops for the glistening effect.  
Well my friends, that's my post for this week. I hope my card has given you some ideas of ways to use this new die set.
Just a reminder that our 6th challenge is going on with a Holiday theme this time around. Get info here.
Until next time.......God bless!!!
http://www.scrappingcottage.com/cottagecutzbirchtreesanddeer.aspx
 
I am also entering:
1.  Craft Rocket Challenge is using mostly blue.
2.  Fab 'n'Funky has an inspired by nature challenge.
3.  Fresh Brewed Designs has an animal challenge.
4.  A Snowflakes Promise is anything goes.
5.  Christmas at Sweet Stampin' has a Christmas die cuts challenge.


Friday, September 9, 2016

~Season's Greetings~

Hello Blogger Friends and a happy Friday to you all. We are still having some crazy hot and humid weather here in the eastern part of the U.S.
 
Our garden is still producing tomatoes at a good rate. Not enough to do another canning process but I get enough to roast them and then freeze for use later. I roast them with garlic, onions and some balsamic vinegar. They are so delicious and will be a flavorful base for whenever I need a tomato based sauce this coming winter. 
 
And speaking of winter, I am showing a card today that I created using the colors from the Splitcoaststampers CC599 challenge. I like using non-traditional colors for Christmas cards and these colors worked out great for my card idea.
 The colors for challenge #599 are wild wasabi, blushing bride and soft sky. Optional is to use glitter.
blushing bride, soft sky and wild wasabi
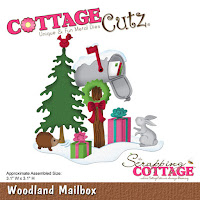
I also posted it on the CottageCutz blog for my weekly blog post. And, the die I used is the Woodland Mailbox from the CottageCutz 2016 Christmas part 2 release. This set comes with the mailbox, pine tree, wreath, presents, bunny, hedgehog, bird, snowbank and even letters for the mailbox. It is a super cute set. 
 
You could die cut with white cardstock and then color the images the way you want. Or you could do as I did and die cut with different colored cardstock. It's your preference and either way it would make for a cute card.
 
So here are some details on how I created this card.:
 
Wild Wasabi card base: 5 1/2" x 4 1/4"
White image panel:  5 1/8" x 3 7/8"
 
I started this card by sponging my background panel with a soft sky and blushing bride inks. I was trying to achieve a soft subtle background for the die images. I used a sponge and a sponge dauber on this background.
 
Once the background I was finished I die cut all my images and adhered them to the card with a combination of glue dots and Ranger multi matte medium.
 
The sentiment is from a Stampin'-Up Paper Pumpkin kit from 2014 and I stamped in cucumber crush ink. Scattered a few sequins for some additional background interest and that completed my card.
Here is a close-up shot of the dies. I also used some white glitter paper for my snowbank and mailbox snow. Look at the cute little hedgie and also the letters in the mailbox. The white one even has a stamp on it- so cute.
 
Well my friends, that's my card for today. I hope I have given you some ideas of ways to use this new die set. So until next time........God bless.
http://www.scrappingcottage.com/cottagecutzwoodlandmailbox.aspx
 
I am also entering:
1.  Animal Friends Challenge wants us to have an animal with fur on our card.
312 months of Christmas linkup is anything goes + an optional theme of nature.
4.  Cute Card Thursday has an animals/creatures challenge.


Wednesday, September 7, 2016

Flying Kris Kringle

Hello Blogger Friends! Thanks for taking the time to stop and visit with the Charmed Life Blog. Well, summer vacation is officially coming to an end for me. Our preschool starts classes tomorrow.
 
Tonight we have a welcome night for our class. The parents bring the kids to meet us and then we have an activity in our classroom. It only lasts about an hour and then tomorrow the parents come with their kids to class and again it only lasts an hour.
 
Next Tuesday will be the first full session. This year we have more girls in our class than boys. For the past 4 years its been the other way around. It will be interesting to see the dynamic with the girls in the majority.
 
We finished up last year's school session in May. That seems so long ago and now it's time to start thinking about my Thanksgiving and Christmas cards. Whew! The older I get the faster the months and years fly by. Who was it that said "time and tide waits for no man"?
 
Speaking of Christmas, today it's all about Santa with a twist. He is flying an airplane.  This one I made for the color challenge #596 on Splitcoaststampers. Maura was our hostess and she chose always artichoke, cherry cobbler and pool party. Optional was to have some bling on your card.
cherry cobbler, always artichoke, pool party
 
My flying Kris Kringle is a die from CottageCutz. The die is a 4 x 6 and all the plane pieces are arranged separately on the metal plate. Which allows you the option of cutting in whatever color you want. I love all the detail on this die. And, I just checked the website and it looks like it's on a 50% off sale. It's a chance to pick up some great dies.
 
My background panel is designer paper from the Stampin'-Up “irresistibly yours” collection. It is already embossed and all you have to do is add your color. The embossed area will resist the ink. I thought this background looked like snow falling. I sponged pool party ink on the background.

The pine trees (deer & forest border) & Merry Christmas sentiment(Merry Christmas Santa) dies are from the new CottageCutz Christmas 2016 collection.

My bling is the gold star, glitter on Santa’s hat and arms plus I added chunky glitter to my hilly slope. And, with that I have another Christmas card to add to my slowly growing collection. This one will be sent to my sweet granddaughter. I also have another idea for a card for her. I am going to make a card in a box with a nativity scene.
 
Well, that's it for me for today. I have laundry to do plus a bushel of pears waiting to be turned into a pear butter. So until next time.......God bless.
 
card details:
Paper: cherry cobbler, always artichoke, whisper white, pool party, irresistibly yours dsp (Stampin'-Up)   
Card Size: A2
Ink: pool party Accessories: flying Kris Kringle, Merry Christmas Santa, deer & forest border (cottageCutz), chunky essentials glitter (stampin'-Up), warm diamond glitter (Elizabeth Crafts), glittering glue (Stamp La Jolla) 
 
I am also entering:
1.  A Snowflakes Promise is anything goes.
2.  Cuttlebug Mania has an anything goes with die cuts.
3.  Crafty Cardmakers has a layer it up challenge.
4.  ABC Challenge is "O" is for open.
5Classic Design Team Open Challenge is anything goes.
 
http://www.scrappingcottage.com/cottagecutzmerrychristmassanta.aspx
http://www.scrappingcottage.com/cottagecutzdeerandforestborder.aspx


Friday, September 2, 2016

Cornucopia Thanksgiving

Hello Blogger Friends and a happy September to you all. It's the start of the Labor Day holiday weekend and what seems to kick off the fall season. Even though fall doesn't officially hit until later in the month.
 
High School football makes it's debut this weekend and we have our youngest grandson on a high school team. I will also be finishing up on the summer harvest. I have pear butter to make as well as more tomatoes to either can or roast and freeze.
 
And it's also time to start thinking about making Thanksgiving cards. That's what  Iam showing you today. This card I made for my weekly post on the CottageCutz blog.
So let's get started with the details of how I created my card today.
 
Cajun Craze Card Base: 4 1/4" x 5 1/2"
Vanilla Image Panel: 3 5/8" x 4 7/8"
 
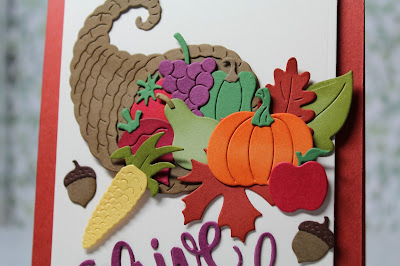
I started my card this week by die cutting all the fruit, veggies and the cornucopia. I used the color of cardstock corresponding to the fruit or vegetable image. I dusted the edges of the images with inks to match. This new die allows you the option to cut in color cardstock or cut in white and then color.
Now this part of the card is ready for assembly on the vanilla panel. I also die cut the "Give Thanks" word from Stampin'-Up's rich razzleberry cardstock. Cut it 2x and layered for a little added dimension. On this panel I also used fun foam to lift it up from the card base. I think doing that gives the card added depth.
Here is a close-up shot of the fruit and veggies. The detail on the CottageCutz dies is so amazing and takes your cards to the next level.
 
The completed card
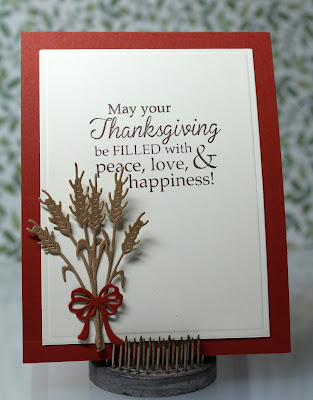
For this card , I also completed the inside panel with a stamped Thanksgiving sentiment and I used the wheat stalks die cut in kraft cardstock to add a little interest. This card will go to my good friend who saves and uses my cards as part of her holiday decorations. She will like the finished inside.
Here is a close-up photo of the wheat stalks. That cute bow is part of this die set. It cuts in one pass with 6 stalks of wheat and the bow.
Well, that's it for me for this post.  Have a great week-end and hope you have time to create. So until next time .......God bless.
http://www.scrappingcottage.com/cottagecutzcornucopia.aspx

http://www.scrappingcottage.com/cottagecutzwheatstalks.aspx

http://www.scrappingcottage.com/cottagecutzgivethanks.aspx
I am also entering:
1.  Time Out Challenges #65 - falling  leaves always remind me of Harvest time and Thanksgiving
2.  Mod Squad Challenge is to use foliage.
3.  Simon Says Stamp Wednesday challenge is anything goes.

LinkWithin

Related Posts with Thumbnails