Saturday, August 25, 2018

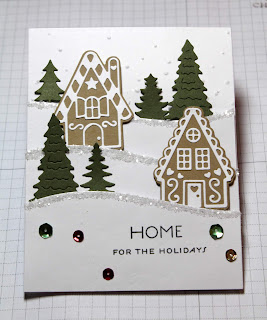
Gingerbread Home for the Holidays

 Hello Blogger Friends! Thanks for taking the time to stop and visit with the Charmed Life Blog today.
The last weekend of August is here. Can you believe it? This month just flew by for me.  
Our tomatoes are all starting to ripen now. So canning time is also here for me. My hubby always plants a variety so it results in a great tasting sauce. That is possibly a chore for me tomorrow.
Today we have a really early wedding to attend. So let's move on with my post for today. This is a card that I created for my weekly DT post on the CottageCutz blog.
 
I am using the Gingerbread House Mini's die. As soon as I saw these cute little houses, I thought of snowbanks and pine trees and the gingerbread houses nestled in among them. And on this card I brought my idea to life. So let's get started with some details on how I created the card.

Step 1: Started my card by cutting the gingerbread houses. I used a soft brown cardstock for the base and then white cardstock for all the trim. The houses are just a bit over 2" when assembled. So this size is perfect for layering on a snowbank.
Step 2: I wanted a snowy background so I used the Stampin'-Up snowfall embossing folder for texture and ran it through my Big Shot machine. 
I cut 3 snowbanks from white cardstock and added chunky glitter to the hill tops.  
 I stamped my sentiment with the help of my MISTI.
 Step 3: Started card assembly. I attached the snowbanks to the embossed background with dimensional adhesive. After I secured the snowbanks, I realized that I covered most of my embossing. I didn't want only 2 hills so I decided to leave it as is.
I added the houses and pine trees to the little snowy scene. The pine trees are older CottageCutz dies. I have a picture and link below of what I used.
 I scattered a few red, green and gold sequins around the sentiment just for some added interest and color.
Attached the image panel to a red card base.
Red Card base: 4 1/4" x 5 1/2"
Image Panel: 4 1/8" x 5 3/8" 
And, that's it for me for this post. So until next time...…..God bless.
 
dies I used to create card:
 
 
I am also entering: 
1.  Christmas at Sweet Stampin' has an anything goes Christmas.
2.  Watercooler Wednesday is all about holidays.
3.  Holly and Ivy Christmas Challenge is anything goes.


Wednesday, August 22, 2018

October Birthday

Hello Blogger Friends! Thanks for taking the time to stop and visit with The Charmed Life Blog today.
 
I am back from my week in San Francisco. I was there taking care of my sweet granddaughter, Phoenix Daisy, while her Mom & Dad went away for a little alone time.
 
The two of us had a wonderful time together. She has 6 "babies" and we had lots of adventures with them. Each one has a name and she has given them a personality. I love the innocence. She will grow up too fast so I am treasuring these precious times.
 
I really missed my hubby this time around.  He stayed home because of work. My cell phone doesn't work in my son's home and this time it didn't work outside either. I guess Verizon is not the big carrier in San Francisco and maybe less cell towers? Not sure of the reason but I wasn't able to talk to my hubby only send text messages. They say love makes the heart grow fonder. I was so happy to see him today.
 
Now onto my card for today. This one I made for one of the Dare To Get Dirty Challenges on Splitcoaststampers. Stacy was the hostess and I was one of her sample makers. If you are a fan club member on SCS, you can get all the details of her challenge here.  
 
For my card, I used elements from the Stampin'-Up September 2017 "layered leaves" paper pumpkin kit. For my pumpkins, I used the CottageCutz "give thanks" die. The background designer paper is from the Stampin'-Up "painted harvest" collection.

This is going to my friend who has an October birthday so I used the CottageCutz "calendar months" die. The October phrase is cut in Cajun craze cardstock. Scattered a few sequins to complete this card.
 
Well, that's it for me for this post. So until next time...…...God bless.
 
card details:
Stamps: abundant blessings (Verve)  
Paper: peach parfait, cajun craze, painted harvest dsp (Stampn'-Up)  
Paper Size: A2  
Ink: cajun craze, pumpkin pie
Accessories: layered leaves paper pumpkin kit, linen thread (Stampin'-Up), calendar months, give thanks dies (CottageCutz), orange sequins (darice), flag dies (MFT)  
 
I am also entering: 
1.  A Bit More Time to Craft has an anything goes.
2.  A Perfect Time to Craft has an anything goes challenge.
3.  Crafting By Designs has an anything goes challenge.
4.  Lemon Shortbread has an anything goes challenge.
5.  Retro Rubber Challenge has a tic tac toe. I chose die cut- green-leaves-. Verve stamp is about 5 years old.

Saturday, August 18, 2018

Snowman Teapot

 
Hello Blogger Friends. Thanks for taking the time to stop and visit with the Charmed Life Blog today.
 
I am out in San Francisco taking care of my precious granddaughter while my son and daughter-in-law have a little r & r before school starts again. It's been a good time and tomorrow they return home.
 
I will stay a couple of more days because my daughter-in-law has teacher in service days next week. Phoenix Daisy doesn't want me to leave but my hubby isn't here and I miss him. She loves all the attention and play time I give her. 
 
I got up early to write this blog post because once she gets up it's breakfast and then the 6 baby dolls will come out and our adventures for the day will begin. That will continue until bed time tonight. She is wearing this Grandma out (lol)!!!

For my card today, I am using the Teapot Snowman die. I am presenting it as a Christmas card, but it could also work for a Christmas thank you note, a winter birthday or as a get well card. So let's get started on some details of how I created my card.

Step 1: This week I started my card with the card colors. I used the colors for the Splitcoaststampers Color Challenge #700 which are sweet sugarplum, mint macaron and chocolate chip. I thought they were perfect colors for this cute little guy peeking out of a teapot.
sweet sugarplum, choc chip, mint macaron

 Mint Macaron Card Base: 4 1/4" x 5 1/2"
White Layering Panel: 4 1/8" x 5 3/8"
Mint Macaron Striped Layer: 3 7/8" x 5 1/8"
 
Step 2: Cut the snowman and teapot in the challenge colors. Used a darker green for the holly, for the berries, candy cane and heart I used a cherry red.
I used the largest nested stitched eyelet oval and the 2nd largest from the oval set die to cut the panels for the image. I used sweet sugarplum although in this photo it looks just a bit darker than the true color. Sometimes our cameras just don't cooperate fully (lol).
Step 3: All the elements are cut and ready for card assembly. I started with the patterned paper panel since I am using ribbon on my card.  The ribbon is also the mint macaron shade.  
Stamped my sentiment in chocolate chip ink. I used my MISTI because it's a clear stamp and sometimes you don't get a good image with one stamping. Today though, one stamping worked fine.
I attached the image to the oval panels using dimensional adhesive. I always like the look when the image is just slightly lifted. It just gives nice dimension to your work.
To complete my card, I decided to add a small bow and I scattered some sweet sugarplum enamel dots.
 

Well, that's my card for today. So until next time...…..God bless.
 
dies I used to create card:
http://www.scrappingcottage.com/cottagecutzteapotsnowman.aspx

http://www.scrappingcottage.com/cottagecutzovalsetbasics.aspx

http://www.scrappingcottage.com/cottagecutznestedstitchedscallopovalset.aspx
I am also entering:
1. .C.R.A.F.T. has a Christmas challenge.
2.  Christmas at Sweet Stampin' has an anything goes challenge.
3.  Merry Little Christmas challenge #1 has an anything goes.

LinkWithin

Related Posts with Thumbnails