Hello Blogger Friends! A happy Friday to you all. thanks for taking the time to stop and visit with the Charmed Life Blog. Another weekend is upon us. Hope you have plans for something fun and have a chance to get a little crafty. That would really be fun!
We are going to our youngest grandson's football game tonight and then tomorrow we have a painter coming to do some work in our kitchen. Yes, we are still working on finishing up the remodeling we started months ago. Sometimes what you think will be a easy project runs into something you didn't expect. Nothing on the schedule for Sunday as yet outside of church.
Today for my blog post I am showing a card that I made of r my weekly blog post on the
CottageCutz Blog. I went to a garage sale recently and the person holding it was selling some Ranger Distressed Crayons. She had 18 of them for $5.00. They were brand new and she just didn't like working with them. What a find for me!!
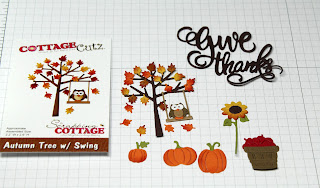
So I watched some YouTube videos to see what to do with them and the idea for the background on this card was born. I am using some new dies from the
Autumn 2016 release. These ones are the
autumn tree w/ swing and the
give thanks die set. So let's get started with details on my card for today.
Chocolate Chip Card Base: 4 1/4" x 5 1/2"
Kraft Layering Panel: 4 1/8" x 5 3/8"
Image Panel: 3 7/8" x 5 1/8"
Distressed Crayon Technique:
Step 1: Used watercolor distressed cardstock and applied a layer of Gesso to prepare the paper. Set aside to dry.
Step 2. After that dried I applied the distress crayons in fossilized amber, spiced marmalade, mustard seed and peeled paint. Used my finger and a little water to spread the color around. The finger method is what Tim Holtz recommended in of his videos. I set this aside to dry. You could use a heat tool to dry it as well. I used this time to start making my die cuts.
Step 3. Once this was dry I took a sun-ray stencil laid it over top of the color and used a wet (but not soaking) paper towel. I followed the stencil layout and started to remove color. I was really pleased how this turned out. Especially since it was my first attempt with these crayons. I did make another one and didn't use the Gesso layer. The color is much subtler without the Gesso. Just depends what you are looking for with your color.
Step 4: Now that my background is prepared, I am ready to make my die cuts. I used various shades of fall cardstock and cut my autumn tree with swing, the leaves pumpkins and sunflower. I used some distress ink to highlight the colors. The Give Thanks word I cut 2x in chocolate chip cardstock for dimension. I attached it to the right side of the card and took it just slightly off the card for added interest. I didn't want to completely cover up the stenciled sun image.
Step 5: Now my card is ready for assembly. I used a combination of Ranger multi-matte medium, glue dots and double sided tape on all the die cuts.
Step 6: The image panel is layered on kraft cardstock. I then used foam adhesive for added dimension to attach to the chocolate chip card base. And with that, my card is completed. I hope I have given you some inspiration on a way to create a fall scene using a couple of different die sets.
Well, that's it for this post. So until next time......God bless
I am also entering:
1. Craft For the Craic has an autumnal twist - use kraft paper. Used kraft for layering plus kraft for some leaves


